


Introduction
There will be times when you want to extend your application without recompiling it. Times change, business rules change, and because of this you need to create functionality inside your applications so that your application can become “extendable” with the least amount of effort. Today, I will show you how to build a basic plug-in framework into your existing applications.
What Is a Plug-in?
Well, it’s in the name. It is literally a piece of code, or a piece of functionality, that can be plugged into existing applications. Now, this may sound funky (it is), but it is also quite complicated. Developing plug-ins can become frustratingly tiresome. It is worth it. In quite a number of my articles—which hopefully some of you have read—I preach planning, thinking ahead, catering for the unknown. You get the idea.
It is difficult to think about every possible event when planning a project. Sometimes, a clearly laid-out plan becomes an obstacle. In my work situation, we have proper meetings every week, sometimes more. In these meetings, we each get tasks to do along with a set deadline.
Most of the time, things run smoothly, but there are some days when the plans simply do not work. Why? Well, the application we inherited—yes, inherited—was written nine years ago. To put it mildly: It was a mess. Apart from the spaghetti code and blatant disregard for rules and object naming, the program was just slapped together piece-by-piece. This shows clearly that there was no initial plan for the application.
Bear with me a bit, please.
After lots of blood, sweat, and tears, the application is, luckily, now at such a point where we can start developing new modules into it and have it running smoothly. The problem now is to develop modules into the main core without affecting the existing code, and libraries, and functionality. This is why we have decided to build in a Plug-in framework into the existing application, so that there is much less work (in the future) and much less effort in the long run.
Now, finally, a Plug-In has the following benefits:
- Extends an program’s functionality without re-compiling it to distribute it to customers.
- Adds functionality without needing access to the original source code.
I repeat: Planning!
Now that you know why you need plug-ins and what their purposes are, let’s create a small project that is capable of handling any new libraries added to your application.
Our Project
Not too much work, but you really need to concentrate, because plug-ins are fragile and delicate.
Start a new Visual Basic Windows Forms project. Name it anything interesting. Once the form is displayed, add one button onto it. Give this button a Text value of ‘Start‘.
This is the point in time where you have to start listening closely. Switch off from the outside world. Add a new Class Library project to the current Solution. Do this by clicking File, Add, New Project. Select Class Library. You could name this Project BasePluginInterface.
This project will host the Plug-in Interface that all the other projects will use. Add the following code into it:
Public Interface IPlugin

   ReadOnly Property Name() As String

   Sub SayHello()

End Interface
The Interface’s name is IPlugIn. A great explanation of Interfaces can be found on Wikipedia. This Interface has one Property called Name—we will refer to this later again—and one Sub procedure that will enable the Interface to perform a function.
Build this Interface by right-clicking the BasePluginInterface project inside the Solution Explorer and clicking Build. This will output a DLL file containing the interface. More information regarding dynamic link libraries can be found here.
Add another Class Library project to your existing solution by using the steps I outlined earlier. Name this project PlugInEx. Add the following code into the resulting Class file:
Imports BasePluginInterface
Imports System.Windows.Forms

Public Class PlugIn
   Implements IPlugin

   Public Sub SayHello() Implements IPlugin.SayHello

      MessageBox.Show("Hello!")

   End Sub

   Public ReadOnly Property Name As String Implements IPlugin.Name

      Get

         Name = "PlugInEx"

      End Get

   End Property

End Class
This code Imports the Interface Namespace we created earlier. Before I continue, you might see that a couple of errors popped up. This is because there is no proper References set for the Interface, as well as the System.Windows.Forms Namespaces. Add a Reference by clicking the project’s name inside the Solution Explorer and selecting Add Reference. Select Solution and select the BasePluginInterface project. To set a reference to Systems.Windows.Forms, you need to select Assemblies in the dialog box. Figure 1 displays the Add Reference dialog box.

Figure 1: Set a reference to the Interface
The code inside the PlugIn class implements the Interface we created earlier. By Implementing, I mean that it ensures that the code references the Interface and has the same Methods and Properties as the Interface. You can see the Interface as the blueprint—or plan, rather—for everything you want to do, and the implementation class as the class that does the actual work.
Build this project using the steps I outlined earlier.
In the Windows Forms project, add a new Module. This module will host the communication to the Implementation class, which in turn is connected to the Base Interface, so please add a reference again to the Base Interface and then add the following code into your Module:
Imports BasePluginInterface
Imports System.IO
Imports System.Reflection

Module LoadPlugIn

   Public Function LoadPlugIn(strPath As String) As _
      ICollection(Of IPlugin)

      Dim strFileNames As String()

      If Directory.Exists(strPath) Then

         strFileNames = Directory.GetFiles(strPath, "*.dll")

         Dim icAsemblies As ICollection(Of Assembly) = _
            New List(Of Assembly)(strFileNames.Length)

         For Each strFile As String In strFileNames

            Dim anName As AssemblyName = _
               AssemblyName.GetAssemblyName(strFile)
            Dim aaAssembly As Assembly = Assembly.Load(anName)

            icAsemblies.Add(aaAssembly)

         Next

         Dim tType As Type = GetType(IPlugin)
         Dim icPlugInTypes As ICollection(Of Type) = _
            New List(Of Type)

         For Each aAssembly As Assembly In icAsemblies

            If aAssembly <> Nothing Then

               Dim tTypes As Type() = aAssembly.GetTypes()

               For Each t As Type In tTypes

                  If t.IsInterface Or t.IsAbstract Then

                     Continue For

                  Else

                     If t.GetInterface(tType.FullName) <>
                        Nothing Then

                        icPlugInTypes.Add(t)

                     End If

               End If

            Next

         End If

      Next

      Dim icPlugIns As ICollection(Of IPlugin) =
         New List(Of IPlugin)(icPlugInTypes.Count)

      For Each tPType As Type In icPlugInTypes

         Dim plugin As IPlugin = _
            Activator.CreateInstance(tPType)

            icPlugIns.Add(plugin)

         Next

         Return icPlugIns

      End If

      Return Nothing

   End Function

End Module
This Function searches through the project’s current directory. So, before continuing, please copy the PlugInEx.dll file into your Windows Forms project, as shown in Figures 2 and 3.
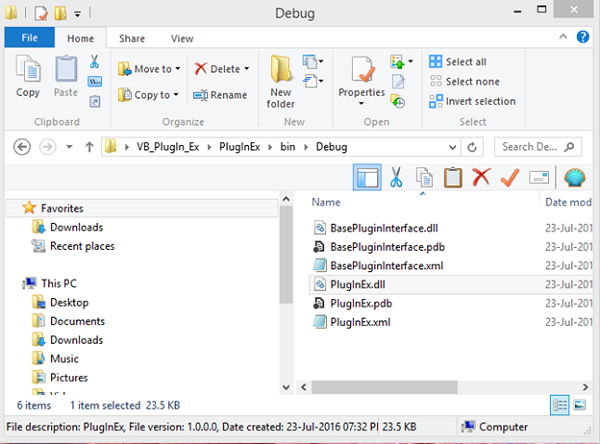
Figure 2: Copy from the Base Interface Debug folder
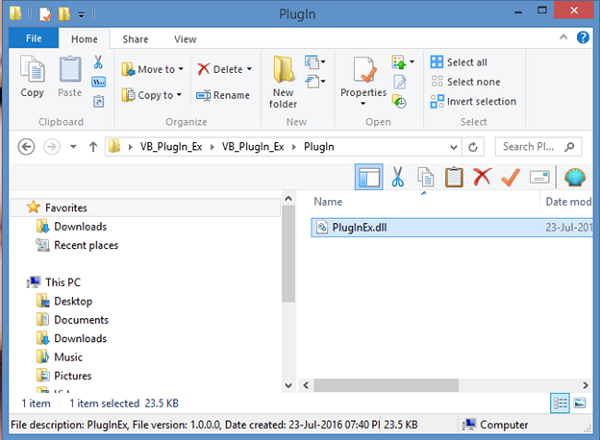
Figure 3: Paste into the Test Project Debug\PlugIn Folder
The code further makes use of the Assembly class to determine what type of file the DLL file is. In other words, it checks inside the file and determines if it is an ordinary library or if it is a plug-in, in easy terms. You can read up on the Assembly class here.
Based on the type information, it adds the Plug-In object into a list that we can iterate through. Obviously, if there were more Plug-Ins, it would have added them to the list too. Now, the plug-in is stored and obtainable. Let’s add the final piece of the puzzle in the Form’s code:
Imports BasePluginInterface

Public Class frmPlugIn

   Private dPlugIns As Dictionary(Of String, IPlugin) = _
      New Dictionary(Of String, IPlugin)
   Private icPlugIns As ICollection(Of IPlugin) = _
      LoadPlugIn.LoadPlugIn("PlugIn")

   Private strPlugInName As String

   Private Sub btnStart_Click(sender As Object, e As EventArgs) _
      Handles btnStart.Click

      If dPlugIns.ContainsKey(strPlugInName) Then

         Dim Plug As IPlugin = dPlugIns(strPlugInName)

         Plug.SayHello()

      End If

   End Sub

   Public Sub New()

      InitializeComponent()

      If icPlugIns Is Nothing Then

         Close()

         MessageBox.Show("No plugins to load.")

         Return

      End If

      For Each item In icPlugIns

         strPlugInName = item.Name

         dPlugIns.Add(item.Name, item)

      Next

   End Sub
End Class
Using the Dictionary class and ICollection Interface, we obtain a reference to the Plug-in and add it. We then iterate through the list to determine if an object with the specified key (name) exists. If it does, execute the code.
By clicking the Start button now, you would see a MessageBox similar to Figure 4:
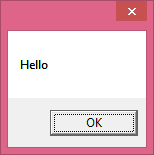
Figure 4: The plug-in in action
Conclusion
Creating plug-ins for the right purpose can save you a lot of time and effort in the long run. I hope you have enjoyed today’s article. Until next time, bye!