


Another month, another game…
Today, I will show you how to create a Tile Slide game with Visual Basic.NET.
What Is a Tile Slider Game?
A tile slider, sliding puzzle, sliding block puzzle, or sliding tile puzzle is a combination puzzle in which a player has to slide pieces along certain routes on a board to establish a certain end-configuration. Sliding puzzles are mostly two-dimensional in nature and you are not allowed to lift a piece off the board.
Let’s create the game!
Design
Start a new Visual Basic Windows Forms project. You may name it anything you desire; I have named my project HTG_TileSlide. When the loaded form appears, design it as displayed in Figure 1:
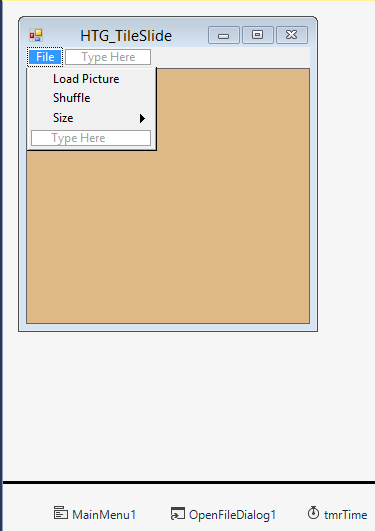
Figure 1: Main form design
On the form, you need to include the a MainMenu with the following items and subitems:
- Load Picture
- Shuffle
- Size:
- 3 x 3
- 4 x 4
- 5 x 5
- OpenFileDialog
- Timer
- Panel
Feel free to name the objects differently than I have; just remember having done so when you code them. Add a User Control to your project (again, name it anything you want). Design it to resemble Figure 2.

Figure 2: User Control design
On the User Control, make sure you have the following objects:
- Button
- PictureBox
Code
Open the code window for your User Control and add the following fields:
   Private pntImage As Point

   Private intIndex As Integer
pntImage is used to keep track of each tile object’s position. intIndex is used to keep track of the tile’s index. Add the following Properties to your User Control:
   Public ReadOnly Property Index() As Intege

      Get

         Return intIndex

      End Get

   End Property

   Public ReadOnly Property ImageSize() As Size

      Get

         Return Me.picTile.Size

      End Get

   End Property
The Index property will be used in conjunction with intIndex. ImageSize gets and sets the image’s size depending on which Size menu option was selected. Add the Tile Sub procedure, which is responsible for setting each tile’s position:
   Public Sub Tile(ByVal imImage As Image, ByVal ptStart As Point)

      picTile.Image = imImage
      pntImage = ptStart

   End Sub
Add the Paint event for the Tile User Control. This event creates all the tiles:
   Private Sub picTile_Paint(ByVal sender As System.Object, _
         ByVal e As System.Windows.Forms.PaintEventArgs) _
         Handles picTile.Paint

      If Not (picTile.Image Is Nothing) Then

         Dim g As Graphics = e.Graphics

         g.DrawImage(picTile.Image, New _
            Rectangle(New Point(0, 0), New Size(picTile.Width, _
            picTile.Height)), New Rectangle(pntImage, _
            New Size(picTile.Width, picTile.Height)), _
            GraphicsUnit.Pixel)

      End If

   End Sub
Now, let’s proceed with the Form’s code.
Add the following fields to your Form:
   Private Const intSquare As Integer = 64
   Private Const intWidth As Integer = 62

   Private intNumberOfRows As Integer = 3
   Private intNumberOfCols As Integer = 3

   Private rndRandom As Random

   Private tilBlank As Block

   Private blnLoaded As Boolean

   Dim intCountDown As Integer

   Private tilTiles(,) As ucTile
   Friend WithEvents tilLast As ucTile
You set the size of each tile with intSquare and intWidth. You set the number of rows and columns next. You create a random object that you will use when shuffling the board. Next, you create a Block object—you will create the Block structure later. blnLoaded determines if an image has been loaded. tilTiles and tilLast are User Control objects that will be used in playing the game.
Load the game board and its associated objects:
   Private Sub frmMain_Load(ByVal sender As System.Object,_
         ByVal e As System.EventArgs) Handles MyBase.Load

      Create(intNumberOfRows, intNumberOfCols)

   End Sub

   Public Sub Create(ByVal intRows As Integer, _
         ByVal intCols As Integer)

      Dim index As Integer = 0

      ReDim tilTiles(intRows, intCols)

      pnlTiles.Size = New Size(intSquare * intRows + 4, _
         intSquare * intCols + 4)

      pnlTiles.Location = New Point(4, 4)

      Me.ClientSize = New Size(pnlTiles.Size.Width + 6, _
         pnlTiles.Size.Height + 6)

      Dim Row, Col As Integer

      For Row = 0 To intRows - 1

         For Col = 0 To intCols - 1

            tilTiles(Row, Col) = New ucTile(intSquare, _
               intSquare, index)

            tilTiles(Row, Col).Parent = Me.pnlTiles

            tilTiles(Row, Col).Location = New Point(Col *_
               intSquare, Row * intSquare)

            index += 1

         Next

      Next

   End Sub
The Create sub procedure creates the 3 x 3 board. Later on, you will create each Menu Size event to enable the board to expand to 4 x 4 and 5 x 5.
Load the Picture:
   Private Sub MenuLoadPicture_Click(ByVal sender As Object, _
         ByVal e As System.EventArgs) _
         Handles MenuLoadPicture.Click

      OpenFileDialog1.Filter = "All Picture Formats _
         (*.jpg,*.bmp, *.gif, *.png)|*.jpg;*.bmp;*.gif;*.png"

      OpenFileDialog1.ShowDialog()

      Dim intRow As Integer
      Dim intCol As Integer

      For intRow = 0 To intNumberOfRows - 1

         For intCol = 0 To intNumberOfCols - 1

            Try

               tilTiles(intRow, intCol).Dispose()

            Catch ex As Exception


            End Try

         Next

      Next

      Create(intNumberOfRows, intNumberOfCols)

      Dim intXThumb As Integer = intWidth * intNumberOfRows
      Dim intYThumb As Integer = intWidth * intNumberOfRows

      Dim imgImage As Image = _
         Image.FromFile(OpenFileDialog1.FileName)

      imgImage = imgImage.GetThumbnailImage(intXThumb, _
         intYThumb, Nothing, System.IntPtr.Zero)

      For intRow = 0 To intNumberOfRows - 1

         For intCol = 0 To intNumberOfCols - 1

            tilTiles(intRow, intCol).Tile(imgImage, _
               New Point(intCol * intWidth, intRow * intWidth))

         Next

      Next

      tilBlank = New Block(intNumberOfRows - 1, _
         intNumberOfCols - 1)

      blnLoaded = True
   End Sub
The MenuLoadPicture_Click event fires when a user has chosen the ‘Load Picture’ menu item. It allows you to browse for a picture. Once a valid picture has been chosen, the picture gets broken up into thumbnails according to which size option has been selected. In the default case, the chosen picture has been broken up into nine thumbnails to fit its 3 x 3 grid.
Figure 3 (broken up into 16 pieces) shows a picture of Namaqualand in South Africa. Look at the blue skies! This particular region is very barren and dry most of the year, except for in South Africa’s spring (from September onwards). I was fortunate enough to visit this region in 2016.
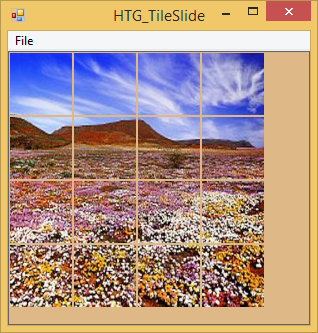
Figure 3: A picture is loaded
Shuffle the tiles:
   Private Sub MenuShuffle_Click(ByVal sender As Object, _
         ByVal e As System.EventArgs) Handles MenuShuffle.Click

      tilLast = tilTiles(intNumberOfRows - 1, intNumberOfCols - 1)

      tilLast.Visible = False

      tilTiles(intNumberOfRows - 1, _
         intNumberOfCols - 1).Visible = False

      Randomize()

   End Sub

   Protected Sub Randomize()

      rndRandom = New Random()

      intCountDown = 64 * intNumberOfRows * intNumberOfCols

      tmrTime.Interval = 1

      tmrTime.Enabled = True

   End Sub

   Private Sub tmrTime_Tick(ByVal sender As Object, _
         ByVal e As EventArgs) Handles tmrTime.Tick

      Dim intCol As Integer = tilBlank.intCol
      Dim intRow As Integer = tilBlank.intRow

      Select Case (rndRandom.Next(4))

         Case 0

            intCol += 1

         Case 1

            intCol -= 1

         Case 2

            intRow += 1

         Case 3

            intRow -= 1

      End Select

      If (intCol >= 0 And intCol < intNumberOfCols And _
            intRow >= 0 And intRow < intNumberOfRows) Then

         Shift(intCol, intRow)

      End If

      intCountDown = intCountDown - 1

      If (intCountDown = 0) Then

         tmrTime.Stop()

      End If

   End Sub

   Private Sub Shift(ByVal intCol As Integer, _
         ByVal intRow As Integer)

      tilTiles(intRow, intCol).Location = New _
         Point(tilBlank.intCol * intSquare, _
         tilBlank.intRow * intSquare)

      tilTiles(tilBlank.intRow, tilBlank.intCol) = _
         tilTiles(intRow, intCol)

      tilTiles(intRow, intCol) = Nothing

      tilBlank = New Block(intRow, intCol)

End Sub
A Random number gets generated and the timer gets enabled. Depending on which number was generated, the tiles shift accordingly. Figure 4 shows the result.
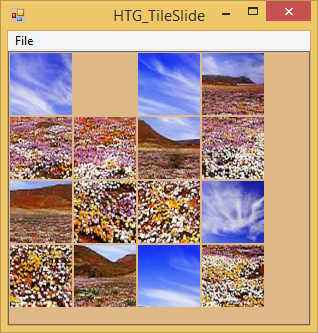
Figure 4: Shuffle
Program the game play:
   Private Sub frmMain_KeyDown(ByVal sender As Object, _
         ByVal e As System.Windows.Forms.KeyEventArgs) _
         Handles MyBase.KeyDown

      If blnLoaded = False Then Return

      If (e.KeyCode = Keys.Left And tilBlank.intCol < _
            intNumberOfCols - 1) Then

         Shift(tilBlank.intCol + 1, tilBlank.intRow)

      ElseIf (e.KeyCode = Keys.Right And tilBlank.intCol > _
            0) Then

         Shift(tilBlank.intCol - 1, tilBlank.intRow)

      ElseIf (e.KeyCode = Keys.Up And tilBlank.intRow < _
            intNumberOfRows - 1) Then

         Shift(tilBlank.intCol, tilBlank.intRow + 1)

      ElseIf (e.KeyCode = Keys.Down And tilBlank.intRow > _
            0) Then

         Shift(tilBlank.intCol, tilBlank.intRow - 1)

      End If

      e.Handled = True

      GameOver()

   End Sub

   Private Sub pnlTiles_MouseDown(ByVal sender As Object, _
         ByVal e As System.Windows.Forms.MouseEventArgs) _
         Handles pnlTiles.MouseDown

      If blnLoaded = False Then Return

      Dim intRow As Integer = e.Y \ intSquare
      Dim intCol As Integer = e.X \ intSquare

      If (intCol = tilBlank.intCol) Then

         If (intRow < tilBlank.intRow) Then

            Dim intTempRow As Integer

            For intTempRow = tilBlank.intRow - 1 To intRow Step -1

               Shift(intCol, intTempRow)

            Next

         ElseIf (intRow > tilBlank.intRow) Then

            Dim intTempRow As Integer

            For intTempRow = tilBlank.intRow + 1 To intRow

               Shift(intCol, intTempRow)

            Next

         End If

      ElseIf (intRow = tilBlank.intRow) Then

         If (intCol < tilBlank.intCol) Then

            Dim intTempCol As Integer

            For intTempCol = tilBlank.intCol - 1 To intCol Step -1

               Shift(intTempCol, intRow)

            Next

         ElseIf (intCol > tilBlank.intCol) Then

            Dim intTempCol As Integer

            For intTempCol = tilBlank.intCol + 1 To intCol

               Shift(intTempCol, intRow)

            Next

         End If

      End If

      GameOver()

   End Sub

   Private Sub GameOver()

      Dim blnFinish As Boolean = True

      Dim intIndex As Integer
      Dim intRow As Integer
      Dim intCol As Integer

      For intRow = 0 To intNumberOfRows - 1

         For intCol = 0 To intNumberOfCols - 1

            If ((intIndex <> intNumberOfRows * intNumberOfCols) _
                  And Not (tilTiles(intRow, intCol) Is Nothing)) _
                  Then

               blnFinish = blnFinish And (tilTiles(intRow, _
                  intCol).Index = intIndex)

            End If

            intIndex += 1

            If Not blnFinish Then Return

         Next

      Next

      If blnFinish Then

         tilTiles(intNumberOfRows - 1, intNumberOfCols - 1) = _
            tilLast

         tilTiles(intNumberOfRows - 1, _
            intNumberOfCols - 1).Visible = True

         MessageBox.Show("You Win", "Game Over", _
            MessageBoxButtons.OK, MessageBoxIcon.Exclamation)

         tilBlank = New Block(intNumberOfRows - 1, _
            intNumberOfCols - 1)

      End If

   End Sub
When the desired keys are pressed or the mouse event occurs, the tile objects should update their locations. Once the picture is correct, the GameOver sub gets called, notifying the user that he or she has won.
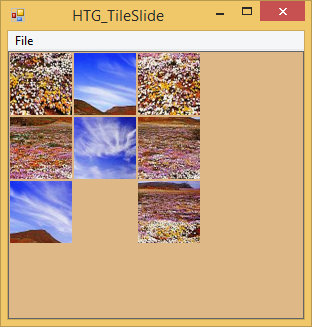
Figure 5: The game in action
Next, add the events to resize the game board according to which Size Menu option was selected:
   Private Sub MenuSize3_Click(ByVal sender As Object, _
         ByVal e As System.EventArgs) Handles MenuSize3.Click

      If (MenuSize3.Checked) Then Return

      Clear()

      MenuSize3.Checked = True

      intNumberOfRows = 3

      intNumberOfCols = 3

      Create(intNumberOfRows, intNumberOfCols)

   End Sub

   Private Sub MenuSize4_Click(ByVal sender As Object, _
         ByVal e As System.EventArgs) Handles MenuSize4.Click

      If (MenuSize4.Checked) Then Return

      Clear()

      MenuSize4.Checked = True

      intNumberOfRows = 4
      intNumberOfCols = 4

      Create(intNumberOfRows, intNumberOfCols)

   End Sub

   Private Sub MenuSize5_Click(ByVal sender As Object, _
         ByVal e As System.EventArgs) Handles MenuSize5.Click

      If (MenuSize5.Checked) Then Return

      Clear()

      MenuSize5.Checked = True

      intNumberOfRows = 5
      intNumberOfCols = 5

      Create(intNumberOfRows, intNumberOfCols)

   End Sub

   Private Sub Clear()

      MenuSize3.Checked = False
      MenuSize4.Checked = False
      MenuSize5.Checked = False

      Dim intRow As Integer
      Dim intCol As Integer

      For intRow = 0 To intNumberOfRows - 1

         For intCol = 0 To intNumberOfCols - 1

            Try

               tilTiles(intRow, intCol).Dispose()

            Catch ex As Exception

            End Try

         Next

      Next

   End Sub
Clear clears the game board and discards the size selection. Lastly, add the Block structure:
Public Structure Block

   Public intRow As Integer
   Public intCol As Integer

   Public Sub New(ByVal iRow As Integer, ByVal iCol As Integer)

      Me.intRow = iRow
      Me.intCol = iCol

   End Sub

End Structure
Download the Code
The code to accompany this article is available. Please feel free to download it and use it for your own project.
Conclusion
Now that you know how to make a Tile Slider game and its logic involved, practice and try making your own.