


Making it Work
Introduction
Welcome back! In part 2 of this article we will concentrate on the user interface, and user interaction with our preview pane. We will also finalize this project. Let’s jump right in, but before we continue, make sure you have enough snacks and drinks – we must keep those brain cells happy.
Code
There is no design. You might think it strange that there is no design, and yet I mentioned that we will concentrate on the user interface. We will do this through code, as everything has been set up already in Part 1. If you haven’t followed Part 1 yet, I’d advise you to do so now, because we will build upon the Source from Part 1.
HTG_Preview2
Add the following Imports Statements:
Imports System.Runtime.InteropServices 'API Functions
Imports System.ComponentModel 'UserControl Functions
Imports HTG_OpenPics.HTG_OpenPics_OSStuff.OS_APIs 'API Declarations / Structs / Enums / Consts
Here we import the functionalities present in the InteropServices and ComponentModel libraries. We also include all the methods and fields from our very own namespace called OS_APIs. This is quite nice, because now we don’t have to create an instance to the OS_APIs class as all the code is already imported.
Change the Class definition to:
Namespace HTG_OpenPics_UC 'Our Controls to be "built" into the OFD
    Public Class HTG_Preview2
We make a Namespace here also, because we use the same reasoning as outlined above later-on in other classes. Let us now add our Variables for HTG_Preview2:
        Public strFileName As String 'Selected File name

        'Delegate Sub to Handle File Changed Events
        Public Delegate Sub FileNameChangedHandler(ByVal sender As HTG_Preview2, ByVal strPicPath As String)

        Public Event FileNameChanged As FileNameChangedHandler 'File Name Changed
        Public Event FolderNameChanged As FileNameChangedHandler 'Folder Changed

        Public Event ClosingDialog As EventHandler 'Closing Event Handler

        Private locStart As WinLoc = WinLoc.Right 'Show Preview Pane on the Right Side

        Private vmDefaultView As FolderViewMode = FolderViewMode.[Default] 'Default Folder View Mode
You would probably say: “Again with the events?? Seriously?” Yes. Remember, in Part 1 of this series we created a class named BuildOpenDialog? Hmm, good. Now, if you can recall further, we created an HTG_Preview2 object inside BuildOpenDialog named htpSource. This object was used to manipulate the default events of the standard OFD. We need to ensure that we can raise the events at the appropriate times. This is what we are achieveing here. Later-on, we will create our final FolderChanged and FileNameChanged events to be used as substitutes.
The bottom two objects (locStart and vmDefaultView) will reference enums (which will be created soon). These will be used to indicate what Viewtype the OFD must display, as well as where our Preview pane must be placed.
Add the class Initialization and properties exposed by this class:
        Public Sub New() 'Class Initialization

            InitializeComponent()

        End Sub

        Public ReadOnly Property ofdOpenDialog() As OpenFileDialog 'Make Use of ofdOpen to Get the Open Procedure Started

            Get

                Return ofdOpen

            End Get

        End Property

        <DefaultValue(WinLoc.Right)> _
        Public Property locStartup() As WinLoc 'Property to Determine Location of Preview Pane

            Get

                Return locStart

            End Get

            Set(ByVal value As WinLoc)

                locStart = value

            End Set

        End Property

        <DefaultValue(FolderViewMode.[Default])> _
        Public Property vmDefault() As FolderViewMode 'Property to Determine View Mode of Dialog

            Get

                Return vmDefaultView

            End Get

            Set(ByVal value As FolderViewMode)

                vmDefaultView = value

            End Set

        End Property
These properties determine where the Preview must be displayed and in which FolderView. Of course we can add more properties for the View type here, as well as more locations, but I’ll leave that up to you to experiment with.
Add the events:
        Public Overridable Sub OnFileNameChanged(ByVal strPicName As String)

            RaiseEvent FileNameChanged(Me, strPicName)

        End Sub

        Public Overridable Sub OnFolderNameChanged(ByVal strFolder As String)

            RaiseEvent FolderNameChanged(Me, strFolder)

        End Sub

        Public Overridable Sub OnClosingDialog()

            RaiseEvent ClosingDialog(Me, New EventArgs())

        End Sub

        Public Sub ShowDialog()

            ShowDialog(Nothing)

        End Sub

        Public Sub ShowDialog(ByVal winOwner As IWin32Window) 'Show Preview Pane

            Dim form As New frmHost(Me) 'Temporary Form

            form.Show(winOwner)

            SetWindowPos(form.Handle, IntPtr.Zero, 0, 0, 0, 0, _
             SetWindowPosFlags.SWP_NOACTIVATE _
                              Or SetWindowPosFlags.SWP_NOOWNERZORDER _
                              Or SetWindowPosFlags.SWP_NOMOVE _
                              Or SetWindowPosFlags.SWP_NOSIZE _
                              Or SetWindowPosFlags.SWP_HIDEWINDOW) 'Indicate Where To Show Preview Form

            form.Active = True

            Try

                If ofdOpen.ShowDialog(form) = DialogResult.OK Then

                    strFileName = ofdOpen.FileName 'Obtain Selected Filename For Further Processing

                End If

            Catch ex As Exception 'If Something Goes Wrong

                MessageBox.Show(ex.Message)

            End Try

            form.Dispose()

            form.Close()

        End Sub
I have bored you to sleep already with the FolderChanged and FileNameChanged events, I think by now you get the idea. What is interesting here is the last sub procedure. Let me take you step by step through it.
First, it creates an instance of frmHost (which we still have to create). Second, it shows the form as an IWin32Window – this provides an interface to expose Win32 HWND handles. We need these window handles to manipulate where we want to show the form. This gets done with the SetWindowsPos API. This form wil host our Preview pane, HTG_PreviewPics. We then get a result from the OFD, so that we can know which picture was selected and display it on frmOpenPics.
Almost done here; add the following:
    End Class

    Public Enum WinLoc 'Window Location Options

        Right = 1

    End Enum

    Public Enum OFDControls 'OFD Controls Window Names / Settings

        DefView = &H461

    End Enum

End Namespace
As you can clearly see, the Class ends, but the Namespace doesn’t. We need these two enumerations for more classes. Creating them in here, makes them available everywhere. We created the WinLoc enum, which can be modified to your needs, then we needed the OFDControls enum to know about DefView, which we use for indicating the particular view we want to display our files. This can also be modified to suit your needs, I just felt doing it like this is apt enough, as it shows in thumbnail view already.
frmHost
Add a new class to your project, and give it a name of frmHost. This will be a form, but we will not do any designing on it, because it will just serve as a host for our preview control. Add the following above the class declaration:
Imports System.Runtime.InteropServices 'API Functions
Imports System.ComponentModel 'UserControl Functions
Imports HTG_OpenPics.HTG_OpenPics_OSStuff.OS_APIs 'API Declarations / Structs / Enums

Namespace HTG_OpenPics_UC 'Our Controls to be "built" into the OFD using frmTemp as a host
Make sure we inherit from Form. Your class definition should now look like:
    Public Class frmHost
        Inherits Form
Create the variables:
        Private odnDialog As BuildOpenDialog = Nothing 'Override OFD functionalities
        Private hpDialog As HTG_Preview2 = Nothing 'Our Preview Pane

        Private blnActive As Boolean = False
        'Acitive

        Private iptOpenDialogHandle As IntPtr = IntPtr.Zero 'Handles For Dialog Windows
Add the necessary properties and subs:
        Public Sub New(ByVal hpDialogEx As HTG_Preview2) 'Show Preview Pane on frmTemp

            hpDialog = hpDialogEx

            Me.StartPosition = FormStartPosition.Manual

            Me.Location = New System.Drawing.Point(-16000, -16000) 'Start Location

            Me.ShowInTaskbar = False 'Hide From Taskbar

        End Sub

        Public Property Active() As Boolean 'Determine if OFD is Active

            Get

                Return blnActive

            End Get

            Set(ByVal value As Boolean)

                blnActive = value

            End Set

        End Property

        Protected Overrides Sub OnClosing(ByVal e As CancelEventArgs) 'OFD Closing

            If odnDialog IsNot Nothing Then

                odnDialog.Dispose()

            End If

            MyBase.OnClosing(e)

        End Sub
Inside New() we set up the form. The Active property indicates whether or not the standard OFD is active, and the closing sub disposes properly of frmHost. Lastly, we need to add WndProc:
        Protected Overrides Sub WndProc(ByRef m As Message) 'Place Preview pane on frmTemp

            If blnActive AndAlso m.Msg = CInt(Msg.WM_ACTIVATE) Then

                blnActive = False

                iptOpenDialogHandle = m.LParam

                odnDialog = New BuildOpenDialog(m.LParam, hpDialog)

            End If

            MyBase.WndProc(m)

        End Sub
As the form gets created, we make a call to the BuildOpenDialog class, which places our control onto frmHost, which gets built into the normal system OFD. This will be the last snack-break I give you, so make use of it, quickly. 🙂
HTG_PreviewPics
I have continually spoken about our own events that we will build into our Preview control. Everywhere we have made use of Delegates and RaiseEvents to raise these events, but the question still remains, what will happen? What are we going to do with the overriden OnFolderChanged and OnFileNameChanged events? These questions and more, will be answered here.
Add the Imports statements:
Imports System.IO 'File Functions
Imports HTG_OpenPics.HTG_OpenPics_UC 'Our Controls to be "built" into the OFD
Imports System.Drawing.Imaging 'Image Functions
Imports System.ComponentModel 'API Functions
Inherit from HTG_Preview2:
Public Class HTG_PreviewPics
    Inherits HTG_Preview2 'Secondary Control With All Methods / Properties

    Public Sub New() 'Instantiate Class

        InitializeComponent()

    End Sub
Add our events:
    Public Overrides Sub OnFileNameChanged(ByVal strSelPicPath As String) 'Determine When File Has Been Selected

        If strSelPicPath.ToLower().EndsWith(".bmp") OrElse strSelPicPath.ToLower().EndsWith(".jpg") _
            OrElse strSelPicPath.ToLower().EndsWith(".jpeg") OrElse strSelPicPath.ToLower().EndsWith(".jpe") _
            OrElse strSelPicPath.ToLower().EndsWith(".jif") OrElse strSelPicPath.ToLower().EndsWith(".png") _
            OrElse strSelPicPath.ToLower().EndsWith(".tif") OrElse strSelPicPath.ToLower().EndsWith(".gif") _
            OrElse strSelPicPath.ToLower().EndsWith(".wmf") Then 'Filter Images

            If picPreview.Image IsNot Nothing Then 'Release previous Picture's Memory

                picPreview.Image.Dispose()

            End If

            Try
                Dim fiSelPic As New FileInfo(strSelPicPath) 'Obtain File Information

                picPreview.Image = Bitmap.FromFile(strSelPicPath) 'Display Selected Picture

                lblFileSize.Text = (fiSelPic.Length / 1024).ToString() & " KB" 'Obtain File Size Information

                lblColours.Text = ImageColours(picPreview.Image) 'Obtain Colours in Picture
                lblFormat.Text = ImageFileFormat(picPreview.Image) 'Obtain File Format
                lblImageSize.Text = ImageDimensions(picPreview.Image) 'Obtain Image Size

            Catch ex As Exception 'If Something Goes Wrong :(

                MessageBox.Show(ex.Message.ToString())

            End Try

        Else

            If picPreview.Image IsNot Nothing Then 'Dispose Image

                picPreview.Image.Dispose()

            End If

            picPreview.Image = Nothing

        End If

    End Sub

    Public Overrides Sub OnFolderNameChanged(ByVal strSelPicFolder As String) 'Override Event From Preview2

        If picPreview.Image IsNot Nothing Then 'Disposal of Image and Reset of All Controls

            picPreview.Image.Dispose()

        End If

        picPreview.Image = Nothing

        lblFileSize.Text = String.Empty
        lblColours.Text = String.Empty
        lblFormat.Text = String.Empty

    End Sub

    Public Overrides Sub OnClosingDialog() 'Dispose When Closing

        If picPreview.Image IsNot Nothing Then

            picPreview.Image.Dispose()

        End If

    End Sub
OnFileNameChanged updates our preview pane. It checks for the appropriate file extensions for the most common graphic files. It obtains the file size information via the FileInfo method. The colours, format and image dimensions (height and width ) are obtained through various functions that we’ll create later.
OnFolderChange resets all the controls to their default values – we only need all the info when a file has been selected.
OnClosingDialog disposes of our preview pane.
Add the functions for image properties:
    Private Function ImageColours(ByVal imSelPic As Image) As String 'Determine Amount of Colours Present in the Image

        Select Case imSelPic.PixelFormat

            Case PixelFormat.Format16bppArgb1555, PixelFormat.Format16bppGrayScale, _
                PixelFormat.Format16bppRgb555, PixelFormat.Format16bppRgb565 '16 Bit

                Return "16 bits (65536 Colours)"

            Case PixelFormat.Format1bppIndexed '1 Bit

                Return "1 bit (Black & White)"

            Case PixelFormat.Format24bppRgb '24 Bit

                Return "24 bits (True Colours)"

            Case PixelFormat.Format32bppArgb, PixelFormat.Format32bppPArgb, _
                PixelFormat.Format32bppRgb '32 Bit

                Return "32 bits (Alpha Channel)"

            Case PixelFormat.Format4bppIndexed '4 Bit

                Return "4 bits (16 Colours)"

            Case PixelFormat.Format8bppIndexed '8 Bit

                Return "8 bits (256 Colours)"

        End Select

        Return String.Empty

    End Function

    Private Function ImageFileFormat(ByVal imSelPic As Image) As String 'Determine File Format of Image

        If imSelPic.RawFormat.Equals(ImageFormat.Bmp) Then 'BMP

            Return "Bitmap"

        ElseIf imSelPic.RawFormat.Equals(ImageFormat.Gif) Then 'GIF

            Return "Graphic Interchange Format"

        ElseIf imSelPic.RawFormat.Equals(ImageFormat.Jpeg) Then 'JPG

            Return "Joined Photographic Experts Group"

        ElseIf imSelPic.RawFormat.Equals(ImageFormat.Png) Then 'PNG

            Return "Portable Network Graphic"

        ElseIf imSelPic.RawFormat.Equals(ImageFormat.Tiff) Then 'TIFF

            Return "Tagged Image File Format"

        ElseIf imSelPic.RawFormat.Equals(ImageFormat.Wmf) Then 'WMF

            Return "Windows Meta File"

        End If

        Return String.Empty

    End Function

    Private Function ImageDimensions(ByVal imSelPic As Image) As String 'Determine Image Size

        Dim sizSelPic As SizeF = imSelPic.Size 'Get Size

        Return "Width = " & sizSelPic.Width.ToString & " Height = " & sizSelPic.Height.ToString

    End Function
ImageColours makes use of the PixelFormat enumeration to obtain the amount of colours present in the selected file. Based on that, we update our lblColours lable inside our preview pane.
ImageFileFormat uses the ImageFormat class to identify the file format of the selected picture.
ImageDimensions calculates the height and width of the selected picture file.
frmOpenPics
Add the following code to your frmOpenPics form:
Imports System.IO 'File Handling Functions
Imports System.ComponentModel 'UserControl Functions
Imports System.Windows.Forms 'Windows Forms Functions
Imports HTG_OpenPics.HTG_OpenPics_UC 'Our Controls to be "built" into the OFD
Imports HTG_OpenPics.HTG_OpenPics_OSStuff.OS_APIs 'API Declarations / Structs / Enums

Partial Public Class frmOpenPics

    Private Sub btnCustom_Click(ByVal sender As System.Object, ByVal e As System.EventArgs) Handles btnCustom.Click

        Dim htgPP As HTG_PreviewPics = New HTG_PreviewPics() 'Creat Instance of Preview pane

        htgPP.locStartup = WinLoc.Right 'Set Location

        htgPP.vmDefault = FolderViewMode.Thumbnails 'Set View Mode

        htgPP.ofdOpenDialog.InitialDirectory = "::{20D04FE0-3AEA-1069-A2D8-08002B30309D}" ' My Computer CLSID

        htgPP.ofdOpenDialog.AddExtension = True 'Show Extensions

        htgPP.ofdOpenDialog.FileName = "Select a File" 'Prompt For File Name

        htgPP.ofdOpenDialog.Filter = "Image Files(*.bmp;*.jpg;*.gif;*.png;*.wmf)|*.bmp;*.jpg;*.gif;*.png;*.wmf" 'Filtering of Files

        htgPP.ShowDialog(Me) 'Display

        If htgPP.strFileName <> "" Then 'Determine Selection

            pic1.Image = Image.FromFile(htgPP.strFileName) 'Show Picture

        End If

        htgPP.Dispose() 'release Memory

    End Sub

    Private Sub btnNormal_Click(ByVal sender As System.Object, ByVal e As System.EventArgs) Handles btnNormal.Click

        ofdOpen.InitialDirectory = "::{20D04FE0-3AEA-1069-A2D8-08002B30309D}" ' My Computer CLSID

        ofdOpen.Filter = "Image Files(*.bmp;*.jpg;*.gif;*.png;*.wmf)|*.bmp;*.jpg;*.gif;*.png;*.wmf" 'Filter Files

        If ofdOpen.ShowDialog = DialogResult.OK Then 'Determine File Selection

            pic1.Image = Image.FromFile(ofdOpen.FileName)

        End If

    End Sub

End Class
We imported all the needed namespaces, including our own. In btnCustom_Click we create a new instance of our preview control and set the appropriate properties where and how we would like it to be displayed. You will notice that I made use of the My Computer CLSID. Why? Well, force of habit I suppose. If you do not know about CLSIDs, have a look here for more detailed explanations.
We further display the dialog box and get the selected filename picture.
If you were to run your application now, you will be presented with this screen:
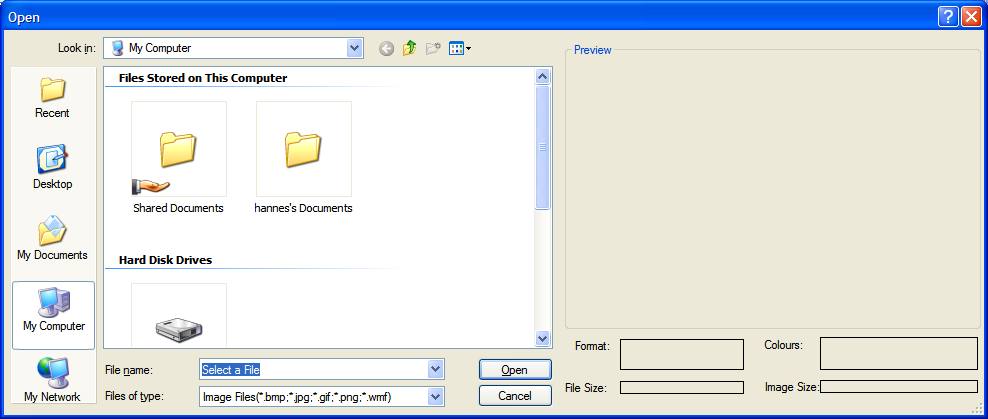
Figure 1 – Empty Preview screen
After a valid selection has been made, your preview screen will resemble Figure 2:
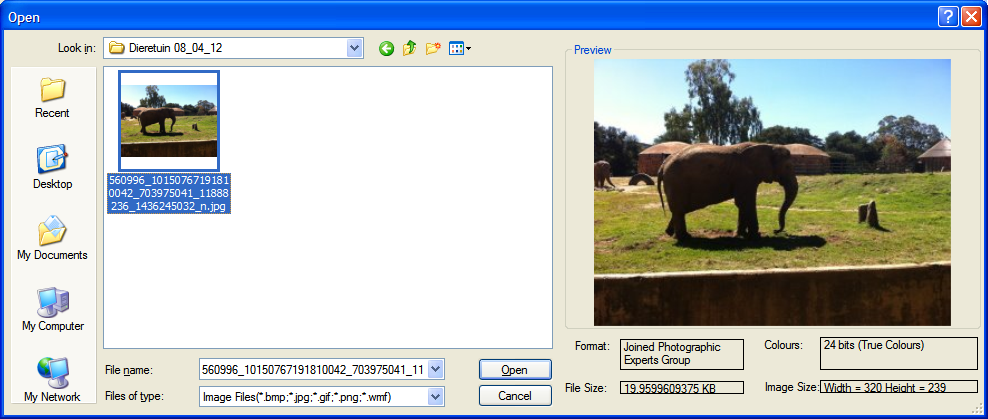
Figure 2 – Our Preview Window in action
btnNormal shows how to manipulate the standard OFD.
I am including the project’s source file with this article, so that you can experiment with your new knowledge and always have a resource when this need arises again.
Conclusion
This project ended up being much more work than I anticipated. I suppose that you would probably feel the same. All the hard work was well worth the while at the end of the day, and that is all that matters. I hope you have enjoyed this article series and that you have learned a lot from it. Until next time, cheers!