


Introduction
The term ‘Strings‘ always seem to amount to some sort of headache among new programmers. We all know what a string is: It is any set of alphanumeric input. The trick comes in to manipulate strings properly. Once you have learned this skill, you’re halfway to becoming a great programmer!
What String Functions are There?
The key to working with strings is to know what functions are available. There are actually many string functions available to Visual Basic developers. Within this article you will see 25 of the most common string functions and manipulation techniques . A more detailed list of all of the string functions can be found at : http://msdn.microsoft.com/en-us/library/system.string_methods%28v=vs.110%29.aspx.
Design
The best way to understand strings is to jump into code. To show the examples, I’ll use a simple project. Start Visual Studio and create a new VB Windows Forms project. Design the form to resemble Figure 1. You can name the objects anything you like. I did not name any of the buttons.
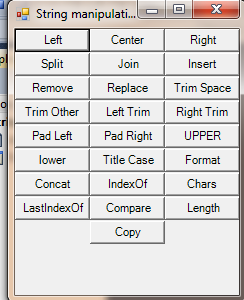
Figure 1 – Our Design
Code
Looking at the design, you will have a very basic idea of what you will be doing today. With each of these buttons you will do a small example outlining that particular String function’s use. I have kept it easy by giving each button a caption of the particular String function I will demonstrate.
Extracting Strings from an Existing String: Substring
The Substring string method enables you to extract a string from a string. You need to supply a starting point and an endpoint. If you do not supply an ending character position, it will take all the characters from the start you have specified, as shown with the ‘Right‘ example below. Keep in mind that the first character is always 0 and that any character is counted, including a space character.
Add the following code underneath the ‘Left‘ Button:
Dim DirectionString As String = "Left Center Right"
DirectionString = DirectionString.Substring(0, 4) 'Get Left
MessageBox.Show(DirectionString)
In this example we create a string object called DirectionString (I have kept the naming of objects very simple). I then use the Substring method to obtain the first Five characters from our string. Substring starts extracting characters at index 0 and continues until character 4. So it takes character 0, character 1, character 2, character 3 and character 4. I then simply display the resulting string in a MessageBox.
Add the following code, under the ‘Center‘ button:
Dim DirectionString As String = "Left Center Right"
DirectionString = DirectionString.Substring(5, 6) 'Extract Center
MessageBox.Show(DirectionString)
Here, you start the string extraction at character 5. Now, it doesn’t stop at character 6. It takes six characters from the starting point. So, if it starts at character 5, it will take the following characters:
Character 5 – C
Character 6 – e
Character 7 – n
Character 8 – t
Character 9 – e
Character 10 – r
This produces the string: “Center”.
Add the following code under the ‘Right‘ button:
Dim DirectionString As String = "Left Center Right"
DirectionString = DirectionString.Substring(12) 'Get Right
MessageBox.Show(DirectionString)
Here, I did not specify an “ending point“. I simply said that Substring should take all characters from character 12 onwards. When you do not specify the second parameter for the Substring function, it takes all the characters from the first parameter specified. This gives you: “Right”
When run, you will be able to extract Left, Center and Right respectively.
Breaking a String Apart: Split
You can use Split to break a string apart and make many other little strings from it. How does this happen? Well, all you need to have is a delimiter. If you look at normal written language: we use a space as a separator between words so that we know which word starts where. In this case, space is a delimiter. A delimiter can be any character such as a comma, a period, a colon or even a hyphen. It depends on your needs ultimately.
I will now demonstrate how to split a sentence at each comma. Add this code for the ‘Split‘ button:
Dim SplitString As String = "Milk,Toast,Honey"
Dim SplitArr(2) As String
Dim i As Integer

SplitArr = SplitString.Split(","c) 'Split at Each Comma

For i = 0 To SplitArr.Length - 1
MessageBox.Show(SplitArr(i))
Next
If you look at the very first line of the above code segment, you will see that an object called SplitString is created. It contains the phrase: “Milk,Toast,Honey“. Now, notice the commas. Those commas are your delimiters. The next line creates an array with three elements ( from zero to two). This will be used to store each phrase from the original string. An object named i is created, which will be used as a loop counter a bit later. The next line is where the Splitting process actually happens. I employed the Split method to split at each comma character. Inside the loop I simply displayed the contents of each array object. It should read:
Milk
Toast
Honey
Inserting Characters into a String: Insert
As the name implies, you can use Insert to insert characters into a specified string. All you need to specify is the character(s) you want to insert and the location of the new characters.
Add the next code for the ‘Insert‘ button:
Dim IncompleteString As String = "This is My Stng"
Dim FullString As String
' Results in a value of "This is My String".
FullString = IncompleteString.Insert(13, "ri")
MessaeBox.Show(FullString)
Here I created an object that contains an incomplete string. I created another string object to store the full edited string. I used Insert to insert the phrase “ri” at the 13th position in the string. The resulting string is now: “This is My String”
Remove Characters from a String: Remove
Again, quite self-explanatory. This helps with removing certain characters from a given string. The same principle is also being employed here, as we need to specify the character to remove, and where those character(s) are.
Add this code for the ‘Remove‘ button:
Dim RemoveString As String = "This is My Str@o@o@ing"
Dim NewString As String

' NewString = "This is My String"
NewString = RemoveString.Remove(14, 5)
MessageBox.Show(NewString)
Here, some jargon text gets removed. Jargon text is text that cannot be understood. Sometimes people type in nonsense characters to test your system, or sometimes a program does this automatically. The jargon text in this case is: “Str@o@o@oing“. The aim of the above code segment is to remove those characters so that only “String” appears.
Replacing Characters Inside a String: Replace
Add the code for the ‘Replace’ button:
Dim ReplaceString = "This is My String"
Dim NewString As String

' NewString = "This is Another String"
NewString = ReplaceString.Replace("My", "Another")

MessageBox.Show(NewString)
How the String methods work should now be fairly obvious to you, agree? Good. Here, you simply replace the letters : “My” with the phrase “Another“.
Removing Redundant Characters: Trim
Trim helps us remove unwanted leading spaces (in front of a sentence or word) and trailing spaces (at the end of a word or sentence).
Add the following under the ‘Trim Spaces‘ button:
'Trim Spaces
Dim SpaceString As String = " This string will have the spaces removed "
MessageBox.Show(SpaceString)
Dim TrimmedString As String
TrimmedString = Trim(SpaceString)
MessageBox.Show(TrimmedString)
Look closely at the first line of code. You will notice that the sentence has a space in front of the text as well as a space at the end of the text. Sometimes this happens. When dealing with a database such as MS Access for example, it adds unnecessary spaces at the end of text. This can cause a lot of headache when you’re dealing with exact phrases such as usernames or passwords. By using Trim, it removes all leading (characters in front of) characters and trailing (characters at the end) characters.
Add the next code segment for the ‘Trim Other‘ button:
Dim HashString As String = "#####Testing!######"
Dim TrimmedString As String
TrimmedString = HashString.Trim("#")
MessageBox.Show(TrimmedString)
In the above example, the # characters are inserted. By specifying which character we want to remove with Trim, we have to supply it as a parameter.
Add the following code behind the button labelled ‘Left Trim‘:
Dim SpaceString As String = " This string will have the leading spaces removed "
MessageBox.Show(SpaceString)
Dim TrimmedString As String
TrimmedString = SpaceString.TrimStart(" ")
MessageBox.Show(TrimmedString)
Here, you could use a variant of the Trim function named TrimStart. By supplying the space ” ” character to the TrimStart function, it will remove all the spaces in front of the sentence only.
Update your ‘Right Trim’ code to look like the following:
Dim SpaceString As String = " This string will have the trailing spaces removed
"
MessageBox.Show(SpaceString)
Dim TrimmedString As String
TrimmedString = SpaceString.TrimEnd(" ")
MessageBox.Show(TrimmedString)
Here, TrimEnd is being used to remove the trailing spaces after the sentence.
Adding Characters into a String: Pad
Padding is opposite to Trimming. Where Trimming takes spaces or other characters away, Pad adds them into the string.
Add this code for the ‘Pad Left‘ button:
Dim MainString As String = "This will be padded on the left"
Dim PaddedString As String
PaddedString = MainString.PadLeft(36, "@") '36 = new length of string with 5 new
chars
MessageBox.Show(PaddedString)
The amount of characters inside the MainString variable is 31. Why is this important? Well, when you are going to use either PadLeft or PadRight, you will need to not only specify the character to be inserted into the string, but what the resulting length of the edited string should be. In this case, I have entered 36. This does not mean that we want to insert 36 @ characters, it means that it will simply insert five @ characters, because the original string’s length was 31. PadLeft will add the five @ characters in front of the text.
Add this code for the ‘Pad Right‘ button:
Dim MainString As String = "This will be padded on the right"
Dim PaddedString As String

PaddedString = MainString.PadRight(36, "@") '36 = new length of string with 5
new chars
MessageBox.Show(PaddedString)
PadRight adds five @ characters at the end of MainString.
Changing Character Casing
You can convert strings to upper case, lower case or title case. A good use for upper or lower case is to establish if the user has entered the correct text. Then convert the input characters to either upper or lower case and compare it with the correct string.
Place this code behind the ‘UPPER‘ button:
Dim MixedString As String = "UpPeR oR LoWeR cAsE"
Dim UPPERString As String
' UPPERString = "UPPER OR LOWER CASE"
UPPERString = MixedString.ToUpper
MessageBox.Show(UPPERString)
By looking at the first line in the above code segment, you will see that MixedString contains a set of words that are not properly cased. This is mixed case. Now, to change this text to look more professional or more legible, you need to change its case. In the above segment I made use of ToUpper. This converts “UpPeR oR LoWeR” to “UPPER OR LOWER“.
Add the code for the ‘lower‘ Button:
Dim MixedString As String = "UpPeR oR LoWeR cAsE"
Dim lowerString As String
'lowerString = "upper or lower case"
lowerString = MixedString.ToLower
MessageBox.Show(lowerString)
ToLower converts MixedString to “upper or lower“.
Add the next code for the ‘Title Case‘ button:
Dim TitleString As String = "UPPER lower Title"
TitleString = TitleString.ToLower() ' mainly because of UPPER not changing to
title
TitleString =
System.Globalization.CultureInfo.InstalledUICulture.TextInfo.ToTitleCase(TitleString)
MessageBox.Show(TitleString)
This one is a bit different. There isn’t a ToTitle function inside all the string functions; we have to make use of some Globalization functions to get the correct format. Title case, in case you do not know looks like: “This Is Title Case“. Every word is capitalized at the beginning. Now why couldn’t we do this differently. I suppose it is due to the fact that some cultures employ different casing techniques. Run it now and you will see TitleString shows: “Upper Lower Title”
Displaying Text in a Desired Format: Format
We can use the Format function to format the given string into the desired format. OK, now what does that mean? It means that we can format an input string that resembles a date into a long date, short date. We can convert the text to currency. This is pretty useful especially when dealing with more than one currency type or more than one date type.
Using Format function
Add the next code for the ‘Format‘ button:
Dim UnFormattedDateTime As Date = #1/27/2001 5:04:23 PM#
Dim FormatString As String
' Returns current system time in the system-defined long time format.
FormatString = Format(Now(), "Long Time")
' Returns current system date in the system-defined long date format.
MessageBox.Show(FormatString)
FormatString = Format(Now(), "Long Date")
MessageBox.Show(FormatString)
' Also returns current system date in the system-defined long date
' format, using the single letter code for the format.
FormatString = Format(Now(), "D")
MessageBox.Show(FormatString)
' Returns the value of UnFormattedDateTime in user-defined date/time formats.
FormatString = Format(UnFormattedDateTime, "h:m:s") ' Returns "5:4:23".
MessageBox.Show(FormatString)
FormatString = Format(UnFormattedDateTime, "hh:mm:ss tt") ' Returns "05:04:23
PM".
MessageBox.Show(FormatString)
FormatString = Format(UnFormattedDateTime, "dddd, MMM d yyyy") ' Returns
"Saturday,
' Jan 27 2001".
MessageBox.Show(FormatString)
FormatString = Format(UnFormattedDateTime, "HH:mm:ss") ' Returns "17:04:23"
MessageBox.Show(FormatString)
FormatString = Format(23) ' Returns "23".
MessageBox.Show(FormatString)
' User-defined numeric formats.
FormatString = Format(5459.4, "##,##0.00") ' Returns "5,459.40".
MessageBox.Show(FormatString)
FormatString = Format(334.9, "###0.00") ' Returns "334.90".
MessageBox.Show(FormatString)
FormatString = Format(5, "0.00%") ' Returns "500.00%".
MessageBox.Show(FormatString)
The Format function is quite versatile, as you can see. If you click on this button, you will see a lot of different outputs in different formats. This is the real power of Format. For more information on the Format function, have a look here : http://msdn.microsoft.com/en-us/library/system.string.format%28v=vs.110%29.aspx
Joining Strings: Concatenation
Concatenation is the process of joining multiple strings into one. There are three ways:
- You could use the + and & operators, although it is advised to only use the & operator and not the + operator.
- You could use Concat, which is a bit more structured.
- You could use Join, with which we supply a delimiter which could be used to separate the strings in the final string.
Add all of the following under the ‘Concat‘ button:
Dim FirstName As String = "Hannes"
Dim Surname As String = "du Preez"
MessageBox.Show(FirstName & Surname)
This is very simple. I have created two separate strings. Inside the Show method of the MessageBox, I joined them with the ampersand character. This gives me the output: “Hannesdu Preez“. Why doesn’t it add spaces? Well, you have to do that yourself! You could either have had a trailing space after “Hannes “, or a leading space before “ du Preez“. If you added both a leading and trailing space, you’ll end up with two spaces instead of just one.
Replace the code inside ‘Concat’ with:
Dim ConcatString As String
Dim aString As String = "A"
Dim bString As String = "B"
Dim cString As String = "C"
Dim dString As String = "D"
' ConcatString = "ABCD"
ConcatString = String.Concat(aString, bString, cString, dString)
MessageBox.Show(ConcatString)
Here, I created four small string objects (just for illustration purposes). Then, I used the Concat method to join them together. The resulting string is: “ABCD”. As you can see, this method is quite powerful, yet limited. You’d have to manually enter the delimiter inside each string.
Add this code to the Join button:
Dim JoinArr(2) As String
Dim JoinString As String
JoinArr(0) = "Milk"
JoinArr(1) = "Toast"
JoinArr(2) = "Honey"
JoinString = String.Join(",", JoinArr)
MessageBox.Show(JoinString)
I made an array with three elements: Milk, Toast and Honey. Then I used Join to join these three strings into one. The benefit of using Join is that we can specify a delimiter to use. The resulting string looks like: “Milk,Toast,Honey“
Finding Character Locations: IndexOf
We can use IndexOf to determine if a certain character or phrase is present in the supplied string. A simple example would be to check if an ‘@‘ sign is present in an email address. If it is not, we know that the supplied email address is not valid.
Add the following three code segments behind the ‘IndexOf‘ button:
Dim MainString As String = "ABCDE"
Dim Result As Integer
Result = MainString.IndexOf("D") ' result = 3
MessageBox.Show("D is Character number : " & Result.ToString)
The above code segment creates a string object named MainString and holds “ABCDE” inside it. I created an Integer variable to hold the location of the desired character. I then used Indexof to determine where D is inside the string. D in this case, is character three. A = 0. B =1. C = 2. D = 3.
Add this code underneath the previous code:
Dim MainString As String = "ABCDE"
Dim ResultChar As Char
ResultChar = MainString.Chars(3) ' resultChar = "D"
MessageBox.Show("Character 3 is : " & ResultChar.ToString)
Same principle. Well, almost! I created the same string object with the same characters inside it. I declared an abject of type Char. This will enable me to show the desired character. I then used the Chars method and supplied the number three to it. This translates to: Give the character at index three. This will show “D”.
Add this code underneath:
Dim MainString = "A\B\C\D\E\F\G\H\I\J"
Dim Result As Integer

Result = MainString.LastIndexOf("\")
MessageBox.Show("Last occurence of ' \ ' is at Position : " & Result.ToString())
LastIndexof is in principle the same as Indexof. The only difference is that it gives the last index of the character’s occurrence. You can see that I added \ between each character inside MainString. LastIndexof will tell you that the last \ is found at position 17. This is especially useful when working with file paths, where we just simply need the file name and not its full path.
Comparing Strings: Compare
We can use Compare to establish whether two or more strings are exactly the same.
Add the following code behind ‘Compare‘:
Dim FirstString As String = "Alphabetical"
Dim SecondString As String = "Order"
Dim ThirdString As String = "Order"
Dim FourthString As String = "Alphabetical"
Dim Result1 As Integer
Dim Result2 As Integer
Result1 = String.Compare(FirstString, SecondString)
MessageBox.Show("Result = " & Result1.ToString & Environment.NewLine & "First
String Is Smaller Than Second")
Result2 = String.Compare(ThirdString, FourthString)
MessageBox.Show("Result = " & Result2.ToString & Environment.NewLine & "Third
String Is Greater Than Fourth")
I created four strings. Two of them are exactly alike. With the use of Compare, you can compare two strings with one another. It basically checks to see the strings relative position in the sort order. Now, I have kept the strings content obvious. “Alphabetical” is obviously earlier in a sort, than “Order“. This is what is called a lexical relationship. If the result is -1, it means that the first string is earlier in the sort operation than the second. If the result is 0, both strings are equal. If the result is +1, it means that the last supplied string is earlier in the sort operation.
Obtaining the Length of a string: Length
You can use the Length property to find out how many characters are present in a string. A simple example would be to test the length of the entered password phrase. If it is too short, or too long, inform the user.
Add this code behind the button labelled ‘Length‘:
Dim MainString As String = "String To Test The Length"
Dim Result As Integer = MainString.Length
MessageBox.Show(Result.ToString & " Characters")
This simply shows the amount of characters inside the string.
Copy
We can copy strings with Copy.
Copying strings
Add the next code behind ‘Copy‘:
Dim EmptyString As String
Dim CopyString As String = "This Will Be Copied Into An Empty String"
EmptyString = String.Copy(CopyString)
MessageBox.Show(EmptyString)
Here a string is copied into another string.
I have attached a working sample with all of these functions in action.
Conclusion
Obviously these String functions are only a few out of the hundreds available, but these will help you in most situations you will encounter. Enjoy playing around with them! Good luck! Cheers!