

Introduction
Microsoft’s new Cloud offering of Office 365 APIs is very popular now a days among developers. Developers can access the Office 365 REST APIs by using libraries available for .NET and JavaScript. Along with these libraries, the Visual Studio 2017 release also brings some key updates to developers for the tooling experience, making it easier to interact with Office 365 services. In this post, I will demonstrate how to log in to Office 365 and access REST services from a Web application.
How the Application Works
When users visit the sample Web site I have developed, they will be redirected to the Office 365 Web site for authentication. After successful authentication, the user will be redirected back to my Web site with a code to request a REST API for a token. The user also will get the account information details with the token. Follow the upcoming steps to create your own app.
Step 1
Visit this link to register your Web application.
Please sign in with Microsoft account credentials when prompted.
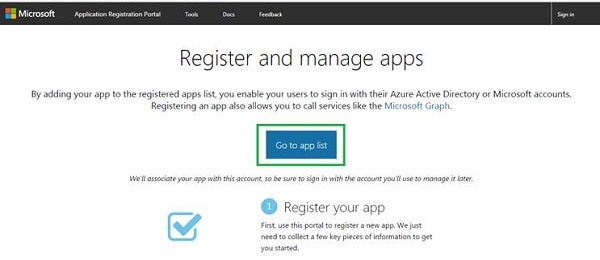
Figure 1: Register your app
Step 2
Add a meaningful name of your application. Click Create.
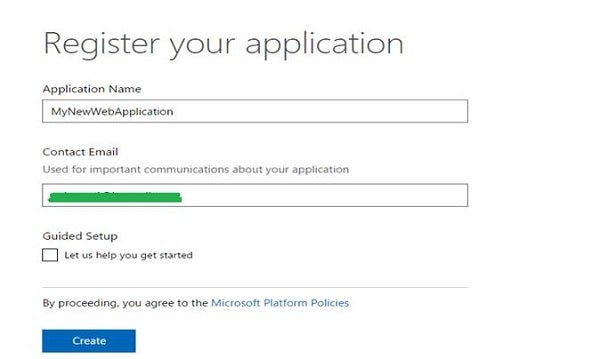
Figure 2: Name your application
Step 3
Select the server site Web application and ASP.NET. You can change the selection if you are not adding Office 365 authentication for a Web application.
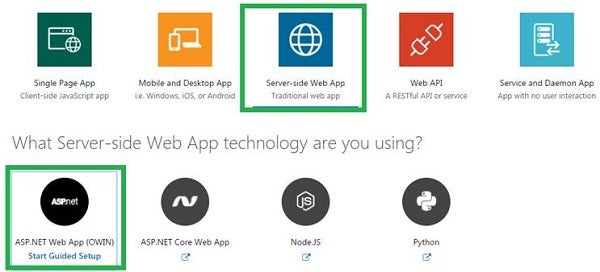
Figure 3: Platform and Technology selection
Step 4
Next, click Setup.
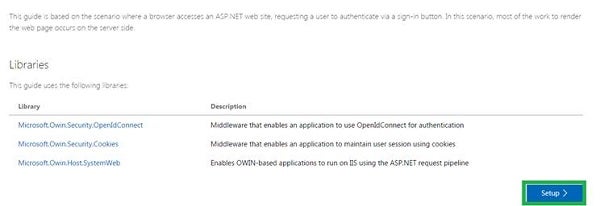
Figure 4: Set up the app
Step 5
You now can download the sample’s Visual Studio project code and copy/paste the authentication code in your Web application. I have mentioned the necessary code snippets and steps to add sample C# authentication code in your Web application.
To add authentication components, go to Visual Studio Editor: Tools > Nuget Package Manager > Package Manager Console > add OWIN middleware NuGet packages and install. Alternatively, you can execute the following install commands in the package manager console manager. Installed OWIN libraries enable single sign-on (SSO) using an OpenID Connect via cookie-based authentication.
Install-Package Microsoft.Owin.Security.OpenIdConnect
Install-Package Microsoft.Owin.Security.Cookies
Install-Package Microsoft.Owin.Host.SystemWeb
Step 6
Next, you have add a new Startup.cs class to your project that will be executed automatically when the IIS process starts. This class is required for OWIN middleware to configure a OpenID connect authentication.
When creating, make sure the class selected is an OWIN startup class and not a standard C# class. Also, add OWIN and Microsoft.IdentityModel references to Startup.cs.
using Microsoft.Owin;
using Owin;
using Microsoft.IdentityModel.Protocols;
using Microsoft.Owin.Security;
using Microsoft.Owin.Security.Cookies;
using Microsoft.Owin.Security.OpenIdConnect;
using Microsoft.Owin.Security.Notifications;
The following is a code snippet of the startup class.
public class Startup
{
   string clientId = System.Configuration.ConfigurationManager
      .AppSettings["ClientId"];
   string redirectUri = System.Configuration.ConfigurationManager
      .AppSettings["RedirectUri"];
   static string tenant = System.Configuration
      .ConfigurationManager.AppSettings["Tenant"];
   string authority = String.Format(System.Globalization
      .CultureInfo.InvariantCulture,
      System.Configuration.ConfigurationManager.AppSettings
      ["Authority"], tenant);
   public void Configuration(IAppBuilder app)
   {
      app.SetDefaultSignInAsAuthenticationType
         (CookieAuthenticationDefaults.AuthenticationType);

      app.UseCookieAuthentication
         (new CookieAuthenticationOptions());
      app.UseOpenIdConnectAuthentication(
         new OpenIdConnectAuthenticationOptions
         {
            ClientId = clientId,
            Authority = authority,
            RedirectUri = redirectUri,
            PostLogoutRedirectUri = redirectUri,
            Scope = OpenIdConnectScopes.OpenIdProfile,
            ResponseType = OpenIdConnectResponseTypes.IdToken,
            TokenValidationParameters = new
               System.IdentityModel.Tokens
                  .TokenValidationParameters() {
               ValidateIssuer = false },

            Notifications = new
               OpenIdConnectAuthenticationNotifications
            {
               AuthenticationFailed = OnAuthenticationFailed
            }
         }
      );
   }


   private Task OnAuthenticationFailed
      (AuthenticationFailedNotification<OpenIdConnectMessage,
      OpenIdConnectAuthenticationOptions> context)
   {
      context.HandleResponse();
      context.Response.Redirect("/?errormessage=" +
         context.Exception.Message);
      return Task.FromResult(0);
   }
}
Step 7
Next, add a controller to your project to handle sign-in and sign-out requests. Also, add OWIN references to the controller class.
using Microsoft.Owin.Security;
using Microsoft.Owin.Security.Cookies;
using Microsoft.Owin.Security.OpenIdConnect;
The following are code snippets of two methods to handle the sign-in and sign-out processes.
public void SignIn()
{
   if (!Request.IsAuthenticated)
   {
      HttpContext.GetOwinContext().Authentication.Challenge(
         new AuthenticationProperties { RedirectUri = "/" },
         OpenIdConnectAuthenticationDefaults.AuthenticationType);
   }
}

public void SignOut()
{
   HttpContext.GetOwinContext().Authentication.SignOut(
      OpenIdConnectAuthenticationDefaults.AuthenticationType,
      CookieAuthenticationDefaults.AuthenticationType);
}
Now, create the application home page for sign-in users. Name it Index page. Add the following HTML code to the Index page.
<html>
<head>
   <meta name = "viewport" content="width=device-width" />
   <title>Sign-In with Microsoft Guide</title>
</head>
<body>
@if (!Request.IsAuthenticated)
{
   < !--If the user is not authenticated,
        display the sign-in button-- >
      < a href = "@Url.Action("SignIn", "Home")"
        style = "text-decoration: none;" >
         < svg
           xml: space = "preserve" width = "300px"
           height = "50px" viewBox = "0 0 3278 522"
           class="SignInButton">
            <style type = "text/css" >.fil0:hover
             {fill: #4B4B4B;} .fnt0 {font-size: 260px;
             font-family: 'Segoe UI Semibold', 'Segoe UI';
             text-decoration: none;}</style>
            <rect class="fil0" x="2" y="2" width="3174"
                  height="517" fill="black" />
            <rect x = "150" y="129" width="122"
                  height="122" fill="#F35325" />
            <rect x = "284" y="129" width="122"
                  height="122" fill="#81BC06" />
            <rect x = "150" y="263" width="122"
                  height="122" fill="#05A6F0" />
            <rect x = "284" y="263" width="122"
                  height="122" fill="#FFBA08" />
            <text x = "470" y="357" fill="white"
                  class="fnt0">Sign in with Microsoft</text>
         </svg>
      </a>
}
else
{
   <span><br/>Hello @System.Security.Claims
      .ClaimsPrincipal.Current.FindFirst("name").Value;</span>
   <br /><br />
   @Html.ActionLink("See Your Claims", "Index", "Claims")
   <br /><br />
   @Html.ActionLink("Sign out", "SignOut", "Home")
}
@if(!string.IsNullOrWhiteSpace
   (Request.QueryString["errormessage"]))
{
   <div style = "background-color:red;color:white;
    font-weight: bold;" >
    Error: @Request.QueryString["errormessage"]</div>
}
</body>
</html>
Next, add a controller to display the user’s claims. Next is the code of your controller class.
[Authorize]
public class ClaimsController : Controller
{
   /// <summary>
      /// Add user's claims to viewbag
   /// </summary>
   /// <returns></returns>
   public ActionResult Index()
   {
      var claimsPrincipalCurrent = System.Security.Claims
         .ClaimsPrincipal.Current;
      // You get the user's first and last name below:
      ViewBag.Name =
         claimsPrincipalCurrent.FindFirst("name").Value;

      // The 'preferred_username' claim can be used for showing
      // the username
      ViewBag.Username = claimsPrincipalCurrent.FindFirst
         ("preferred_username").Value;

      // The subject claim can be used to uniquely identify the
      // user across the Web
      ViewBag.Subject = claimsPrincipalCurrent.FindFirst
         (System.Security.Claims.ClaimTypes.NameIdentifier).Value;

      // TenantId is the unique Tenant ID - which represents an
      // organization in Azure AD
      ViewBag.TenantId = claimsPrincipalCurrent.FindFirst
         ("http://schemas.microsoft.com/identity/claims/tenantid")
         .Value;

      return View();
   }
}
Add a view to display the user’s claims details. Add the following HTML to it.
<html>
<head>
   <meta name = "viewport" content="width=device-width" />
   <title>Sign-In with Microsoft Sample</title>
   <link href = "@Url.Content("~/Content/bootstrap.min.css")"
         rel= "stylesheet" type= "text/css" />
</ head >
< body style= "padding:50px" >
   < h3 > Main Claims:</h3>
   <table class="table table-striped table-bordered
                 table-hover">
      <tr><td>Name</td><td>@ViewBag.Name</td></tr>
      <tr><td>Username</td><td>@ViewBag.Username</td></tr>
      <tr><td>Subject</td><td>@ViewBag.Subject</td></tr>
      <tr><td>TenantId</td><td>@ViewBag.TenantId</td></tr>
   </table>
   <br />
   <h3>All Claims:</h3>
   <table class="table table-striped table-bordered
                       table-hover table-condensed">
      @foreach(var claim in System.Security.Claims.ClaimsPrincipal
         .Current.Claims)
      {
         < tr >< td > @claim.Type </ td >
               < td > @claim.Value </ td ></ tr >
      }
   </table>
   <br />
   <br />
   @Html.ActionLink("Sign out", "SignOut", "Home", null,
      new { @class = "btn btn-primary" })
</body>
</html>
Step 8
Now, configure your ASP.NET Web App with the application’s registration information, SSL, and RedirectUri.
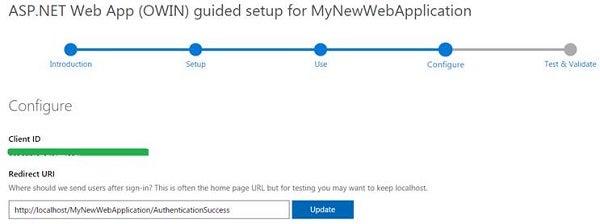
Figure 5: Configure for successful redirection
Add the following entries in the Web application’s web.config file located in the root’s folder. The RedirectUri value will be different for your application.
<add key = "ClientId"
     value="669eabf8-0497-4ee4-a3ef-8b5279532fgt" />
<add key = "RedirectUri"
     value="http://localhost/MyNewWebApplication" />
<add key = "Tenant" value="common" />
<add key = "Authority"
     value="https://login.microsoftonline.com/{0}/v2.0" />
Step 9
Execute your code and let the browser open and direct you to http://localhost/MyNewWebApplication. Now, click the Sign in button and complete the sign-in process. After a successful sign-in, the user will be redirected to the home page of the sample Web site. To view the user’s claims, click the hyperlink; you should see a table containing the basic logged-in user properties.
Summary
For more information about the Office 365 authentication process and code snippets, refer to this MSDN Web site.