

Introduction
Azure Service provides SQL relational database-as-a-service with high performance, reliability, and security. Developers can write C# code to connect to an Azure SQL database by using the .NET code framework from Visual Studio or Visual Studio Code editor. As a prerequisite, you need to install the latest version of Visual Studio or Visual Studio Code and you should have created the server level firewall rule in Azure to access the database from your development environment.
In this article, I will demonstrate to you how to create an Azure SQL database and to query that database by writing C# code from Visual Studio Code.
SQL Database
To create an Azure SQL DB, log in to the Azure Portal. You need to create a Microsoft Outlook account, or use your existing one. Next, Click New -> Databases -> SQL Database. Enter the Database name and select your subscription. Also, create a new resource group and select the respective source. Click Server and then click Create a new server. Enter server name, server admin login, and password. Finally, confirm your password and location.
After creating the database, note down the DB name, user name, password, and subscription ID. These details will be required to connect the DB from C# code. This is shown in Figure 1.
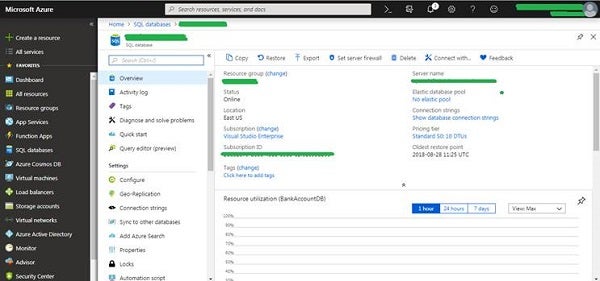
Figure 1: Azure SQL Database Created in Azure Portal
Figure 2 demonstrates the ADO.NET connection string; we can copy that from the Azure portal. Please remember to set a firewall rule for the public IP address of the computer/computers from which you will access the Azure database. If you are using multiple computers or have a different public IP address, create a server-level firewall rule using the Azure portal.
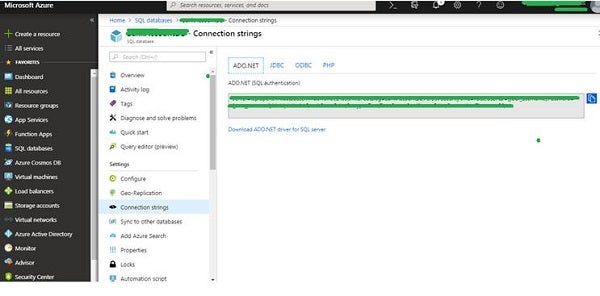
Figure 2: Azure SQL Database Connection String
A New C# Project to Query an Azure Database
Let’s create an application now to connect to the Azure database and query. As mentioned earlier, you can create a console project from Visual Studio or a project from Visual Studio Code.
To create a Sample Azure DB consumer application in .NET, Open Visual Studio 2017 -> File Menu -> New, then Project. It will open a new project window. Choose the Console Application type. Specify the project name as “PrjAzureDBConnect” and click OK.
Next, In Solution Explorer, right-click PrjAzureDBConnect and click Manage NuGet Packages. On the Browse tab, search for System.Data.SqlClient and install it. When the install completes, review the changes and then click OK to close the Preview window.
Now, we will write a few lines of code to insert data in the Azure database table. For that, open the Program.cs file and replace the contents of Program.cs with the following code and add the appropriate Azure database connection string.
Run the application to insert records.
using System.Collections.Generic;
using System.Data.SqlClient;
using System.Linq;
using System.Text;
using System.Threading.Tasks;

namespace SampleAzureDBQuery
{
   class Program
   {
      static void Main(string[] args)
      {
         try
         {
            var cb = new SqlConnectionStringBuilder();
            cb.ConnectionString = "Server =
               tcp:sample.database.windows.net,1433;
               Initial Catalog = SampleDB;
               Persist Security Info = False;
               User ID =user; Password =database@12345;
               MultipleActiveResultSets = False;
               Encrypt = True; TrustServerCertificate = False;
               Connection Timeout = 30;";

            using (SqlConnection connection = new
               SqlConnection(cb.ConnectionString))
            {

               SqlCommand cmd = new SqlCommand("INSERT INTO User
                  VALUES (@Id, @Name, @Address, @IdCard,
                  @Account_Type, @Gender, @Email, @DOB)",
                  connection);
               cmd.Parameters.Add("@Id", "12345");
               cmd.Parameters.Add("@Name", "Tapas Pal");
               cmd.Parameters.Add("@Address", "Kolkata,India");
               cmd.Parameters.Add("@Account_Type", "Admin");
               cmd.Parameters.Add("@Gender", "M");
               cmd.Parameters.Add("@Email",
                  "paltapas4@hotmail.com");
               cmd.Parameters.Add("@DOB", "19/12/2000");
               connection.Open();
               int result = cmd.ExecuteNonQuery();
               connection.Close();

            }
         }
         catch (SqlException e)
         {
            throw e;
         }
      }
   }
}
Copy and paste the following lines of code in your Main() method to display the data entered in the previous step.
using System;
using System.Collections.Generic;
using System.Data.SqlClient;
using System.Linq;
using System.Text;
using System.Threading.Tasks;

namespace SampleAzureDBQuery
{
   class Program
   (

      static void Main(string[] args)
      {
         try
         {
            var cb = new SqlConnectionStringBuilder();
            cb.ConnectionString = "Server =
               tcp:sample.database.windows.net,1433;
               Initial Catalog = SampleDB;
               Persist Security Info = False;
               User ID =user; Password =database@12345;
               MultipleActiveResultSets = False; Encrypt = True;
               TrustServerCertificate = False;
               Connection Timeout = 30;";

            using (SqlConnection connection = new
               SqlConnection(cb.ConnectionString))
            {
               Console.WriteLine("\nQuery data example:");
               Console.WriteLine
                  ("=========================================\n");
               connection.Open();
               StringBuilder sb = new StringBuilder();
               sb.Append("SELECT TOP 10 Id as UserID,
                  Name as UserName, Address as UserAddress,
                  Account_Type as AccountType");
               sb.Append("FROM [User]");

               String sql = sb.ToString();

               using (SqlCommand command = new SqlCommand(sql,
                  connection))
               {
                  using (SqlDataReader reader =
                     command.ExecuteReader())
                  {
                     while (reader.Read())
                     {
                        Console.WriteLine("{0} {1}",
                           reader.GetString(0),
                           reader.GetString(1));
                     }
                  }
               }
            }
         }
         catch (SqlException e)
         {
            throw e;
         }
      }
   }
}
Conclusion
Remember, you can connect to and query Azure Database by using SQL Server Management Studio. Also, you can query by using the Azure portal. That’s all for today. Happy coding!