

Welcome to the second installment of this series. Because the normal GroupBox is a Container control, you obviously need to have that ability in yours as well; otherwise, it is not a GroupBox replacement at all. In this article, you will cover the ability to contain controls, as well as adding a little preview for oyur control in design time. Interesting stuff, so let me not waste any more of your time.
Adding Container Capabilities
All you need to do, believe it or not, is to add one line of code to your UserControl. Yes, that’s right; one line of code!
And here is the magical line of code:
<Designer("System.Windows.Forms.Design.ParentControlDesigner, _
   System.Design", GetType(IDesigner))> _
This line should be just above the Class statement.
Okay, make it two!
You would also need to include the following Import:
Imports System.ComponentModel.Design
Changing the design
If you have read the first part, you would know that I put a Label and a Panel on the UserControl. The original plan was to have the Panel host all the child controls, but, it is not really necessary to have the Panel here because the UserControl is already a Scrollable Control, and provides the Scrolling capabilities already. All you need to do is to delete the Panel from the UserControl, and comment out all the references you have made to it, in code.
The label should be used only to display the title of the GroupBox; it would be senseless to allow the label to host controls as well, and it would look ugly. So, the plan is to have the remaining body of the UserControl host the children. Two things you have to remember here are the following:
- The added control(s) should not be allowed to have any part of it, inside the Heading label, nor outside the left edge of the UserControl.
- When the add controls are moved, they should not be able to have any part of it inside the Heading label, nor outside the left edge of our UserControl.
You simply can set the AutoScroll property of the UserControl to enable scrolling for controls outside the bottom and right edges of the UserControl.
Handling Control Placement
UserControl_ControlAdded event
To handle point number 1, you need to use the UserControl’s built-in ControlAdded-event. This event is not specific to UserControl; any container control would have this property. This is a nice way to determine when a control has been added, what type of control it was, and the added control’s location. Add the following to your UserControl:
Private Sub HTG_Group_ControlAdded(ByVal sender As Object, _
   ByVal e _
   As System.Windows.Forms.ControlEventArgs) _
   Handles Me.ControlAdded
   tmrGB.Enabled = True
   e.Control.BringToFront()
   AddHandler e.Control.Move, AddressOf MoveAddedControl
   gbAddedControl = e.Control

End Sub
In this code segment, you enabled a Timer (which you will add with point number 2) and you used the BringToFront property of the added control to bring it to the front of its container. You then added an event handler named MoveAddedControl; this will handle the location properties of your added control. Lastly, you set a variable named gbAddedControl equals to the added control. This variable you will refer to in the Timer’s Tick event, with point number 2. Add this Private variable with the type of Control to your UserControl.
MoveAddedControl
The MoveAddedControl looks like the following:
Private Sub MoveAddedControl(ByVal sender As Object, _
                             ByVal e As System.EventArgs)
   If gbAddedControl.Top <= lblGBHead.Bottom Then _
      gbAddedControl.Top = _
   (lblGBHead.Top + gbAddedControl.Top) + 10
   If gbAddedControl.Left <= 0 Then gbAddedControl.Left = 1
End Sub
Here, you determine whether the added control’s top is anywhere inside your label; if it is, you shift it down. You also handled the left property of the added control; this ensures that the added control will not be outside of the container.
Handling Child Control Movement
As mentioned earlier, you need to add a Timer to your control. Add it now, and set the following properties.
The Timer’s Tick event looks like the following:
Private Sub tmrGB_Tick(ByVal sender As System.Object, _
   ByVal e As System.EventArgs) Handles tmrGB.Tick
   If gbAddedControl.Top <= lblGBHead.Bottom Then _
      gbAddedControl.Top = _
   (lblGBHead.Top + gbAddedControl.Top) + 10
   If gbAddedControl.Left <= 0 Then gbAddedControl.Left = 1
   tmrGB.Enabled = False
   End Sub
Here, you used the same logic as in the MoveAddedControl event, and you disabled the Timer again because it only needed to fire once.
If you build your project now, and add the new UserControl to the test form (frmTest), you should be able to add child controls in design time as well as run time to your UserControl. You may be greeted with a picture similar to Figure 1:
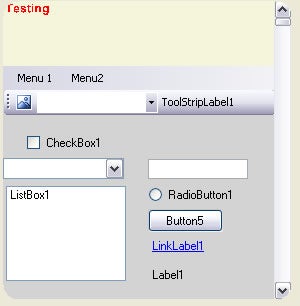
Figure 1: Adding Child Controls at Design Time
Just in case you are wondering what the code would look like to add controls during runtime, you can add this quick and dirty example in frmTest’s Form_Load event:
Private Sub frmTest_Load(ByVal sender As Object, ByVal e As _
   System.EventArgs) Handles Me.Load
   Dim TempButton(49) As Button
   TempButton(0) = New Button
   TempButton(0).Top = 67
   TempButton(0).Left = 1
   TempButton(0).Text = "Button1"
   HtG_Group1.Controls.Add(TempButton(0))
   For i As Integer = 1 To 49
      TempButton(i) = New Button
      TempButton(i).Text = "Down " & CStr(i + 1)
      TempButton(i).Top = TempButton(i - 1).Top + _
      TempButton(i - 1).Height + 2
      TempButton(i).Left = 1
      HtG_Group1.Controls.Add(TempButton(i))
   Next

   For j As Integer = 1 To 49
      TempButton(j) = New Button
      TempButton(j).Text = "Right " & CStr(j + 1)
      TempButton(j).Top = 67
      TempButton(j).Left = TempButton(j - 1).Left + _
      TempButton(j - 1).Width + 2
      HtG_Group1.Controls.Add(TempButton(j))
   Next
End Sub
All this code achieves is to add 50 buttons underneath each other, and 50 buttons to the right of each other. Do you notice the automatic scrollbars? If you added this exact code, you should have a form that looks similar to Figure 2.

Figure 2: Adding Child Controls at Run Time