

The following is Chapter 17 from Building Websites with Microsoft Content Management Server by Lim Mei Ying, Joel Ward, and Stefan Goßner; published by Packt Publishing.
Authoring Connector provides the ability to upload content from Microsoft Word directly to MCMS, allowing authors to continue to work in the familiar Word environment without having to learn the technicalities of HTML or other web scripting languages. Through a simple publishing process, a Word document can be uploaded to the MCMS web server and published as a posting.
You will find Authoring Connector particularly useful when:
- Authors are not comfortable editing content in the browser and would be happier using Word instead.
- Authors require a rich editing environment that allows them to work with complex objects such as tables.
- Templates are structured to contain a single placeholder.
Authoring Connector is a client component and needs to be installed on every desktop that requires it. Once installed, it adds a Send to MCMS option to Word’s File menu. Authors click on this option to upload the open document to the website.
In this chapter, we will build an additional section for the TropicalGreen site, named Columns. This new segment serves as an area for authors to upload articles they have written about fellow members, latest events, their gardening experiences, and what they’ve been growing in their backyards. To test the capabilities of Authoring Connector, we will use it to publish content from Word to the Columns channel.
Before We Begin
In order to complete the rest of the chapter, you must have the following software installed on your computer:
- Word XP or Word 2003
- Authoring Connector, which we will install below.Publishing with Authoring Connector
Installing Authoring Connector
To begin, close all instances of Word on your desktop (remember to save your work first).
Insert the Microsoft Content Management Server 2002 CD into your computer. On the splash screen, choose to Install Authoring Connector. Click Next to get past the Welcome screen.
Note: You could also download the latest version of Authoring Connector from the official Microsoft website (http://www.microsoft.com/downloads) and store the installation file, AuthConn.exe , on a central computer for distribution to authors.
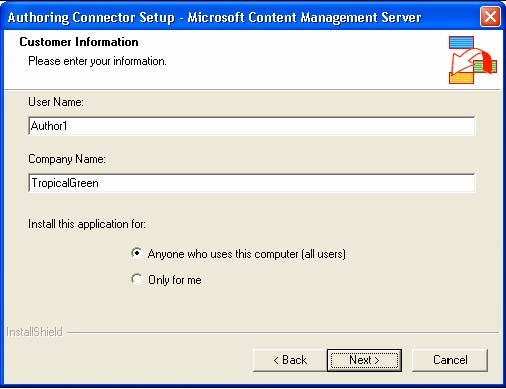
In the Customer Information dialog, enter your name and the name of your company. Choose to either add Authoring Connector options to all profiles on the computer or only to your profile. When you are done, click Next.
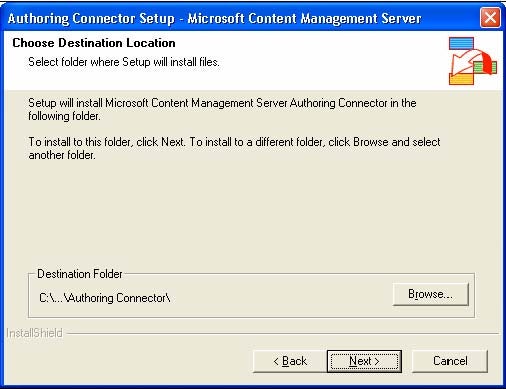
Select the Destination folder. The default folder is \Authoring Connector\ under the MCMS installation folder. If the specified folder does not exist, the installer will create it for you. When you have made your selection, click Next.
 /p>
/p>
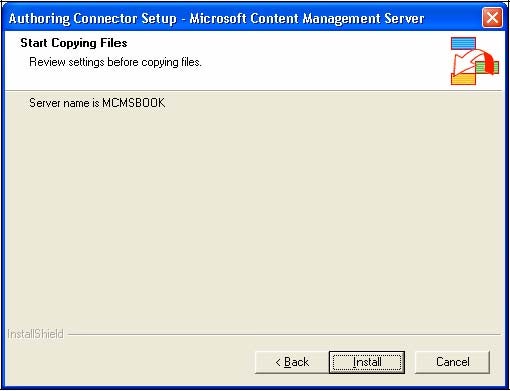
Enter the MCMS server name. Click Next when you have entered the name of a valid MCMS server, or leave it as localhost.

The next screen displays the name of the MCMS server name entered earlier. You can change the setting by clicking on the Back button. To begin the installation, click Install.
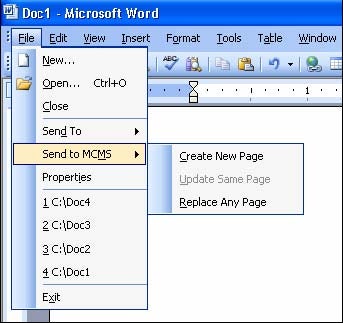
Once you have installed Authoring Connector, open Word and select File from the menu bar. You should see a new entry Send to MCMS, which expands to reveal more options.
- Create New Page
- Update Same Page
- Replace Any Page
The Update Same Page option is not available at the moment because you have not published the page to MCMS.
In addition, a new entry, MCMS Authoring Connector Help is added to the Help menu. The link leads to the Authoring Connector help file, which guides authors through a step-by-step tutorial on how to use Authoring Connector to publish Word documents to MCMS.
Note: If the Send to MCMS menu item is missing or grayed out, it means that Authoring Connector was not registered properly on the client. Run the installation process again, this time:
- Ensure that all instances of Word on the client machine have been properly closed
- After Authoring Connector has been installed, open Word. Select Tools | Macro | Security. In the Security dialog, click on the Trusted Sources tab. Check that the Trust all installed add-ins and templates option is selected.
Columns
We will now create the new section for the TropicalGreen website, named Columns. It will be a place for listing articles about the latest news from TropicalGreen. Authors usually create articles from Word documents. A typical column runs about a page long and may include pictures at appropriate points. Here’s what we will be doing:
- We will start by creating a template for our columns.
- Next, we will open an existing Word document and use Authoring Connector to create a new posting based on the template that we have created.
- Then we will use the existing Word document and test the update and replace functions of Authoring Connector.
The final part of the chapter will discuss how certain parts of the publishing process can be automated using Publishing Tasks.
We’ll re-use the channel rendering script from Chapter 9 to list all articles available in the channel.

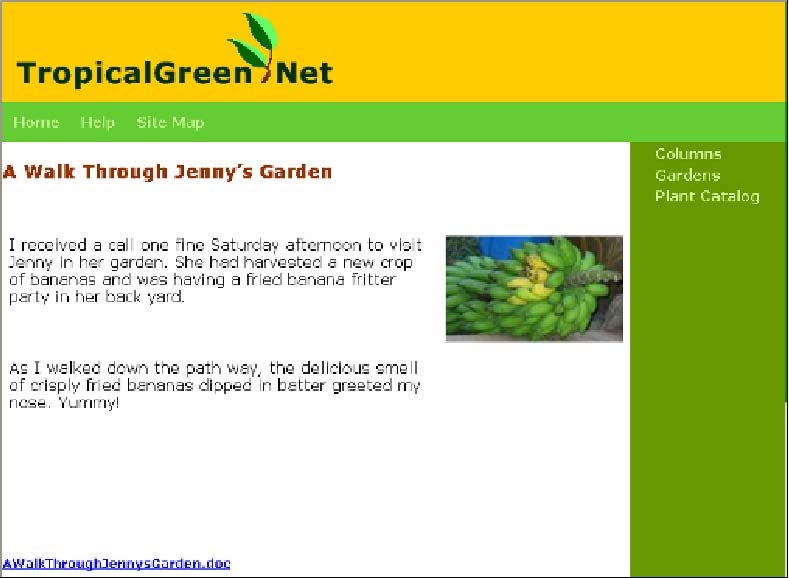
An article created for the columns section appears as shown in the following figure:
Building the Column Template
Before we can publish with Word, we need to build a template to be used by postings created using Authoring Connector. Like regular postings, a template object and template file pair will be created.
Creating the Template Object
Open the TropicalGreen solution in Visual Studio .NET.
First, create the template object. In Template Explorer, add a new template object to the Columns template gallery. Name the new template Column.
Next, in the PlaceholderDefinitions collection, add an OfficeHtmlPlaceholderDefinition and an OfficeAttachmentPlaceholderDefinition with the properties shown in the following table.
| Placeholder Type | Property Name | Property Value |
|---|---|---|
| OfficeHtmlPlaceholderDefinition | AllowHyperlinks | True |
| AllowLineBreaks | True | |
| Formatting | FullFormatting | |
| Description | Placeholder containing the story | |
| Name | Story | |
| AllowAttachments | True | |
| AllowImages | True | |
| MustUseResourceGallery | False | |
| UseGeneratedIcon | False | |
| OfficeAttachmentPlaceholderDefinition | Description | Placeholder containing the story in its original Word document format |
| Name | StorySource | |
| MustUseResourceGallery | False | |
| UseGeneratedIcon | False |
Add a TextCustomPropertyDefinition to the custom property definition collection with the following properties:
| Custom Property Type | Property Name | Property Value |
|---|---|---|
| TextCustomPropertyDefinition | Name | SourceOfInformation |
| Value | Author’s own research |
Creating the Template File
Add a new MCMS template file to the Templates folder of the TropicalGreen project. Name the new template file Columns.aspx. Immediately switch the PageLayout property to FlowLayout.
Toggle back to the MCMS Template Explorer. Set the TemplateFile property of the Column template to point to the Columns.aspx template file. Check in the template object.
In Columns.aspx, switch to HTML view. Between the <head> and </head> tags, link to the stylesheet created in Chapter 7 to the template file.
<head>
. . . code continues . . .
<LINK href="/tropicalgreen/Styles/Styles.css" type="text/css"
      rel="stylesheet">
</head>
Between the <form> and </form> tags enter the code below.
<table width="100%" border="0" cellspacing="0" cellpadding="0"
       height="100%">
<tr>
   <td width="100%" colspan="2" valign="top" bgcolor="#FFCC00">
      <IMG src="/tropicalgreen/images/Logo.gif">
   </td>
   <td rowspan="10" valign="top">
      (Space for Console)
   </td>
</tr>
<tr bgcolor="#66CC33">
   <td colspan="2">(Space for Top Menu)<td>
</tr>
<tr>
   <td valign="top">
   <br>
   (Space for HTML Placeholder Control)
   <br>
   (Space for Attachment Placeholder Control)
   <br>
   </td>
   <td class="RightMenuBar" width="20%" valign="top" height="100%"
       align="center" rowspan="2" bgcolor="#669900">
      (Space for Right Menu Bar)
   </td>
</tr>
When you have entered the HTML code, switch back to Design view. Drag and drop the following Web User Controls onto the form:
- TopMenu.ascx (built in Chapter 13) into the cell containing the words (Space for Top Menu)
- RightMenu.ascx (built in Chapter 13) into the cell containing the words (Space for Right Menu Bar)
- DefaultConsole.ascx into the cell containing the words (Space for Default Console)