


JavaScript has continued to spread into different domains than its original client side use case. Today, I’m going to show you how easy it is to use JavaScript for Internet of Things (IoT) devices. As with most things in the Node community, getting started is quick, easy, and straightforward, thanks to the hard work of the open source community.
There are plenty of JavaScript libraries out there that, along with having cool names, allow you to operate on embedded systems. The most popular of microcontroller boards on the market is Arduino. We’re going to use the Johnny-five library to control Arduino, and display information on a Web page by using a simple express server.
Shopping List
- Arduino Uno (or any Arduino)
- PIR Motion Sensor
- LED
- Various Male to Female/Male to Male wires

Figure 1: The items you need to have for this project
Basic Setup
You should have Node set up on your system already. After this, you can install the johnny-five library globally (npm instal -g johnny-five) or per project (npm install -- save johnny-five). One you’ve done this, let’s test out a simple program to make sure everything is okay. Plug your LED into you Arduino Uno. LED components have two legs. The longer leg is the positive end, and the shorter leg is the negative end. Always plug in the short negative leg into ground, labeled GND on the Arduino board. Because pin 13 is right next to the ground pin on Arduino, we’re going to utilize that for our LED.
Create a file, name it test.js, and fill in the contents with this code…
const five = require('johnny-five');
const board = new five.Board();

board.on('ready', function () {
   var led = new five.Led(13);
   led.blink(500);
});
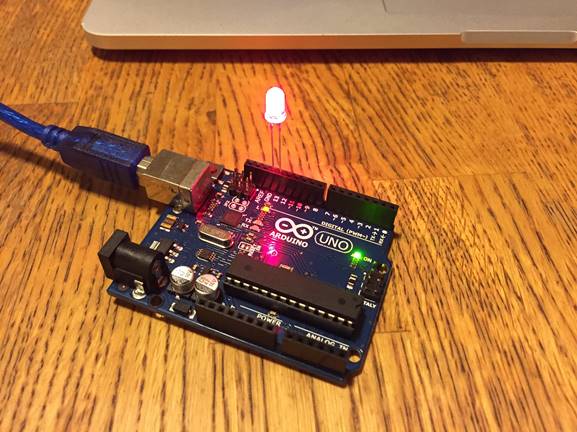
Figure 2: Observe the blinking lights
If everything went perfectly, you should see a blinking LED every half second.
Building an Express Server
We’ve accomplished blinking an LED light. Now, we’re going to build on top of that and turn on/off the LED based motion detection, and also build a simple Web UI to react to this changing state. This is a simple application, but it shows how easy it is to get started with physical systems by using JavaScript.
package.json
{
   "name": "iot",
   "version": "1.0.0",
   "description": "IoT using JavaScript",
   "main": "app.js",
   "scripts": {
      "start": "node_modules/.bin/nodemon"
   },
   "author": "Andrew Allbright",
   "license": "MIT",
   "dependencies": {
      "express": "^4.14.0",
      "johnny-five": "^0.9.60",
      "socket.io": "^1.4.8"
   },
   "devDependencies": {
      "nodemon": "^1.9.2"
   }
}
You can see, based on my package.json file, that I’ve gone ahead and installed nodemon (npm install -- save-dev nodemon) for my dev dependency and express, socket.io, and johnny-five for my application dependency (npm install -- save express socket.io johnny-five).
Now, it’s time to plug in the motion sensor. Because we already have an LED attached to pin 13, I’m going to use pin 12 for the motion sensor. There are three wires that attach to the component: 5V power, ground, and a “logic” wire. The 5V wire is sometimes labeled with VCC, as in the case with my component, and the logic pin is labeled “OUT”. If you have questions, look up the information on your component model’s data sheet.
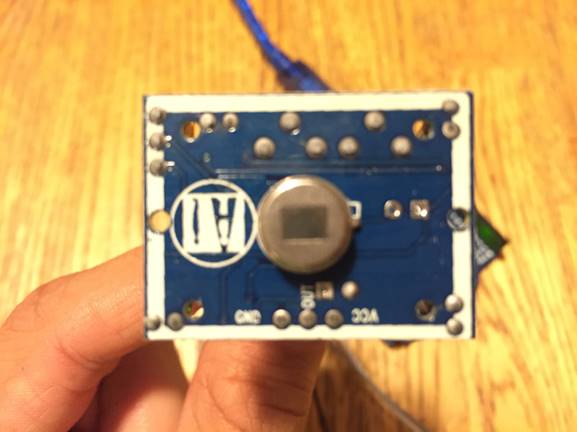
Figure 3: The motion sensor
I’ve gone ahead and attached the VCC pin to Arduino’s 5V pin, the GND pin to Arduino’s GND pin, and the OUT pin to Arduino’s 12 pin. You can connect the logic pin to another pin number on Arduino, but make sure to reflect that in the code.
Now for the express server.
app.js
const express = require('express');
const app = express();
const http = require('http').Server(app);
const io = require('socket.io')(http);
const five = require('johnny-five');
const board = new five.Board();
const EVENTS = {
   MOTION_DETECTED: 'motion detected'
};
board.on('ready', function () {
   const led = new five.Led(13)
   const motion = new five.IR.Motion(12);
   io.on('connection', (socket) => {
      motion.on('motionstart', () => {
         console.log('motionstart', Date.now());
         led.on();
         socket.emit(EVENTS.MOTION_DETECTED);
      });
      motion.on('motionend', () => {
         console.log('motionend', Date.now());
         led.off();
      });
   });
});
app.use('/public', express.static({__dirname}/public));
app.get('/', (req, res) => {
   res.redirect('/public/index.html');
});
http.listen(3000, () => {
   console.log('listening on *:3000');
});
Here’s the express server. I’ve configured the server to start up an instance of a Johnny-five board where, upon socket connect, it will pipe motion detection events to connected clients. I’ve also configured a static directory to serve content. When you connect to the root of the server (in this case, localhost:3000/`), it will redirect you to the front-end asset.
Which leads us to the front-end code…
public/index.html
<!DOCTYPE html>
<html>
   <head>
      <meta charset="utf-8">
      <title>IoT using JavaScript</title>
      <link rel="stylesheet" href="https://maxcdn.bootstrapcdn.com/
               bootstrap/4.0.0-alpha.2/css/bootstrap.min.css"
            integrity="sha384-y3tfxAZXuh4HwSYylfB+J125MxIs6mR5FOHam
               PBG064zB+AFeWH94NdvaCBm8qnd"
            crossorigin="anonymous">
   </head>
   <body>
      <div class="container">
         <h3> IoT Basic Demonstration </h3>
         <p> Once the connected board detects motion, an alert will display
             in the Web interface. </p>
         <hr />
         <div id="display" class="card card-block card-danger card-inverse">
            <h4 class="card-title">Motion has been detected!</h4>
            <p class="card-text">
               Timer resets in... <span id='timer'>0</span> milis
            </p>
         </div>
      </div>
      <script src="https://ajax.googleapis.com/ajax/libs/jquery/
                 2.1.4/jquery.min.js"></script>
      <script src="https://maxcdn.bootstrapcdn.com/bootstrap/
                 4.0.0-alpha.2/js/bootstrap.min.js"
              integrity="sha384-vZ2WRJMwsjRMW/8U7i6PWi6AlO1L79sn
                 BrmgiDpgIWJ82z8eA5lenwvxbMV1PAh7"
              crossorigin="anonymous"></script>
      <script src="/socket.io/socket.io.js"></script>
      <script src="/public/js/index.js"></script>
   </body>
</html>
public/js/index.js
(function () {
   var TIMER_UPDATE = 10;
   var TIMEOUT = 2750;
   var state = {
      accumulator: 0,
      interval: undefined
   };
   $(function () {
      var socket = io();
      var $display = $('#display');
      var $timer = $('#timer');
      var reset = function () {
         state.interval = clearInterval(state.interval);
         state.accumulator = 0;
         $timer.text('0');
         $display.hide();
      };
      var intervalUpdate = function () {
         state.accumulator += TIMER_UPDATE;
         if (state.accumulator > TIMEOUT) {
            reset();
         } else {
            $timer.text(TIMEOUT - state.accumulator);
         }
      };
      reset();
      socket.on('motion detected', function () {
         $display.show();
         state.interval = setInterval(intervalUpdate, TIMER_UPDATE);
      });
});
Both public/index.html and public/js/index.js make up the client code. A socket connect to the express server is established and, whenever the server emits that the Arduino’s motion sensor has been triggered, it displays an alert-styled card. This card is then dismissed after a couple seconds. I’m using bootstrap and jQuery for the simple interface, but you can get fancier.
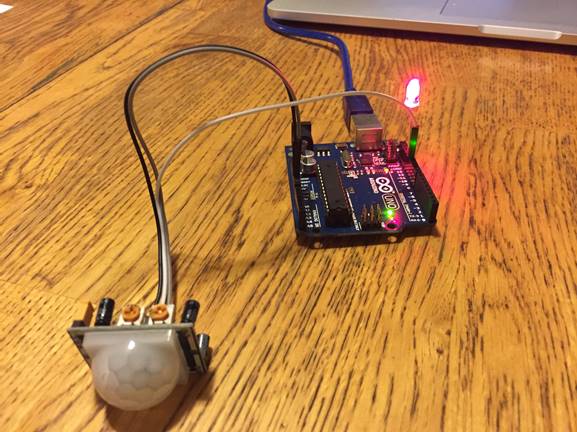
Figure 4: The completed project
Next Steps
I’ve shown you how to create a simple IoT device and how to have that device communicate to a Web service. It is limited in some ways, though. First, it must be connected to the computer serving the host, which for me is my Macbook. If you want a more portable solution, you may explore utilizing a Raspberry Pi to serve the Web server code and “talk” to Arduino. Once you’ve miniaturized the project in this way, you then may want to assign a static IP to your Raspberry PI, host the site on port 80, and connect the PI to the Internet so you can view your simple site from outside your home network.
The possibilities are limited only by your budget and imagination.