


Have you ever wondered if your front-end application works like you think it does? Naturally, yes, because while you developed your incredible new feature, you manually tested all the happy and the sad user stories. But, how can you be sure, exactly? What if you haven’t touched that code directly in a week? That’s what we’re here to discuss today. Testing your UI code is very important to a professional software engineer because it solves a critical issue when creating user interfaces: certainty.
Testing means you can be reasonably sure that new stuff you work on around the system doesn’t break old work. When refactoring older code in the system, tests allow you to redo without fear of breaking edge cases. If you are diligent in creating tests, you will be in a good position to set up a continuous integration, continuous deployment pipeline. As icing on the cake, it’s quite a blast to see a suite of tests go green and pass.
To prepare you to reap all these benefits, I will be discussing linting your code by using ESLint library, then stepping it up with unit and functional tests using a library called Intern in this article. Let’s get to it!
Linting with ESLint
Linting your code is your first line of defense for preventing code rot. The benefit linters have on your source code is that it provides a standard that all files in a project are held against, meaning your code should look very similar across all files. It ensures that, when you revisit your code in the future, you don’t bring in a different new style. Add all of the benefits up and you should be able to look at any file and more easily parse out the important differences in files rather than variable declarations, or two or four spaces.
The big names in the linting space for JavaScript applications are JSLint and ESLint. JSLint is a standard that doesn’t encourage much customization in rules whereas ESLint is more of a “build your own linter” tool. ESLint comes with a CLI so you can inherit rules from popular frameworks or answer questions to generate a rules file.
Install ESLint though npm by running the following command: npm i --save-dev eslint. Next, you’ll want to run eslint --init (or node_modules/.bin/eslint --init) to start a questionnaire to generate rules for your project (it’s simple and pain free!). The rules I want to initialize for this project are to get standard ESLint rules and be able to get rules for react apps. You can see my .eslintrc.json file below:
{
   "env": {
      "browser": true,
      "commonjs": true,
      "es6": true
   },
   "extends": "eslint:recommended",
   "parserOptions": {
      "ecmaFeatures": {
         "experimentalObjectRestSpread": true,
         "jsx": true
      },
      "sourceType": "module"
   },
   "plugins": [
      "react"
   ],
   "rules": {
      "indent": [
         "error",
         2
      ],
      "linebreak-style": [
         "error",
         "unix"
      ],
      "quotes": [
         "error",
         "single"
      ],
      "semi": [
         "error",
         "always"
      ],
      "curly": [2, "multi-line"],
      "no-shadow": 0,
      "no-underscore-dangle": 0,
      "no-unused-expressions": 0,
      "quotes": [2, "single", "avoid-escape"],
      "react/jsx-uses-react": 1,
      "react/jsx-uses-vars": 1,
      "react/react-in-jsx-scope": 1,
      "semi": 2,
      "strict": 0
   }
}
Once you have a lint file generated, many popular editors can already detect the file and provide warnings in your editor for you. This allows seamless development that makes it easy to follow the rules you’ve set out for yourself.
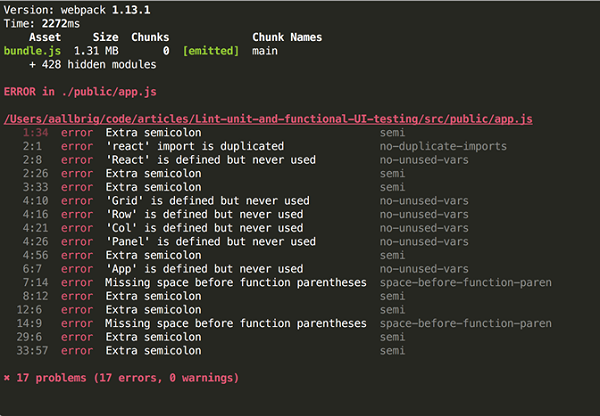
Figure 1: Warnings were detected
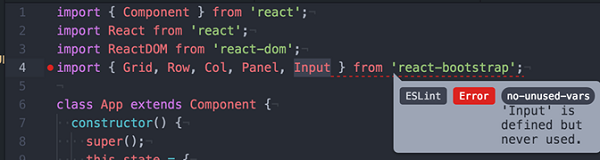
Figure 2: The error is explained
If linting is the first line of defense against code rot, units test are a step up. However, we should take a moment to talk about the framework we’ll be using to write our functional and unit tests.
The Intern—Complete Test Suite
The Intern is a project started to provide a single framework for Web application testing needs. It can run low-fidelity unit tests, high-fidelity functional tests where it interacts with UI, take screenshots during tests, upload test results to console, documentation, or HTML page, and much more. It has a few different styles: You can write tests, such as in “Behavior Driven Development” style (“BDD”, using phrases like “describe,” “it,” and “should”), the “Test Driven Development” style (“TDD,” using phrases like “suite” and “test”) or an object notation. Although it ships with a few assertion libraries, you can bring in your own, like Mocha and Chai. Due to its extensive features, it’s a great framework when you’re just getting into testing. It’s the framework that we’re going to be using.
Install Intern by running npm i --save-dev intern. I typically see tests sectioned off in a “tests” directory, so we should make this now: mkdir tests. The Intern has a single entry point configuration file, so before you can use Intern you must generate this file: touch tests/intern.js. Leave this empty because we’ll add more values when we describe writing unit and functional tests. With this setup out of the way, we’re ready to learn about, then write, unit tests!
Unit Testing with Intern
Unit tests are small tests that allow you to check function input and outputs for expected values. Files are typically made up of functions and each function should be covered by a unit test. This is what is referred to as “code coverage.” The neat thing about the Intern is that when you run unit tests it will also display information on your project’s code coverage as a percent.
Let’s start off by creating a unit test directory: mkdir tests/unit. For an example app, I’ve created a login form that has special business logic around what a valid email and a valid password should look like. We’re going to write tests for this file. Given this source code…
define(function (require) {
   const checkLength = (length) => (fn) => fn(length);
   => (value) => length < value.length);
   => (value) => length > value.length);
   const emailRegex = /^(([^<>()\[\]\\.,;:\s@"]+(\.[^<>()\[\]\\.,;:\s@"]+)*)
      |(".+"))@((\[[0-9]{1,3}\.[0-9]{1,3}\.[0-9]{1,3}\.[0-9]{1,3}])
      |(([a-zA-Z\-0-9]+\.)+[a-zA-Z]{2,}))$/;
   const checkValidEmail = (value) => emailRegex.test(value);
   return {
      email: (email) => new Promise((resolve, reject) => {
         if (!checkValidEmail(email)) {
            reject(new Error('Not a valid email'));
         } else {
            resolve(true);
         }
      }),
      password: (value) => new Promise((resolve, reject) => {
         if (!checkMinLength(value)) {
            reject(new Error('Password length too short'));
         } else if (!checkMaxLength(value)) {
            reject(new Error('Password length too long'));
         } else {
            resolve(true);
         }
      })
   };
});
…located in the common/validation.js file, we’re going to test what this module exposes. Create a unit test file for this in the newly created unit directory: touch tests/unit/validation.js. Let’s quickly set up plumbing so we can run this new unit test by adding the following code into the Intern configuration file located at tests/intern.js:
define({
   suites: [
      'tests/unit/validation'
   ],
   excludeInstrumentation: /^(?:tests|node_modules)\//
});
You now can run node_modules/.bin/intern-client config=tests/intern from the root of your project and see that 0/0 tests pass. Let’s fill in some unit tests using Intern’s object notation…
'''
define((require) => {
   const registerSuite = require('intern!object');
   const assert = require('intern/chai!assert');
   require('../../common/validation');
   registerSuite({
      name: 'validation tests',
      checkTestSuite: function () {
         assert.strictEqual(true, true);
      }
   });
});
I typically like to check plumbing by writing a passing test when I get started in a new test file. I’ve done so here where I ‘assert.strictEqual(true, true)’. But, to run this test, I must first successfully bring in the validation file, meaning that if that test runs and passes, I must have access to the file I want to check. Rerunning ‘node_modules/.bin/intern-client config=tests/intern’ indeed shows this is true! Let’s now replace the ‘checkTestSuite’ with two unit tests for the validation file…
emailValidation: function () {
   const invalidEmail = validation.email('abcdefg');
   const validEmail = validation.email('email@email.com');
   invalidEmail.then(() => {}, (error) => {
      assert.strictEqual(error.toString(),
         'Error: Not a valid email');
   });
   validEmail.then((response) => {
      assert.strictEqual(true, response);
   });
},
passwordValidation: function () {
   const passwordEmptyString = validation.password('');
   const passwordTooShort = validation.password('1234');
   const passwordTooLong = validation.password
      ('1234567890123456789012345678901234567890');
   const passwordJustRight = validation.password('1234567890');
   passwordEmptyString.then(() => {}, (error) => {
      assert.strictEqual(error.toString(),
         'Error: Password length too short');
   });
   passwordTooShort.then(() => {}, (error) => {
      assert.strictEqual(error.toString(),
         'Error: Password length too short');
   });
   passwordTooLong.then(() => {}, (error) => {
      assert.strictEqual(error.toString(),
         'Error: Password length too long');
   });
   passwordJustRight.then((response) => {
      assert.strictEqual(true, response);
    });
}
''
Once this is filled in to the object body, you can rerun the tests and see that I now have 100% code coverage for the validation.js' file!
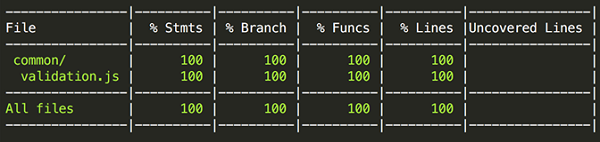
Figure 3: The code coverage is complete
Let’s create some functional tests.
Functional Testing with Intern
The Intern uses selenium to interact with the browser, allowing for programmatic testing of the UI. This allows you to create UI tests for “happy paths,” where users do what you expect them to do with your Web app, but also the “sad paths,” where they do unexpected things. The Intern also can take screnshots of the UI at different stages of theses tests, but this is functionality that I will not explore. Functional tests in the context of the UI are tests that are high fidelity interactions with the UI; think “click here,” “fill this in,” and “scroll down” type interactions. Instead of testing individual functions, you test pages and perhaps even page transitions (like a shopping cart flow, for example).
Instead of using intern-client to run functional tests, we must use intern-runner to do so.
Creating functional tests in intern requires that you once again visit the Intern configuration file and modify it to look like so…
define({
   capabilities: {
      'browserstack.selenium_version': '2.45.0'
   },
   environments: [
      { browserName: 'firefox', version: '37', platform: 'MAC' },
      { browserName: 'chrome', version: '39', platform: 'MAC' },
      { browserName: 'safari', version: '8', platform: 'MAC' }
   ],
   maxConcurrency: 3,
   tunnel: 'NullTunnel',
   suites: [
      'tests/unit/validation'
   ],
   functionalSuites: [
      'tests/functional/index'
   ],
   excludeInstrumentation: /^(?:tests|node_modules)\//
});
We’ve added some information relating to which browsers to test, how many to test at once, selenium information, and finally we’ve added a function test suite named tests/functional/index. Let’s go ahead and create both the directory and the file by running this command: mkdir tests/functional && touch tests/functional/index.js.
I’ve created a basic express application with webpack to bundle and render a react application to render the login form. I’ll spare you the details of the source for this, but I’m assuming you have a login form at the localhost:3000/ route, then your functional test might look something like so…
define(function (require) {
   var assert = require('intern/chai!assert');
   var bdd = require('intern!bdd');
   bdd.describe('login form', function () {
      bdd.it('should display an error when you type
            in an invalid email', () => {
         return this.remote
         .get(require.toUrl('http://127.0.0.1:3000/'))
         .setFindTimeout(5000)
         .findByCssSelector('input[type=email]'
         .click()
         .type('abcdefg')
         .end()
         .findByCssSelector('button[type=submit]')
         .click()
         .end()
         .findByClassName('alert-danger')
         .getVisibleText()
         .then(function (text) {
            assert.strictEqual(text, 'Error: Not a valid email');
         });
      });
      bdd.it('should display an error when you type in a valid
            email but a password that\'s too short', () => {
         return this.remote
         .get(require.toUrl('http://127.0.0.1:3000/'))
         .setFindTimeout(5000)
         .findByCssSelector('input[type=email]')
         .click()
         .type('email@email.com')
         .end()
         .findByCssSelector('input[type=password]')
         .click()
         .type('1234')
         .end()
         .findByCssSelector('button[type=submit]')
         .click()
         .end()
         .findByClassName('alert-danger')
         .getVisibleText()
         .then(function (text) {
            assert.strictEqual(text,
               'Error: Password length too short');
         });
      });
      bdd.it('should display an error when you type in a valid
            email but a password that\'s too long', () => {
         return this.remote
         .get(require.toUrl('http://127.0.0.1:3000/'))
         .setFindTimeout(5000)
         .findByCssSelector('input[type=email]')
         .click()
         .type('email@email.com')
         .end()
         .findByCssSelector('input[type=password]')
         .click()
         .type('1234567890123456789012345678901234567890
                1234567890')
         .end()
         .findByCssSelector('button[type=submit]')
         .click()
         .end()
         .findByClassName('alert-danger')
         .getVisibleText()
         .then(function (text) {
            assert.strictEqual(text,
               'Error: Password length too long');
         });
      });
   });
});
As you can see, the functional tests read like a manifest for a quality assurance engineer to run though. Now, to run these tests using the aforementioned intern-runner: node_modules/.bin/intern-runner config=tests/intern.
You should see browsers opening, closing, and re-opening while what’s displayed on screen are rapid interactions with the pages. At the end of this, you will see a functional test report that should describe passing and failing tests.
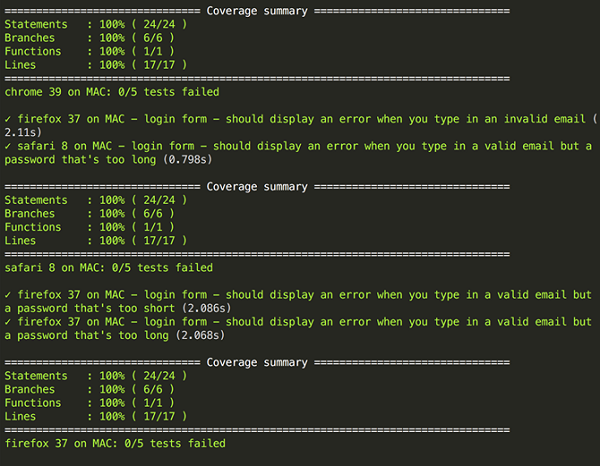
Figure 4: The functional test report
Pat yourself on the back. You’ve just successfully run and passed both functional and unit tests!
Conclusions
Combining a linter, unit tests, and functional tests will allow you to focus on what’s important: consistent, high quality code. There are so many advantages to testing your code that you should get into a habit of doing so. If you have extremely high code coverage and functional tests that run through a majority of happy and sad paths for your Web app in an automated fashion, you’ve eliminated a great deal of tedium from your development lifecycle. By getting into a habit of creating tests, you are in the best position to take advantage of continuous integration tools, and ultimately continuous deployment. There are many more frameworks out there and much more capabilities that I haven’t explored here that the Intern provides. I’d encourage you to do more investigation yourself!