


Introduction
The data entered by the end user in various form fields must be validated before it is saved in the database. Developers often use validation HTML helpers provided by ASP.NET MVC to perform the input validations. Additionally, you can also use data annotation attributes from the System.ComponentModel.DataAnnotations namespace to perform validations at the model level. Data annotation attributes are attached to the properties of the model class and enforce some validation criteria. They are capable of performing validation on the server side as well as on the client side. This article discusses the basics of using these attributes in an ASP.NET MVC application.
Overview of Data Annotation Attributes
Data annotation attributes are a set of attributes residing in the System.ComponentModel.DataAnnotations namespace that allow you to validate property values of a model class. Once added they can perform validations on the server side as well as on the client side. The important data annotation attributes used for data validation are as follows:
- Required : Ensures that a property has been assigned some value.
- Range : Ensures that a property value falls within a minimum and maximum value.
- StringLength : Can be used to check the length of a string property. You can either specify maximum permissible length or maximum and minimum permissible length.
- EmailAddress : Validates that an email address with a valid email format has been supplied as a property value.
- Url : Validates that a valid URL has been supplied as a property value.
- RegularExpression : Uses a regular expression to ensure that a property value matches the specified pattern.
All of the above attributes also allow you to specify an error message that is displayed in the event of an error. If an error message is not specified, a default error message is displayed.
Now that you have some idea about data annotation attributes, let’s develop a simple ASP.NET MVC application that makes use of these attributes for data validation.
Creating a Model Class
Begin by creating a new ASP.NET MVC project and select the Empty project template. Then add a new SQL Server database named UserDb to the App_Data folder and create a table – UserProfile. The UserProfile table has columns as shown in the following figure:
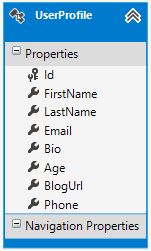
The UserProfile table
As you can see from the above model class, the UserProfile table consists of eight columns, viz. Id, FirstName, LastName, Email, Bio, Age, BlogUrl and Phone. Once you create the UserProfile table make sure to add an ADO.NET Entity Data Model to the project so that you get the UserProfile entity class as shown above. In this example, you will validate all of the columns except Id, using various data annotation attributes.
Creating Metadata Class
If your model class is a plain .NET class (POCO) then you can directly decorate its properties with data annotation attributes. However, in this case our model class is an Entity Framework class. Since the data model class is automatically created for you by the Visual Studio designer it is not recommended to modify the same class file. The recommended approach is to create a metadata class and decorate its properties with data annotation attributes. Let’s see how.
Add a new class in the Models folder and name it UserProfileMetadata. Write the following code in the UserProfileMetadata class.
using System;
using System.Collections.Generic;
using System.Linq;
using System.Web;
using System.ComponentModel.DataAnnotations;
using System.ComponentModel;

namespace DataAnnotationDemo.Models
{
    public class UserProfileMetadata
    {
        [DisplayName("First Name :")]
        [Required]
        [StringLength(50,MinimumLength=3,ErrorMessage="First Name must be between 3 and 50 characters!")]
        public string FirstName { get; set; }

        [DisplayName("Last Name :")]
        [Required]
        [StringLength(50, MinimumLength = 3, ErrorMessage = "Last Name must be between 3 and 50 characters!")]
        public string LastName { get; set; }

        [DisplayName("Email :")]
        [Required]
        [EmailAddress(ErrorMessage="Invalid Email")]
        public string Email { get; set; }

        [DisplayName("Profile :")]
        [StringLength(500, ErrorMessage = "Bio must be less than 500 characters!")]
        public string Bio { get; set; }

        [DisplayName("Age :")]
        [Required]
        [Range(18,100)]
        public int Age { get; set; }

        [DisplayName("Blog URL :")]
        [Required]
        [Url(ErrorMessage = "Invalid URL!")]
        public string BlogUrl { get; set; }

        [DisplayName("Phone :")]
        [Required]
        [RegularExpression(@"((\(\d{3}\) ?)|(\d{3}-))?\d{3}-\d{4}",ErrorMessage="Invalid Phone Number!")]
        public string Phone { get; set; }

    }
}
The UserProfileMetadata class contains property definitions for FirstName, LastName, Email, Bio, Age, BlogUrl and Phone. Notice the attributes that are used to decorate these properties. The [DisplayName] attribute is used to specify a friendly name for the property under consideration. This friendly name is used by HTML helpers such as Html.LabelFor() to display the field name on a view. If you don’t use the [DisplayName] attribute a property name will be used for display purpose. The [Required] attribute indicates that a property value must be provided. The [StringLength] attribute is used to specify the maximum length and optionally the minimum length for a property value. For example, the [StringLength] attribute used on the FirstName property specifies the maximum length for FirstName to be 50 and MinimumLength to be 3. The ErrorMessage property of the data annotation attribute indicates an error message that will be displayed in case there is any validation error. If you don’t specify any ErrorMessage, a default error message is displayed.
The [EmailAddress] attribute validates a property for a valid email address. The [Range] attribute checks whether a property value falls between a minimum and a maximum value. In the above example, the [Range] attribute checks whether the Age is between 18 and 100. The [Url] attribute checks whether a property value is a valid URL. Finally, the [RegularExpression] attribute checks whether a property value matches a pattern as specified by a regular expression. In this example you validate the Phone property with a regular expression for US phone numbers.
At this stage, the UserProfileMetadata class is just an independent class in your project. It is not yet linked with the UserProfile model class. To attach the metadata defined in the UserProfileMetadata class to the UserProfile class you need to add a partial class to the project and then use the [MetadataType] attribute as shown below:
[MetadataType(typeof(UserProfileMetadata))]
public partial class UserProfile
{
}
As you can see the UserProfile class is a partial class and has [MetadataType] attribute on top of it. The [MetadataType] attribute accepts the type of the class that is supplying metadata information to the UserProfile class (UserProfileMetadata in this case).
Adding a Controller and Views
Now, add a new controller in the Controllers folder and name it HomeController. Add the following code to the HomeController class.
namespace DataAnnotationDemo.Controllers
{
    public class HomeController : Controller
    {
        public ActionResult Index()
        {
            return View();
        }

        [HttpPost]
        public ActionResult Index(UserProfile profile)
        {
            if (ModelState.IsValid)
            {
                UserDbEntities db = new UserDbEntities();
                db.UserProfiles.Add(profile);
                db.SaveChanges();
                return View("Success");
            }
            else
            {
                return View(profile);
            }
        }
    }
}
The HomeController class contains two versions of the Index() action method. The first version is used when you make a GET request and the other is used when the form is submitted by the end user. The second Index() method accepts UserProfile as a parameter. Inside, it checks whether all the properties of the model class (UserProfile) contain valid values. This checking is done using the ModelState.IsValid property. The IsValid property returns false if any of the properties contain invalid values. If so, Index view is rendered by passing the profile object as the model data. If IsValid returns true, the data is added to the UserProfile table and a success view is rendered.
The following figure shows how the Index view looks like. It also shows validation error messages displayed for various invalid values.
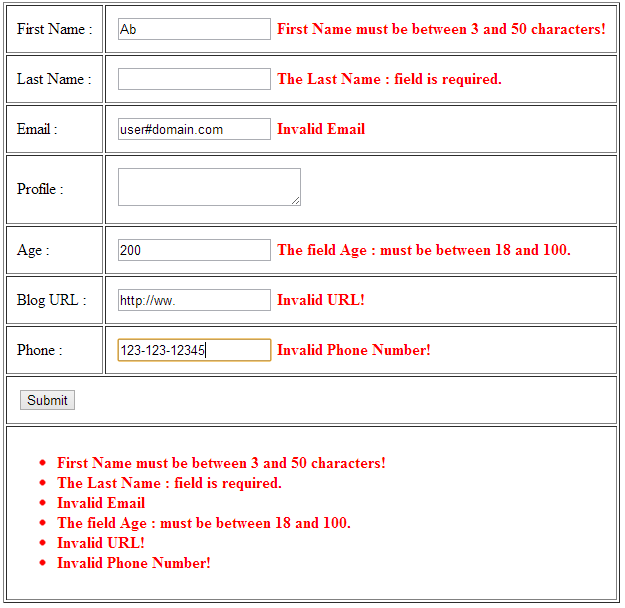
The Index View
A part of the HTML markup of the Index view is as follows:
    <% using(Html.BeginForm("Index","Home",FormMethod.Post)){ %>

    <table cellpadding="10" border="1">
        <tr>
            <td>
                <%= Html.LabelFor(m=>m.FirstName) %>
            </td>
            <td>
                <%= Html.TextBoxFor(m=>m.FirstName) %>
                <%= Html.ValidationMessageFor(m=>m.FirstName) %>
            </td>
        </tr>
        ...
        ...
        ...
        <tr>
            <td colspan="2">
                <%= Html.ValidationSummary() %>
            </td>
        </tr>
    </table>
    <%}%>
As you can see the Index view makes use of HTML helpers such as LabelFor(), TextBoxFor() and ValidationMessageFor(). At the end of the form there is also a validation summary.
Add a CSS file to the project and create two CSS classes as shown below:
.field-validation-error {
    font-weight:bold;
    color:red;
}

.validation-summary-errors {
    font-weight:bold;
    color:red;
}
The ValidationMessageFor() and ValidationSummary() helpers use these classes by default while rendering the validation error messages.
Now, run the project and test various validation rules.
Adding Client Validation Capabilities
You will find that currently the validations are performed on the server side. That means, when you submit a form containing validation errors, the control goes to the server only to return with error messages. To avoid this round trip you can add client side capabilities to the Index view. To do so, add the following markup in the <head> section of the Index view.
<head runat="server">
    <meta name="viewport" content="width=device-width" />
    <title>Index</title>
    <link href="../../StyleSheet.css" rel="stylesheet" />
    <script src='<%= Url.Content("~/scripts/jquery-1.7.1.js") %>'></script>
    <script src='<%= Url.Content("~/scripts/jquery.validate.js") %>'></script>
    <script src='<%= Url.Content("~/scripts/jquery.validate.unobtrusive.js") %>'></script>
</head>
The above markup uses the Url.Content() helper to get URLs of three script files, viz. jquery-1.7.1.js, jquery.validate.js and jquery.validate.unobtrusive.js. These files are required for performing client side validation. Now, open web.config and ensure that the following keys exist in the <appSettings> section:
<appSettings>
    ...
    <add key="ClientValidationEnabled" value="true" />
    <add key="UnobtrusiveJavaScriptEnabled" value="true" />
</appSettings>
The ClientValidationEnabled and UnobtrusiveJavaScriptEnabled keys are set to true.
Run the project again. This time validations will happen on the client side without any server round trip.
Summary
Data annotation attributes from System.ComponentModel.DataAnnotations namespace contain a set of attributes that can be used to validate model data in ASP.NET MVC applications. Attributes such as [Required], [StringLength], [Range], [EmailAddress], [Url] and [RegularExpression] cover common validation scenarios. To use these attributes with Entity Framework data model you need to create a metadata class. The metadata class is then attached with the entity class using the [MetadataType] attribute. Data annotation attributes can perform validations on the client side as well as on the server side.