RESTful services are quite common and popular these days. If you ever developed modern service-based applications using ASP.NET Web Forms and ASP.NET MVC, chances are you used a Web API to create REST services. No wonder ASP.NET Core also allows you to create a Web API. This article discusses how a Web API service can be created in ASP.NET Core. It then shows how the created service can be invoked from JavaScript code.
Creating the Employee service
Let’s create a Web API service that performs CRUD (Create, Read, Update, and Delete) operations on the Employees table of the Northwind database.
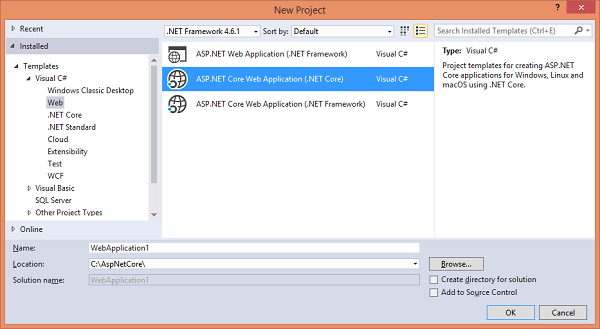
To begin, create a new ASP.NET Core Web application using Visual Studio 2017 (see Figure 1).
Figure 1: Creating a new ASP.NET Core Web application
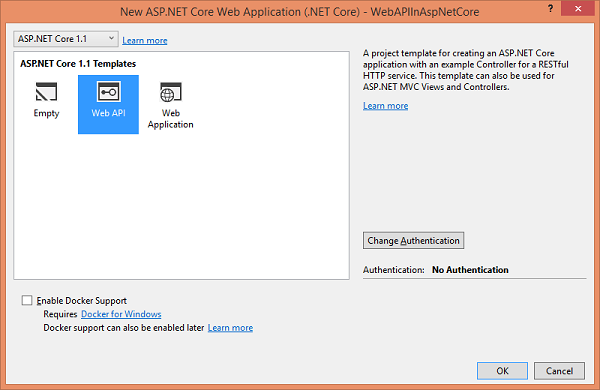
Pick Web API as the project template in the next dialog, shown in Figure 2.
Figure 2: Choosing the project template
This way, you will get the default configuration and Web API controller that you can modify to suit your needs.
When you create the project, open ValuesController.cs from the Controllers folder. You should see something like this:
namespace WebAPIInAspNetCore.Controllers
{
   [Route("api/[controller]")]
   public class ValuesController : Controller
   {
      [HttpGet]
      public IEnumerable<string> Get()
      {
         return new string[] { "value1", "value2" };
      }

      [HttpGet("{id}")]
      public string Get(int id)
      {
         return "value";
      }
      ....
      ....
}
Notice that the ValuesController class inherits from the Controller base class. This is different as compared to ASP.NET. In ASP.NET, the Web API controller inherits from the ApiController base class. In ASP.NET Core, the Web API has been merged with MVC; therefore, both the controllers—the MVC controller as well as the Web API controllers—inherit from the Controller base class.
Because Web API is now just another controller, you can have as many actions you want. Of course, to create a REST style service, you still need to have those standard Get(), Post(), Put(), and Delete() actions as before. You can define the HTTP verb and action mapping on top of an action by using attributes such as [HttpGet], [HttpPost], [HttpPut], and [HttpDelete]. This is different than before, where HTTP verbs were automatically mapped with the actions by default. The ValuesController class also has a [Route] attribute that decides how the service will be accessed. By default, the service URL takes the form /api/values, but you can change the route as needed.
Okay. Rename the ValuesController (both the class and the .cs files) to EmployeeController and save the file. You will revisit EmployeeController after creating the Entity Framework Core model required by the application.
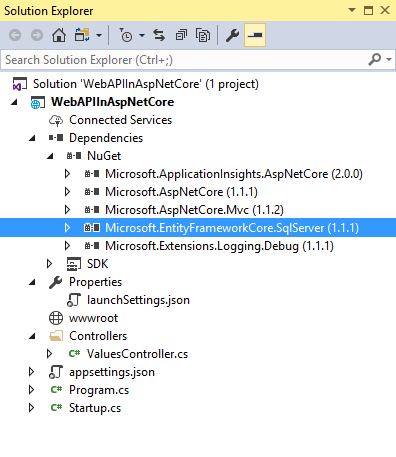
Next, you need to add Entity Framework Core to your project. To do so, right-click the Dependencies folder in the Solution Explorer, and select the Manage NuGet Packages option. Then, add the EntityFrameworkCore.SqlServer NuGet package. After doing this step, you should see the required packages added to your project (see Figure 3).
Figure 3: Adding the EntityFrameworkCore.SqlServer NuGet package
Then, open the Startup class and add EF Core to the services collection. The following code shows how this is done:
public void ConfigureServices(IServiceCollection services)
{
   // Add framework services.
   services.AddMvc();
   services.AddEntityFrameworkSqlServer();
}
ConfigureServices() calls AddEntityFrameworkSqlServer() to add EF Core to the list of services. Although we are not configuring the DbContext here for DI, you could have done so if needed. For the sake of simplicity, we will specify the connection string in the DbContext class itself.
Also, modify the Configure() method to set up the default MVC route as shown below:
public void Configure(IApplicationBuilder app,
   IHostingEnvironment env, ILoggerFactory loggerFactory)
{
   loggerFactory.AddConsole(Configuration.GetSection
      ("Logging"));
   loggerFactory.AddDebug();
   app.UseMvcWithDefaultRoute();
}
Here, we call the UseMvcWithDefaultRoute() method to configure the default route (/controller/action/id) for MVC requests. We do this because later we will develop a JavaScript client that invokes the Web API. And, we will need an MVC controller.
Now, you can create the EF Core model needed by the application. To do so, add a Models folder (you could have placed these classes in some other folder, also) and add two classes to it—Employee and NorthwindDbContext. The following code shows what Employee class looks like.
using System;
using System.Collections.Generic;
using System.Linq;
using System.Threading.Tasks;

using System.ComponentModel.DataAnnotations;
using System.ComponentModel.DataAnnotations.Schema;

namespace WebAPIInAspNetCore.Models
{
   [Table("Employees")]
   public class Employee
   {
      [DatabaseGenerated(DatabaseGeneratedOption
         .Identity)]
      [Required]
      public int EmployeeID { get; set; }
      [Required]
      public string FirstName { get; set; }
      [Required]
      public string LastName { get; set; }
      [Required]
      public string City { get; set; }
   }
}
The Employee class is mapped to the Employees table using the [Table] data annotation attribute. It has four properties: EmployeeID, FirstName, LastName, and City. The EmployeeID property also is marked using the [DatabaseGenerated] attribute because it’s an identity column.
The NorthwindDbContext class is shown next.
using System;
using System.Collections.Generic;
using System.Linq;
using System.Threading.Tasks;

using Microsoft.EntityFrameworkCore;


namespace WebAPIInAspNetCore.Models
{
   public class NorthwindDbContext : DbContext
   {
      public DbSet<Employee> Employees { get; set; }

      protected override void OnConfiguring
      (DbContextOptionsBuilder optionsBuilder)
      {
         optionsBuilder.UseSqlServer("data
            source=.;initial catalog =
            northwind;integrated security = true");
      }
   }
}
The NorthwindDbContext class inherits from the DbContext class. It defines Employees DbSet. The connection string to the Northwind database is specified by using the OnConfiguring() method. Make sure to change the database connection string as per your setup.
Okay. So far, so good. Now, open the EmployeeController and write the following code in it.
using System;
using System.Collections.Generic;
using System.Linq;
using System.Threading.Tasks;
using Microsoft.AspNetCore.Mvc;

using WebAPIInAspNetCore.Models;
using Microsoft.EntityFrameworkCore;

namespace WebAPIInAspNetCore.Controllers
{
   [Route("api/[controller]")]
   public class EmployeeController : Controller
   {

      [HttpGet]
      public List<Employee> Get()
      {
         using (NorthwindDbContext db = new
            NorthwindDbContext())
         {
            return db.Employees.ToList();
         }
      }

      [HttpGet("{id}")]
      public Employee Get(int id)
      {
         using (NorthwindDbContext db = new
            NorthwindDbContext())
         {
            return db.Employees.Find(id);
         }
      }

      [HttpPost]
      public IActionResult Post([FromBody]Employee obj)
      {
         using (NorthwindDbContext db = new NorthwindDbContext())
         {
            db.Employees.Add(obj);
            db.SaveChanges();
            return new ObjectResult("Employee added successfully!");
         }
      }

      [HttpPut("{id}")]
      public IActionResult Put(int id, [FromBody]Employee obj)
      {
         using (NorthwindDbContext db = new NorthwindDbContext())
        {
            db.Entry<Employee>(obj).State = EntityState.Modified;
            db.SaveChanges();
            return new ObjectResult("Employee modified successfully!");
         }
      }

      [HttpDelete("{id}")]
      public IActionResult Delete(int id)
      {
         using (NorthwindDbContext db = new NorthwindDbContext())
         {

            db.Employees.Remove(db.Employees.Find(id));
            db.SaveChanges();
            return new ObjectResult("Employee deleted successfully!");
         }
      }
   }
}
The EmployeeController consists of five actions: Get(), Get(id), Post(), Put(), and Delete(). These actions are discussed next.
The Get() action returns a List of Employee objects. Inside, the code instantiates the NorthwindDbContext and returns all the entities from the Employees DbSet. The Get(id) action accepts an EmployeeID and returns just that Employee as its return value.
The Post() action receives an Employee object as its parameter. This is the new employee to be added to the database. Inside, it adds the Employee to the Employees DbSet by using the Add() method. The SaveChanges() method is called to save the changes to the database. Notice that the obj parameter is decorated with the [FormBody] attribute. This is necessary for model binding with JSON data to work as expected. The Post() returns a success message wrapped in ObjectResult to the caller.
The Put() method accepts two parameters: EmployeeID and Employee object. Inside, the State property is set to EmployeeState.Modified. This way, the entity is marked as modified. The SaveChanges() method attempts to save the changes to the database. The Put() method also returns a success message as before.
The Delete() action accepts an EmployeeID to be deleted. It then looks for that Employee in the Employees DbSet. This is done by using the Find() method. The existing Employee returned by Find() is removed from the DbSet by using the Remove() method. The SaveChanges() action is called to save the changes to the database. A success message is then returned to the caller.
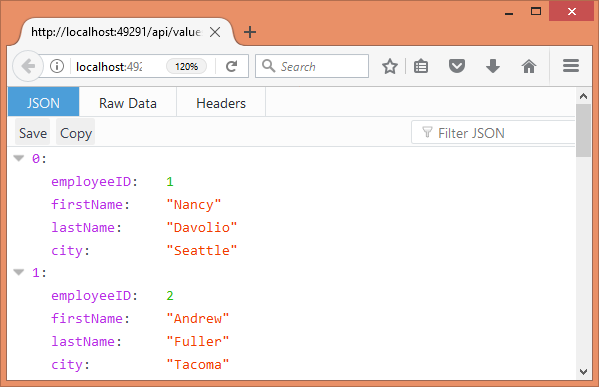
Now, run the application by pressing F5. If all goes well, you should see the JSON data returned from the Get() action. Figure 4 shows how the JSON data is displayed in Firefox.
Figure 4: JSON data has been returned from the Get() action
Creating a Client by Using jQuery Ajax
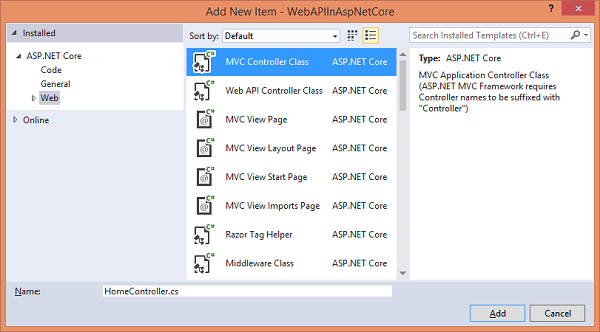
Now that your Employee service is ready, let’s consume it by building a jQuery client. Right-click the Controllers folder and select Add > New Item from the shortcut menu. Using the Add New Item dialog, add an MVC controller—HomeController (see Figure 5).
Figure 5: Building a jQuery client
The controller contains the Index() action. We don’t need to add any code to Index() because all our code will be in the Index view. Index() simply returns the view.
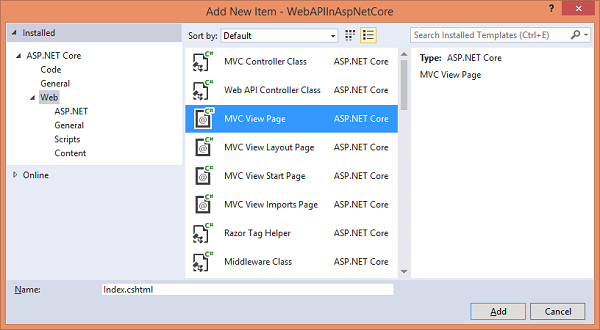
Then, add a subfolder under Views and name it Home. Next, add an Index viewer to the the Views > Home folder. This can be done by using the Add New Item dialog as before (see Figure 6).
Figure 6: Adding an Index viewer to the the Views > Home folder
Then, add Scripts folder under wwwroot folder and place the jQuery library there. If you want, you also can reference jQuery from CDN.
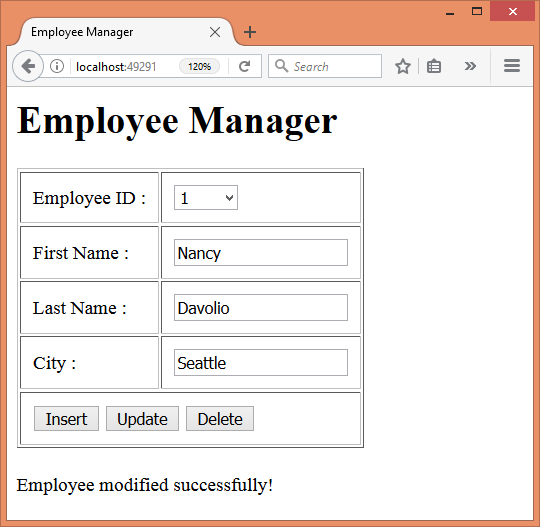
Now, you need to design a form that looks like what you see in Figure 7:
Figure 7: Designing the form
The preceding Web page consists of a form that allows you to add, modify, and remove employees. When the page loads in the browser, the EmployeeID dropdownlist displays a list of existing EmployeeIDs. Upon selecting an EmployeeID, details of that Employee are fetched from the database and displayed in the first name, last name, and city textboxes. You then can modify the details and click the Update button to save them to the database. You can click the Delete button if you want to delete the selected employee. To add a new employee, simply enter a new first name, last name, and city values and click the Insert button (EmployeeID is an identity column and therefore need not be entered from the page). The success message returned from the respective Web API actions is displayed in a <div> element below the table.
The following markup shows the HTML form behind this page.
<h1>Employee Manager</h1>
<form>
   <table border="1" cellpadding="10">
      <tr>
         <td>Employee ID :</td>
            <td>
               <select id="employeeid"></select>
         </td>
      </tr>
      <tr>
         <td>First Name :</td>
            <td><input id="firstname"
                       type="text" /></td>
      </tr>
      <tr>
         <td>Last Name :</td>
         <td><input id="lastname"
                    type="text" /></td>
      </tr>
      <tr>
         <td>City :</td>
         <td><input id="city"
                    type="text" /></td>
      </tr>
      <tr>
         <td colspan="2">
            <input type="button" id="insert"
                   value="Insert" />
            <input type="button" id="update"
                   value="Update" />
            <input type="button" id="delete"
                   value="Delete" />
         </td>
      </tr>
   </table>
   <br />
   <div id="msg"></div>
</form>
The <form> consists of a <select> element, three textboxes, and three buttons. Make sure to use the same IDs for the elements because later you will use them in the jQuery code. After adding the form markup, go in the <head> section and reference the jQuery library by using the <script> tag.
<script src="~/Scripts/jquery-3.1.1.min.js"></script>
Now, we need to write some jQuery code that invokes the Web API by making requests with appropriate HTTP verbs. Add an empty <script> block below the previous script reference and write the code discussed in the following sections.
Filling the dropdownlist with EmployeeIDs
$(document).ready(function () {
   var options = {};
   options.url = "/api/employee";
   options.type = "GET";
   options.dataType = "json";
   options.success = function (data) {
      data.forEach(function (element) {
         $("#employeeid").append("<option>"
            + element.employeeID + "</option>");
      });
   };
   options.error = function () {
      $("#msg").html("Error while calling the Web API!");
   };
   $.ajax(options);
}
The EmployeeID dropdownlist is populated in the ready() callback. The preceding code makes an Ajax request using the $.ajax() method of jQuery. Notice how the URL, type, and dataType properties of the options object are specified. Because we want to invoke the Get() action, the URL points to the Web API end point: /api/employee. The HTTP verb used is GET and the response data type is set to json. The success function simply fills the dropdownlist (the <select> element) with a series of elements, each wrapping an EmployeeID. The error function displays an error message in case something goes wrong while calling the Web API. Once the options object is configured, $.ajax() of jQuery is called by passing the options object to it. Doing so will initiate an Ajax request to the Web API based on the specified configuration.
Displaying the Details of a Selected Employee
$("#employeeid").change(function () {
   var options = {};
   options.url = "/api/employee/" +
      $("#employeeid").val();
   options.type = "GET";
   options.dataType = "json";
   options.success = function (data) {
      $("#firstname").val(data.firstName);
      $("#lastname").val(data.lastName);
      $("#city").val(data.city);
   };
   options.error = function () {
      $("#msg").html("Error while calling the Web API!");
   };
   $.ajax(options);
});
When a user selects an EmployeeID from the dropdownlist, details of that Employee are to be displayed in the other textboxes. Therefore, we use the change() method to wire an event handler to the change event of the dropdownlist. The code shown above is quite similar to the previous one in that it uses the GET verb. However, it appends the EmployeeID whose details are to be fetched to the URL. The success function fills the three textboxes with firstName, lastName, and city. Notice that the property names are automatically converted to use camel casing. This way, client-side code can use JavaScript ways of naming members, whereas server-side code can continue to use C# naming conventions.
Adding a New Employee
$("#insert").click(function () {
   var options = {};
   options.url = "/api/employee";
   options.type = "POST";

   var obj = {};
   obj.firstName = $("#firstname").val();
   obj.lastName = $("#lastname").val();
   obj.city = $("#city").val();

   options.data = JSON.stringify(obj);
   options.contentType = "application/json";
   options.dataType = "html";

   options.success = function (msg) {
      $("#msg").html(msg);
   };
   options.error = function () {
      $("#msg").html("Error while calling the Web API!");
   };
   $.ajax(options);
});
The code to add a new Employee goes inside the click event handler of the insert button. The above code uses the POST verb to invoke the Employee Web API. Moreover, it sets data, dataType, and contentType properties. The data property is set to the stringified version of the new Employee object. Notice that this new object also uses camel casing when setting the properties. The dataType property is set to HTML because our Post() action returns a plain string. The contentType property indicates the request’s data type—JSON, in this case. The success function simply displays the message returned by the Post() action into the msg <div> element.
Modifying an Existing Employee
$("#update").click(function () {
   var options = {};
   options.url = "/api/employee/"
      + $("#employeeid").val();
   options.type = "PUT";

   var obj = {};
   obj.employeeID = $("#employeeid").val();
   obj.firstName = $("#firstname").val();
   obj.lastName = $("#lastname").val();
   obj.city = $("#city").val();

   options.data = JSON.stringify(obj);
   options.contentType = "application/json";
   options.dataType = "html";
   options.success = function (msg) {
      $("#msg").html(msg);
   };
   options.error = function () {
      $("#msg").html("Error while calling the Web API!");
   };
   $.ajax(options);
});
The code that updates employee details goes in the click event handler of the update button. Most of the previous code is similar to the code you wrote in the insert click event handler, except that the EmployeeID being modified is appended to the URL, and the HTTP verb used is PUT.
Deleting an Employee
$("#delete").click(function () {
   var options = {};
   options.url = "/api/employee/"
      + $("#employeeid").val();
   options.type = "DELETE";
   options.dataType = "html";
   options.success = function (msg) {
      $("#msg").html(msg);
   ;
   options.error = function () {
      $("#msg").html("Error while calling the Web API!");
   };
   $.ajax(options);
});
The code that deletes an Employee goes in the click event handler of the delete button. The above code should look familiar to you because it follows the same outline as the other event handlers. This time, the HTTP verb used is DELETE and the EmployeeID to be deleted is appended to the URL.
This completes the client application. Run the application, navigate to /Home/Index, and test the CRUD operations.
Using DI to Inject DbContext into the Web API Controller
In the example you just developed, you instantiated NorthwindDbContext yourself in the EmployeeController. You also can put the DI features of ASP.NET Core to use for that purpose. Let’s see how.
Open the appsettings.json file and store the database connection in it, as shown below:
{
   "Logging": {
      "IncludeScopes": false,
      "LogLevel": {
         "Default": "Warning"
      }
   },
   "ConnectionStrings": {
      "DefaultConnection": "Server=.;
         initial catalog=Northwind;
         integrated security=true;
         MultipleActiveResultSets=true"
   }
}
As you can see, the ConnectionString key stores the Northwind connection string with the name DefaultConnection. Make sure to change the connection string to suit your setup.
Then, open the Startup class and import these two namespaces:
using WebAPIInAspNetCore.Models;
using Microsoft.EntityFrameworkCore;
Here, we imported the Models namespace because our DbContext and entity classes reside in that namespace. We also imported Microsoft.EntityFrameworkCore because we want to use certain extension methods from this namespace.
Then, add the following code to the ConfigureServices() method.
public void ConfigureServices(IServiceCollection services)
{
   services.AddMvc();
   services.AddEntityFrameworkSqlServer();
   services.AddDbContext<NorthwindDbContext>(
   options => options.UseSqlServer(
      Configuration.GetConnectionString("DefaultConnection")));

}
The preceding code registers the NorthwindDbContext with the DI framework. We also specify the connection string by using the UseSqlServer() extension method. Because you are specifying the connection string here, you can remove now OnConfiguring() from the NorthwindDbContext class. You also need to make one more addition in the NorthwindDbContext class. Add a public constructor, as shown below:
public NorthwindDbContext(DbContextOptions
   options) : base(options)
{

}
This constructor accepts a DbContextOptions object and passes it to the DbContext base class.
Now, open the EmployeeController class and modify it as shown below:
[Route("api/[controller]")]
public class EmployeeController : Controller
{

   private NorthwindDbContext db;

   public EmployeeController(NorthwindDbContext db)
   {
      this.db = db;
   }
   ....
}
The code declares a private NorthwindDbContext variable to hold the reference to the injected DbContext. The public constructor accepts the NorthwindDbContext. Once we grab the DbContext, you can use it in all the actions. As an example, the following code uses the injected DbContext in the Get() action.
[HttpGet]
public List<Employee> Get()
{
   return db.Employees.ToList();
}
The complete source code of this example is available with this article’s code download.


