


Introduction to MVC Editor Templates
ASP.NET MVC developers often use HTML helpers such as LabelFor() and TextBoxFor() to display model properties on a view. Although this approach works fine in many situations, it proves to be inadequate when you wish to customize how data is presented to the user for displaying and for editing. Luckily, you can use display templates and editor templates to overcome this limitation. This article discusses what display templates and editor templates are and how to use them in an ASP.NET MVC application.
What Are MVC Display Templates and Editor Templates?
When you an HTML helper, such as LabelFor() or TextBoxFor(), it displays a model property in a fixed manner. For example, LabelFor() renders a model property name in a <label> tag and TextBoxFor() renders a textbox in which a model property is shown for editing. Although this arrangement works fine in many cases, at times you need more control over the way data is shown to the end user. Consider, for example, that you have a model property that represents currency. While displaying this property value to the end user, you want to show a currency symbol such as $ along with the property value. Such a customization is not possible with the above-mentioned HTML helpers. Another example could be a DateTime model property that needs to be displayed in a specific custom format.
Luckily, ASP.NET MVC comes with templated helpers that can be used in such cases. The following MVC editor templates are available:
- DisplayFor()
- DisplayForModel()
- EditorFor()
- EditorForModel()
The DisplayFor() helper displays a model property using what is known as a Display Template. A display template is simply a user interface template that is used to display a model property. If no custom display template is provided by developers, a default one is used. The DisplayForModel() helper is similar to DisplayFor() but displays the whole model (not just a single property) using a display template. The EditorFor() helper displays a user interface for editing a model property. This user interface is known as Editor Template. The EditorForModel() helper displays the whole model for editing using a given editor template. All the helpers listed above pick a template based on the data type of a model property.
When creating views, you can use DisplayFor(), DisplayForModel(), EditorFor(), and EditorForModel() helpers even if you don’t intend to have a customized user interface. Later, if you decide to have a customized interface, all you need to do is define the display and editor templates.
Just to get an idea of how these helpers work, look at the following figure:
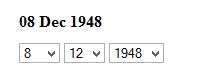
Display Helper
The preceding figure shows a model property named BirthDate (System.DateTime) displayed using a custom display template and editor template respectively. This user interface is the result of the following view code :
@Html.DisplayFor(model => model.BirthDate)
@Html.EditorFor(model => model.BirthDate)
Creating and Using Display Templates
Now that you know what display and editor templates are, let’s begin with an example of creating a custom display template. Create a new ASP.NET MVC application (Empty project template) and add Entity Framework Data Model for the Employees table of Northwind database. This model is shown in the following figure:
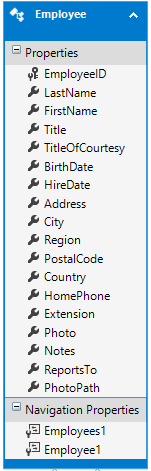
Entity Framework Data Model
Then, add HomeController and Index view to the project. Next, add the following code in the Index() action method.
public ActionResult Index()
{
    NorthwindEntities db=new NorthwindEntities();
    Employee emp = db.Employees.Find(1);
    return View(emp);
}
The preceding code retrieves an Employee from the database whose EmployeeID is 1. It then passes this Employee object to the Index view. The Index view contains the following markup:
@model DisplayEditorTemplatesDemo.Models.Employee

@{
    Layout = null;
}
...
<body>
    @using(Html.BeginForm())
    {
        @Html.DisplayFor(m=>m.EmployeeID)
        @Html.DisplayFor(m=>m.FirstName)
        @Html.DisplayFor(m=>m.BirthDate)
    }
</body>
</html>
The Index view sets the model for the view to be Employee class. It then uses the DisplayFor() helper to show three model properties: EmployeeID, FirstName, and BirthDate.
At this stage, you haven’t defined any custom display templates. If you run the application, you will find that the DisplayFor() helper uses default templates to output the model properties, as shown in the following figure:
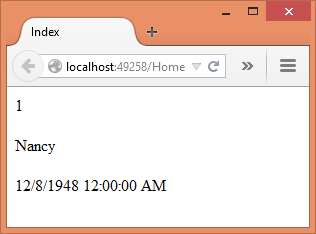
Default Template
Now, let’s define some custom templates. To do so, create a Shared sub-folder under the Views folder. Then, add a DisplayTemplates sub-folder inside the Shared folder. Remember that this folder name must be DisplayTemplates. As mentioned earlier, the DisplayFor() helper looks for custom display templates inside this folder based on the data type of a model property being displayed. In the previous example, the EmployeeID, FirstName, and BirthDate properties are of type Int32, String, and DateTime respectively.
To create custom display templates, add three partial views to the DisplayTemplates folder and name them Int32.cshtml, String.cshtml, and DateTime.cshtml, respectively. Remember that the names of these display template files must reflect the data types they deal with.
Then, add the following code to the Int32.cshtml file:
@model Int32

<h1>#@Model</h1>
As you can see, this display template sets its model to be Int32. It then renders the Model property in the <h1> tag and attaches # at the beginning of the value. On the same lines, create String.cshtml and DateTime.cshtml as shown:
String.cshtml
=============

@model String

<strong>@Model</strong>
DateTime.cshtml
===============

@model DateTime

<strong>@Model.ToString("dd MMM yyyy")</strong>
Notice how the string data is being rendered by using the <string> tag and how the DateTime data is being formatted by using the dd MMM yyyy format.
If you run the application again, you will see the following in the browser:
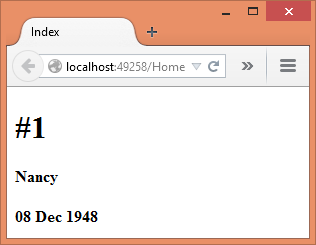
dd MMM yyyy format
Remember that once the templates are created, all the model properties of Int32 type will start using the custom display template. The same holds true for String and DateTime model properties.
Creating and Using Editor Templates
Now, let’s create a custom editor template for the DateTime data type. To do so, create an EditorTemplates sub-folder under the Shared folder and add a DateTime.cshtml file there. This process is quite similar to what you did for creating display templates. Then, add the following code to the DateTime.cshtml editor template:
@model DateTime

@{
    List<SelectListItem> days = new List<SelectListItem>();
    for (int i = 1; i <= 31;i++ )
    {
        days.Add(new SelectListItem() { Text = i.ToString(), Value = i.ToString(), Selected = (i == Model.Day ? true : false) });
    }

    List<SelectListItem> months = new List<SelectListItem>();
    for (int i = 1; i <= 12; i++)
    {
        months.Add(new SelectListItem() { Text = i.ToString(), Value = i.ToString(), Selected = (i == Model.Month ? true : false) });
    }

    List<SelectListItem> years = new List<SelectListItem>();

    int prevYearCount = ViewBag.PreviousYearCount;
    int nextYearCount = ViewBag.NextYearCount;

    for (int i = Model.Year - prevYearCount; i <= Model.Year + nextYearCount; i++)
    {
        years.Add(new SelectListItem() { Text = i.ToString(), Value = i.ToString(), Selected = (i == Model.Year ? true : false) });
    }
}

@Html.DropDownList("days", days)
@Html.DropDownList("months", months)
@Html.DropDownList("years", years)
The preceding code basically renders three DropDownLists for selecting day, month, and year, respectively. The three for loops create generate a List of SelectListItem objects that contain days, months, and years, respectively. Notice how the default selection in these dropdownlists is made using the current model value and Selected property.
The year dropdownlist contains a certain number of years from the past and future. These offsets are passed from the view using the PreviousYearCount and NextYearCount ViewData / ViewBag properties.
To display the BirthDate model property using the editor template you just created, add the following code to the Index view.
@Html.EditorFor(m => m.BirthDate, new { PreviousYearCount = 10, NextYearCount = 10 })
As you can see, the preceding code uses an EditorFor() helper to show an editor for the BirthDate property. Notice how the PreviousYearCount and NextYearCount values are passed as an anonymous object. These properties are translated to equivalent ViewData entries and are accessible inside the editor template (as you did in the editor template code earlier).
If you run the application, you will see this:

The BirthDate Model Property
Using DisplayForModel() and EditorForModel()
The DisplayFor() and EditorFor() helpers work for a single model property. At times, you need to render a user interface for the whole model. For example, you may have a model property that is of a complex type (say, a property that is of type Address). In such cases, you can use the DisplayForModel() and EditorForModel() helpers. These helpers pick display and editor templates based on the model type. If no template is found, they use a default template.
To see DisplayForModel() and EditorForModel() in action, add Employee.cshtml in both the folders—DisplayTemplates and EditorTemplates. Add the following markup in the Employee.cshtml from the DisplayTemplates folder:
@model DisplayEditorTemplatesDemo.Models.Employee

<table border="1" cellpadding="10">
    <tr>
        <td>Employee ID :</td>
        <td>@Model.EmployeeID</td>
    </tr>
    <tr>
        <td>First Name :</td>
        <td>@Model.FirstName</td>
    </tr>
    <tr>
        <td>Last Name :</td>
        <td>@Model.LastName</td>
    </tr>
    <tr>
        <td>Birth Date :</td>
        <td>@Html.DisplayFor(m => m.BirthDate)</td>
    </tr>
</table>
The preceding template has Employee as its model and displays the EmployeeID, FirstName, LastName, and BirthDate model properties. Notice how DisplayFor() is used to display the BirthDate property (and we have a custom template for DateTime properties).
Add the following code in the Employee.cshtml file from the EditorTemplates folder.
@model DisplayEditorTemplatesDemo.Models.Employee

<table border="1" cellpadding="10">
    <tr>
        <td>Employee ID :</td>
        <td>@Html.EditorFor(m=>m.EmployeeID)</td>
    </tr>
    <tr>
        <td>First Name :</td>
        <td>@Html.EditorFor(m => m.FirstName)</td>
    </tr>
    <tr>
        <td>Last Name :</td>
        <td>@Html.EditorFor(m => m.LastName)</td>
    </tr>
    <tr>
        <td>Birth Date :</td>
        <td>@Html.EditorFor(m => m.BirthDate)</td>
    </tr>
</table>
The previous code uses the DisplayFor() and EditorFor() helpers to render EmployeeID, FirstName, LastName, and BirthDate, respectively.
After creating the preceding templates, add the following code to the Index view.
@Html.DisplayForModel()
@Html.EditorForModel(new { PreviousYearCount = 10, NextYearCount = 10 })
Notice that the EditorForModel() helper passes an anonymous object because our custom DateTime template needs that.
If you run the application, you should see something like this:
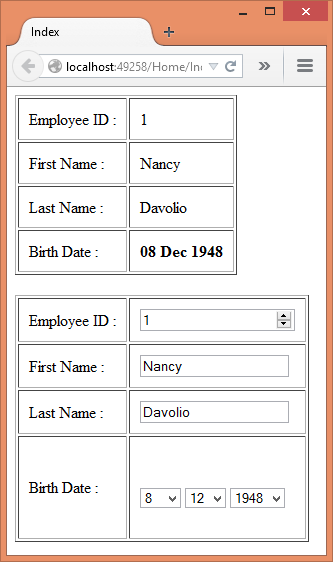
EditorForModel()
The UIHint Attribute
When you create a display template or editor template for a data type, all the model properties of that data type start using it. At times, you may want some of the model properties of the said data type to use some different templates. You can hint your intention by using the [UIHint] attribute. The [UIHint] attribute needs to be added to the model property. To see how [UIHint] works, create another display template called DateTime2.cshtml and write the following code in it:
@model DateTime

<strong>@Model.ToString("dd / MM / yyyy")</strong>
This code displays the date in dd / MM / yyyy format instead of dd MMM yyyy format.
Now, add a metadata class for the Employee model class as shown:
public class EmployeeMetadata
{
    [UIHint("DateTime2")]
    public DateTime BirthDate { get; set; }

}

[MetadataType(typeof(EmployeeMetadata))]
public partial class Employee
{

}
Note how the [UIHint] attribute has been added to the BirthDate property. The [UIHint] attribute specifies that the DateTime2 template is to be used for this model property. If you run the application, you will see the BirthDate property being displayed like this:

BirthDate Property
Summary
Display templates and editor templates allow you to display model properties using a custom UI template. The DisplayFor(), DisplayForModel(), EditorFor(), and EditorForModel() helpers pick display / editor templates based on the data type of a model property. Custom display / editor templates are .cshtml files that you place inside DisplayTemplates and EditorTemplates folders under the Views > Shared folder. Together, they provide a flexible way to display or edit model properties as compared to helpers such as LabelFor() and TextBoxFor().