


In the not-too-distant past, even the thought of making an application speak to the user was nothing more than a far-off dream. With today’s hardware and the power it gives, having applications speak to you by using the sound system present in all modern day PCs is now as easy as eating.
Using Text to Speech (or TTS, as it’s more commonly known) in .NET is trivially easy, and you can enable all the functionality you need by simply adding one single reference to your project. In this article, we’ll run through the creation of a simple Windows Forms application that will allow you to type in some text, set some parameters for that text, and then have the computer speak that text back to you.
To get started, fire up Visual Studio and create a new Windows Forms application. To implement all the functionality, you’ll need to add the following controls to your form:
- 1x textbox set to multi-line operation
- 1x non auto size label for the text below the text box
- 1x standard button to activate the speech
- 1x group box containing the following sub controls:
- 5x label controls
- 2x track bar controls
- 1x combo box
The multi-line text box will be used to type in the text the user wants the computer to speak out loud.
The first label is just used to display some text telling the user to enter text into the text box.
The button is then used to activate the speech synth to speak the entered text.
The group box is used to hold controls allowing the speech output to be varied in terms of volume and speed as well as selection of the voice to be used.
The label controls in the group box are simply used to label things and show the track bar values. The track bars are used to alter the parameters and the combo box to allow selection of the voice to use.
How you lay this out is up to you. Here’s how I’ve arranged the UI in my demo project for this example.
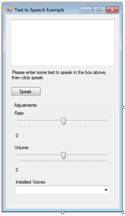
Figure 1: The text to speech example box
Getting Talkative with the Code
Actually getting .NET to say something is so easy; you can get your first words spoken in two lines of code. First off, though, right-click your project in the VS solution explorer and select References. Once you have References open, search for and add a reference to ‘System.Speech’.
Once you’ve included the reference, ensure that you add
using System.Speech.Synthesis;
to your form’s using list.
At this point, you’re now ready to get your app to speak its first words. In your form’s constructor, add the following:
using (SpeechSynthesizer synth =
   new SpeechSynthesizer())
{
   synth.Speak("Hello World");
}
At this point, if you press F5 to run your application, you should hear it say ‘Hello World’ in the default voice.
Adding Some Control to Our Voice
We would, however, like to add a little bit more flexibility to our app than to just have it say the same phrase over and over again. Rather than go through the bits of code piece by piece, I’ll first present all the code that makes up the form class, and then describe the interesting parts.
Here’s the Windows Form class for the form shown in Figure 1 in full:
using System;
using System.Globalization;
using System.Speech.Synthesis;
using System.Windows.Forms;

namespace SpeechBlogPost
{
   public partial class Form1 : Form
   {
      private int _speechRate = 0;
      private int _speechVolume = 50;

      public Form1()
      {
         InitializeComponent();

         lblRate.Text =
            _speechRate.ToString(CultureInfo.InvariantCulture);
         lblVolume.Text =
            _speechVolume.ToString(CultureInfo.InvariantCulture);
         AddInstalledVoicesToList();
      }

      private void BtnSpeakClick(object sender, EventArgs e)
      {
         if(string.IsNullOrEmpty(txtTextToSpeak.Text))
         {
            MessageBox.Show("Please enter some text in the
               text box before trying to speak");
            return;
         }

         using (SpeechSynthesizer synth = new SpeechSynthesizer{ Volume =
            _speechVolume,  Rate = _speechRate })
         {
            synth.SelectVoice(ddlVoices.Text);
            grpAdjustments.Enabled = false;
            synth.Speak(txtTextToSpeak.Text);
            grpAdjustments.Enabled = true;
         }

      }

      private void TrackBar1ValueChanged(object sender, EventArgs e)
      {
         _speechRate = trackBar1.Value;
         lblRate.Text =
            _speechRate.ToString(CultureInfo.InvariantCulture);
      }

      private void TrackBar2ValueChanged(object sender, EventArgs e)
      {
         _speechVolume = trackBar2.Value;
         lblVolume.Text =
            _speechVolume.ToString(CultureInfo.InvariantCulture);
      }

      private void AddInstalledVoicesToList()
      {
         using(SpeechSynthesizer synth = new SpeechSynthesizer())
         {
            foreach (var voice in synth.GetInstalledVoices())
            {
               ddlVoices.Items.Add(voice.VoiceInfo.Name);
            }
         }

         ddlVoices.SelectedIndex = 0;
      }


   }
}
As you can see, the code’s not that complex. The main working code is in the click handler for the speak button, where you can see we set up an IDisposable object that represents the speech synth, and then use the properties and methods on that to produce our speech. In particular, you’ll see we keep a couple of global variables to control the rate and volume of the voice.
The volume is a simple integer from 0 to 100, with 100 being the loudest and 0 being silent.
The rate, on the other, hand is slightly different. The default value of the rate is 0, and this is the default speed at which any generated text will be spoken. The rate can vary from -10 to +10, with the higher values being faster and the lower values being slower. Typically, you use the rate to vary the speed characteristics of the spoken voice, so you can more closely emulate speech differences at different ages.
You’ll also see that on startup, we have a method that retrieves the default installed TTS voices on the machine that your application is run on. It does this by using a method called ‘GetInstalledVoices’ that returns an enumerable list of ‘InstalledVoice’ objects describing each of the voices available on the current system.
All we do with the voice is to extract a list of names, which we then use to populate the drop down list in the adjustments group. There are many other properties, however, and I do recommend that you explore them by using the various inspection tools in Visual Studio. There’s some interesting stuff in there, such as suggested default parameters and voice descriptions.
For now, however, all we need is the name of the voice for the drop down, which we populate and then set the selected voice to the first one in the list. The rest of the code simply attaches our track bars to the labels used to show the current value and the variables used to set the default parameters on our speech object when we ask it to speak the text.
Moving On From Here
There is much, much more that the speech synth class has hidden under the hood. For example, we can get it to say our text using async, which means it won’t hold up our UI as the current example does.
We also can get the TTS engine to produce WAV audio, which we then can stream directly to a wave file or anything else capable of taking streamed data. Using the stream features would, for example, allow us to stream the output to an ASP.NET web application, allowing the user to consume the generated audio in a browser environment.
The current MSDN URL for the full documentation can be found here (as of 24th Nov 2014):
http://msdn.microsoft.com/en-us/library/microsoft.speech.synthesis.speechsynthesizer(v=office.14).aspx
However, knowing MS’s frequency for changing these things, that may not stay current for too long. A general search in MSDN for the SpeechSynthesizer class, however, should usually find the page for you.
If there’s a small slice of .NET you don’t understand or would like to know more about, feel free to come and find me. A quick Google for ‘shawty_ds’ usually turns up more than a dozen or so leads, most of which usually point to my Twitter page. If I can add an article in the future that covers your suggestion, I’ll happily do so.