


It doesn’t matter what OS you’re using or what language you’re working in, sooner or later you’ll need to find out about, and deal with, the various storage devices (“drives”) available in your system. .NET is no different. I’ve covered the File and Directory classes before in this column, but I’ve not yet mentioned handling the actual underlying medium these files and folders reside on, until now.
Like the rest of the classes that are used to manipulate files and folders, the “DriveInfo” classes all live in the “System.IO” namespace.
The first port of call in using the “DriveInfo” class is the one and only static method available on the class “GetDrives”. “GetDrives” returns an Array of “DriveInfo” objects, one for each of the active storage devices present in your system.
Start yourself a small command line application, and add the following to program.cs.
using System;
using System.IO;

namespace IntClassExplorer
{
   class Program
   {
      static void Main()
      {
         DriveInfo[] driveInfos = DriveInfo.GetDrives();

         foreach (DriveInfo driveInfo in driveInfos)
         {
            Console.WriteLine("Drive {0} is present
               in the system.", driveInfo.Name);
         }

      }
   }
}
Once you run and compile this, you should get the following:
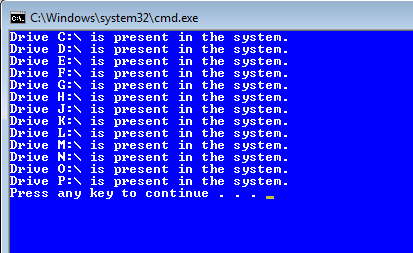
Figure 1: Output from our first listing
Yes, I have 13 devices present in the system I’m working on 🙂 and, as you can see, we can immediately recognize them all by the standard drive letter syntax. However, that’s not all the DriveInfo class has available. Change the Console.WriteLine line so that it reads
Console.WriteLine("Drive {0} is present in the system
   with volume label {1}.", driveInfo.Name,
   driveInfo.VolumeLabel);
Then re-run the application, you should now get:
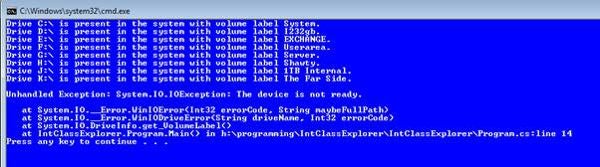
Figure 2: We now can see our drive volume names
Actually, you stand a high chance of not getting the exception I got, just as much as you do.
Because the DriveInfo classes also return ‘CdRoms’ and ‘Removable Media’ drives, there’s a good chance that just indiscriminately looping over the array like this will cause you some problems. In this case, my code fell down as soon as it tried to query the first CdRom drive which, at the time, did not have a disk present in it.
Change the previous line that you changed earlier, so that it now reads
Console.WriteLine("Drive {0} is present in the system
   and is of type {1}.", driveInfo.Name,
   driveInfo.DriveType);
Then, run again. This time, you shouldn’t see any exceptions, but you should see the drive types:
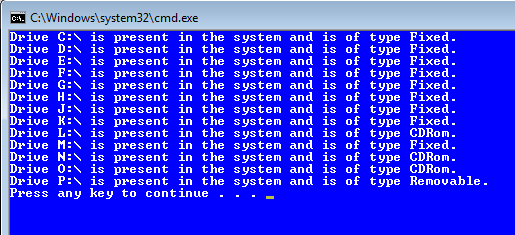
Figure 3: Our program now shows the drive type
A ‘Fixed’ drive is typically a Hard Disk or other non-removable drive, ‘CdRom’ is as the name suggests and ‘Removable’ are typically KeyChains, Phone memory cards, and other similar things.
One thing you need to be careful of is ‘Fixed’.
In my system, you can see that there are nine ‘Fixed’ drives, but the truth of the matter is that at least two of those drives are external USB hard disks, that I can easily unplug and plug into a different machine.
In my mind, those drives are also removable, but it’s difficult to tell them apart from the genuine fixed ones. This rule also unfortunately applies to a lot of those “Portable Passport Hard Drives” or “Hard Drive Docking Caddies”. The way I deal with it is by using the Volume Name and adding an “Ext” or other similar naming convention, so if I’m monitoring them I can tell quite easily.
Okay, so we know how to tell our drive type, but how do we prevent getting ugly exceptions? Well, we could use the good old fashioned try/catch method and catch the exceptions being thrown, or we could use an easier method and check the ‘IsReady’ property on the “DriveInfo” object itself.
Change your for each loop, so that it looks like this
foreach (DriveInfo driveInfo in driveInfos)
{
   if(driveInfo.IsReady)
   {
      Console.WriteLine("Drive {0} is present in the system
         with volume label {1}.", driveInfo.Name,
         driveInfo.VolumeLabel);
   }
}
When you run the program now, you should find no exceptions, but only those drives that have readable media in them will show:
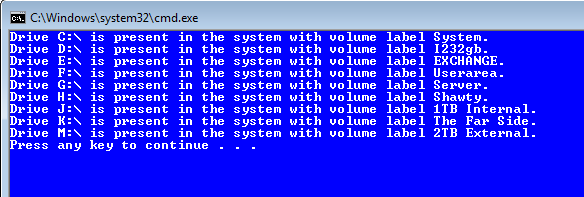
Figure 4: We can now show our drives and volume labels without throwing an exception
If you put a CD in the CdRom drive or an SD card in the card reader, then re-run the app, you’ll see they too appear in the last. Any drives not ready to be accessed are simply ignored.
The Remaining Properties
By now, you should get the idea that the drive info class holds quite a bit of information about a given drive. Here are the remaining properties:
- AvailableFreeSpace: The amount of space, measured in bytes, available for use on the device
- DriveFormat: String containing the format of the device; for example, “NTFS” or “FAT32”
- RootDirectory: String containing the root file system. In most cases, this will be the same as the device name, but for NT volumes or mapped drives, it may be a hardware or UNC formatted path.
- TotalSize: The total amount of space, measured in bytes, available on the device
As you can see, you can get everything displayed in “My Computer” from one call. However, an interesting use of this is to actually call ‘GetDrives’ in a Windows service on a regular schedule. You can easily detect ‘Removable’ devices being inserted into a machine, and then query them to see how much space is used.
Got a .NET class you want to know more about? Come find me on Twitter as @shawty_ds or pay a visit to ‘Lidnug’ the ‘Linked .NET users Group’ that I help run, or simply just drop me a comment below. My next post just might cover it.