


- Introduction
- Tip 1 – Consistent Working Environment across Programming Devices Using Profile Settings
- Tip 2 – Quick Launch Any Command
- Tip 3 – Better Search
- Tip 4 – Listen to Notification Updates
- Tip 5 – Window Management
- Tip 6 – Solution Explorer Everywhere
- Tip 7 – Quick Navigation
- Tip 8 – Install Productivity Power Tools for Visual Studio 2013
- Tip 9 – Learn Keyboard Shortcuts
- Tip 10 – Use Code Map to Visualize Your Complex Code
- Summary
Introduction
As developers targeting the Microsoft platform, it has always been considered a “requirement” to use Visual Studio, and most developers do use it. However, not everyone who uses Visual Studio uses all of the features available in a particular version. In the fall of 2013, Microsoft released Visual Studio 2013 with even more features than before. In that light, this article serves to share the top 10 tips to get the maximum out of Visual Studio 2013.
Before we start with the tips, I want to share the Zeroth tip – install the updates for Visual Studio 2013.
Tip 1 – Consistent Working Environment across Programming Devices Using Profile Settings
One of the new things that users will notice about Visual Studio 2013 is that the IDE will ask you to sign into your Visual Studio profile. One might wonder why this is needed. Microsoft has built in first class support to ensure developers that use multiple programming devices have the same programming experience by storing the profile and basing the experience on the profile (if the user is signed in). This means, that if you like the “Dark theme” as your ideal work theme, you can make that your default theme by signing into your profile.
You can customize what is stored as part of your roaming file by going to Tools -> Options and selecting Environment – Synchronized Settings.
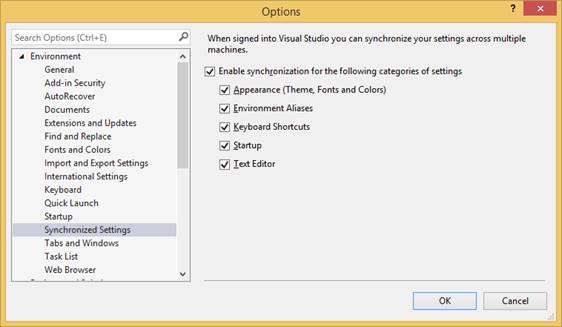
Options > Synchronized Settings
You can see that by default, the appearance, environment aliases, keyboard shortcuts, text editor and startup behavior are synchronized.
Tip 2 – Quick Launch Any Command
Up until Visual Studio 2013, being a super-developer meant remembering the menu/keyboard shortcut for a particular command. With Visual Studio 2013, commands are now searchable through the quick launch bar. The Quick Launch bar is activated by the Ctrl + Q combination and we can just start typing the command name we want to use.
The Quick Launch bar is displayed on the IDE as shown below.
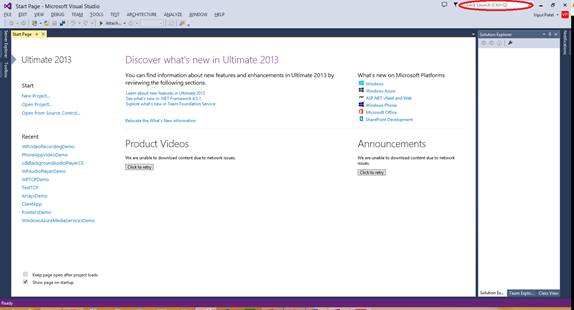
Quick Launch
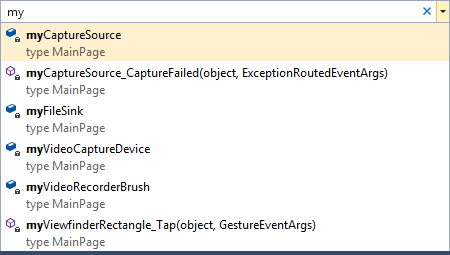
In my case, I am searching for the command to attach my debugger to a process. I start by typing “Debug” and the search results are populated.
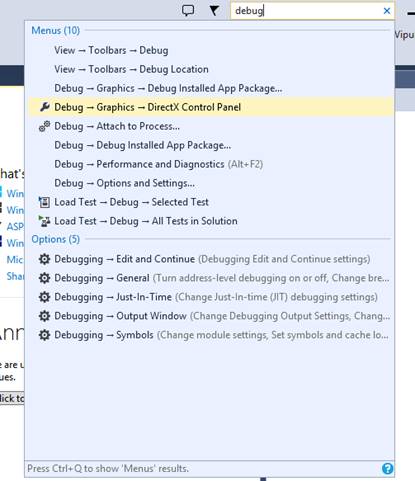
Search Results are Populated
You can see all the debug related commands. You can now select the command you want and it will be launched.
Tip 3 – Better Search
Search now works better in Visual Studio 2013. For example, instead of going through all the different node combinations to arrive at the template you want to use in the New Project Dialog, you can simply search the installed templates (Shortcut Ctrl + E).
Here is how the New Project Dialog looks. Say for example, you were looking for a template to create a new Windows Phone application in C#, you will have to go to Visual C# -> Windows Phone and select an applicable template from there.
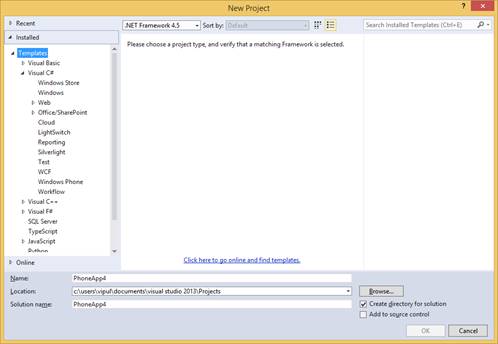
New Project > Templates
With search, you can simple type “C# Windows Phone App” in the Search box, and you will be presented a list of templates matching your criteria.
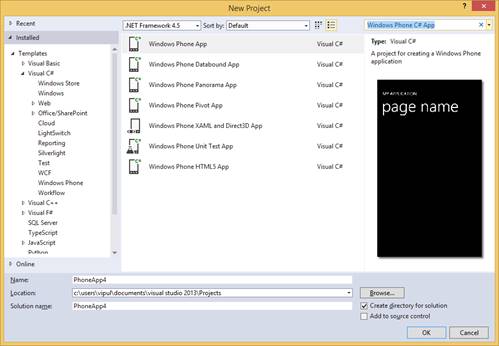
List of Templates
Such Search support is not restricted to only the New Project Dialog. It is available throughout various dialogs in Visual Studio 2013. One of the most helpful places where this will save time is the Tools -> Options dialog. With a myriad of options to choose from, the search is a very helpful feature to triangulate on the command you want.
Tip 4 – Listen to Notification Updates
One of the new features in Visual Studio is the Notifications area, which you can reach by clicking the “Flag” icon next to your profile link.
Notifications Flag
When the notifications are active, and you click on the Flag icon, you will be presented a list of notifications that you might need to act upon.
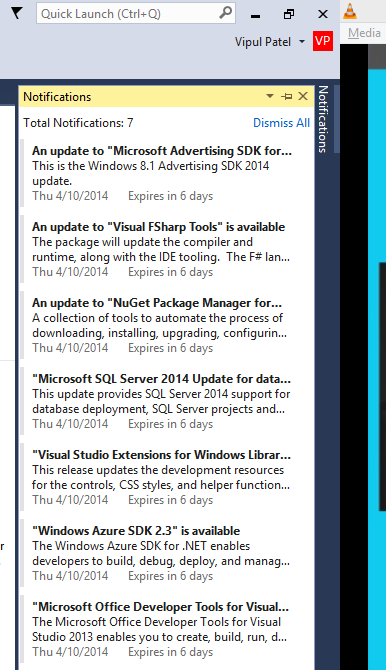
Notifications
At present, the notifications provided are simple – like expiry of trial version of your installations, or a newer version of an installed library being available. However, Microsoft has promised to have richer notifications to be presented as they build momentum behind this feature.
Tip 5 – Window Management
With most developers working in the world with multiple monitors, why should your IDE lag behind? With Visual Studio 2012, Microsoft made some advancement in this space, but with Visual Studio 2013, the support has gone deeper.
Earlier, we could only dock a specific source file into another monitor. With Visual Studio 2013 (and 2012 also), we can dock multiple files in the second monitor. To do this, drag and drop the title of the file (after opening it from the solution explorer) to the monitor where you want to display the file.
Window management becomes more efficient when you club the window management features of the Windows operating system with Visual Studio 2013.
For example, the “Windows + L” key docks a document to the left and “Windows + R” allows a developer to dock the XAML on the left and code behind of the XAML on the right, and work on them at the same time for increased productivity.
Tip 6 – Solution Explorer Everywhere
Visual Studio 2013 supports multiple Solution Explorer views. This helps when you are working in a multi-monitor development environment and you want to have the context of where you are working. Additionally, the new Solution Explorer can be scoped to a specific folder or project.
To open a second Solution Explorer window, right click the folder or project you want to open the Solution Explorer window for and choose “New Solution Explorer View”
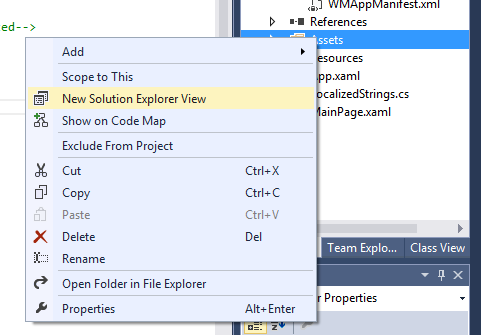
New Solution Explorer View
In the above example, the new solution Explorer will only have the contents of the Assets folder.
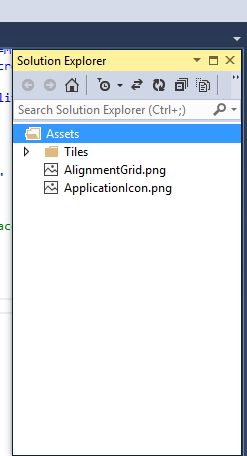
Solution Explorer
Having a second Solution Explorer window can be greatly beneficial to developers who want to use multiple monitors for different aspects of their projects.
Tip 7 – Quick Navigation
To quickly navigate to any function, you can invoke the NavigateTo features by using the “Ctrl + ,” keyboard combination. When “Ctrl + ,” is invoked, a window pops up where you can type the search term. The search is iterative and you can quickly go to the desired location.
NavigateTo
To exit the NavigateTo feature, click “Esc”.
Tip 8 – Install Productivity Power Tools for Visual Studio 2013
Visual Studio 2013 packs a punch, but you can still get lots more out of it if you install the Productivity Power tools for Visual Studio 2013 available at http://visualstudiogallery.msdn.microsoft.com/dbcb8670-889e-4a54-a226-a48a15e4cace
The productivity power tools include peek help, better visualization of errors in Solution Explorer, open a command prompt from within Visual Studio, and the ability to create snippets.
Tip 9 – Learn Keyboard Shortcuts
While the Quick launch window helps with finding commands, it never hurt to master keyboard shortcuts for the commands you frequently use. You can learn all the keyboard shortcuts for Visual Studio at http://msdn.microsoft.com/en-us/library/vstudio/dn320181(v=vs.120).aspx.
Tip 10 – Use Code Map to Visualize Your Complex Code
If you have multiple dependencies in your solution, you can get a simple view by creating a code map. To do that, go to Solution Explorer and click the “Show on Code Map” link. This will result in Visual Studio 2013 analyzing your project/solution and compiling a code map.
Show on Code Map
This will create a Code map as shown below.
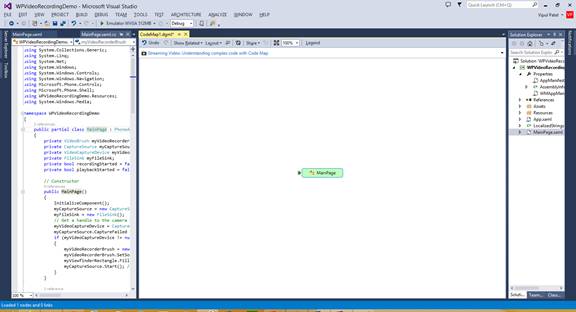
Code Map
You can double click on a specific name to give a finer breakdown of interaction.
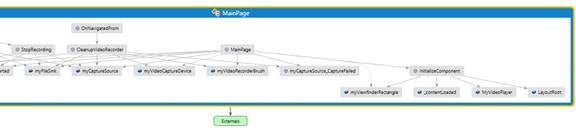
Breakdown of Interaction
This should give a simpler view of the various interactions of your code.
Summary
In this article, we learned about 10 tips to get the best of Visual Studio 2013. If you have your own tips that you would like to share with the developer community, please leave them as comments to the article.
About the author
Vipul Patel is a Program Manager currently working at Amazon Corporation. He has formerly worked at Microsoft in the Lync team and in the .NET team (in the Base Class libraries and the Debugging and Profiling team). He can be reached at vipul.patel@hotmail.com