

In a previous article, I introduced you to Windows Presentation Foundation (formerly code-named ‘Avalon’), XAML (the new language for designing user interfaces and the link between designers and developers) and ‘Cider’ (the graphic designer for the next version of Visual Studio, codenamed ‘Orcas’). In this article, you will explore a new set of tools from Microsoft, designed to help you express your creativity and achieve greater productivity. It also provides superior user experiences for the Windows platform and the Web. These tools are called Expression Graphic Designer, Expression Interactive Designer, and Expression Web Designer.
Each of these tools is designed for different areas of development, but the great news is that they help you achieve a great workflow. You can share objects across different stages of development and different tools (including Visual Studio) by exporting to and importing XAML code. You can copy and paste objects directly from the Expression designers to Microsoft PowerPoint or Microsoft Word, for example. Moreover, the Interactive Designer shares the exact same project structure and files with Visual Studio so you don’t have to convert from one project to another, and you even can have the same project opened in both Interactive Designer and Visual Studio and have the changes made in one place be reflected in the other.
As a quick overview, the three members of the Expression family are:
- Expression Graphic Designer is a professional illustration, painting, and graphic designer for creating on-screen, Web, and application user interfaces. Designers use this tool to create rich user interfaces, being sure that the final product will looked just like they designed it, and not the way developers could code what they imagined.
- Expression Interactive Designer is a professional tool for creating rich user interfaces for desktop and Web applications. It seamlessly integrates with the Graphic Designed and Visual Studio, providing helpful features such as testing and deployment.
- Expression Web Designer is a professional tool for creating sophisticated standards-based Web sites, using advanced CSS tools and writing fully compliant XHTML code.
All the three tools are available for a free trial as a Community Technology Preview release. Just follow the links above to download and install them.
Before going any further, especially if you are not familiar with WPF and XAML, I recommend that you read the previous article, and install all the components specified in the beginning.
In this article, I will give you a short introduction to the three designers. The next article will have the task of building an actual application.
Microsoft Expression Graphic Designer
The Graphic Designer is an advanced professional tool that breaks down the traditional separation between vectors and bitmaps, being a hybrid half-vector, half-bitmap painting and graphic designer. It provides advance vector and raster tools, and lets you export design elements to different formats and tools. Given then complexity of this tool, it’s impossible to present it in an article, and even more in a paragraph of an article. Thus I only give you a short introduction and show you several pictures. For the rest, I’ll let you try it for yourself, and I recommend downloading and watching the training clips available on the Microsoft home page.
As I already said, the Graphic Designer is a hybrid tool, half vector based, half bitmap based. It provides two kinds of layers; as you may guess, a vector layer and a bitmap layer, actually called a pixel layer, offering features such as merging layers or transforming from one type to the other.
If you are into designing, I’m sure you have a graphic tablet, and the good news is that the Graphic Designer is pressure sensitive when you use such a drawing tool.
One of the most powerful features is the non-destructive transformations of bitmaps inside a vector layer. With classical painting and designing software, you can apply all sorts of effects (such as light correction, shadows, sharpness, blurring, and so forth), but once the effect is applied, the bitmap is permanently altered. Of course you can undo it, but if you applied a gamma correction, followed by a sharpness and then an emboss effect, and you want to undo the gamma correction, you’re stuck because you have to undo all the following transformation. That’s not the case with the Graphic Designer because of the dynamic, non-destructive effects, which allow you to turn off and on any effect applied on a bitmap inside a vector layer, or modify the parameters of that effect.
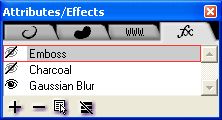
In the picture above, you can see the Attribute/Effects window displaying a list of three filters—Emboss, Charcoal, and Gaussian Blur—of which only the last one is turned on. From this window, you can add new filters, remove one or all of them, or change the attributes of a filter.
In the Graphic Designer, brushes are editable vectors. By default, it provides a large and variant set of built-in brushes, but you can define your own brushes and strokes.

Another powerful feature is the variations that allow you to randomize the strokes and brushes, varying the hue, saturation, stroke, or fill.
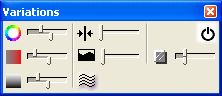
Just to see an example, create a new document with a vector layer (File > New) and open the Variations window show above (Windows > Variations, or simply F9). Initially, the variations are turned off, but by pressing the Enable/Disable All Settings button, the above window will show. Now you can edit:
- Hue Variability for Stroke and Fill
- Saturation Variability for Stroke and Fill
- Lightness Variability for Stroke and Fill
- Width Variability
- Variable Width Randomness
- Random Skeletal Strokes
- Transparency for Strokes and Fill
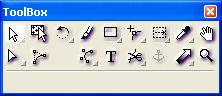
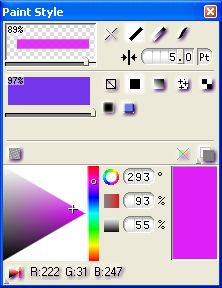
Go to the Toolbox (shown in the picture below), select the Twirl Star, or simply tress J (notice that the buttons with a tiny arrow in the bottom-right corner have multiple options and in the image below the button shows a rectangle) and then play around with the Painting Styles, like I did in the image below.
Then, you can start to draw and you will see the little magic the Graphic Designer is doing for you.

Of course, you can get different results, depending on the values you set. But, imagine changing those particular values for each and every one of the stars you drew. The variations come in hand when you have to design a lot of similar things with different kinds of variations.
One of my favorite features, at least in what concerns bitmaps, is the Photo Montage. It enables you to combine various shots of the same target in a single bitmap (inside a vector layer). I’ll show you a few examples that I put together from pictures that I’ve taken myself.
In the first example, I used three pictures of the statues of Moses by Michelangelo (displayed in the San Pietro in Vincoli Basilica in Rome) and merged them into a single image:
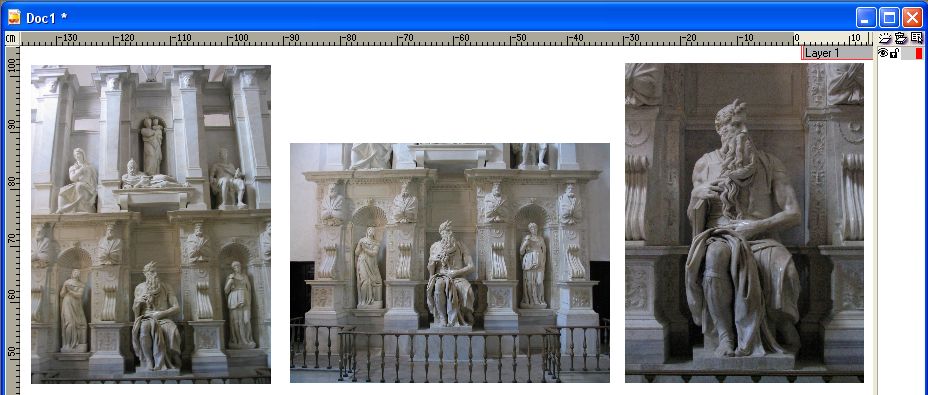
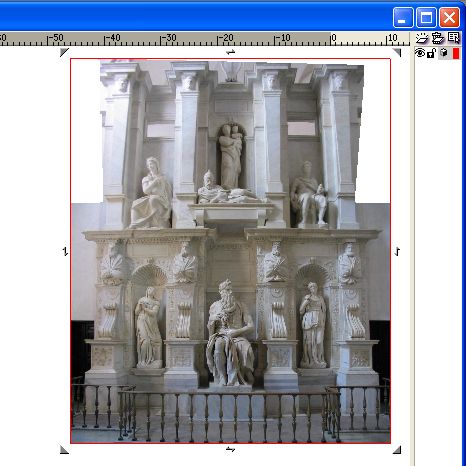
The actual pictures have a resolution of 1600 x 1200, but of course that’s too much to show you here, so I scaled the document so all the three of them fit on the screen. The result is amazing. If you use the Advance Blending option for the Photo Montage, you’ll get a very accurate picture (though sometimes parts of it could be a little distorted). By the way, the little arrows from the corners of the object help you resize it (by keeping the Shift key pressed when you do it, the original ratio is maintained) and the little hooks on the middle of each margin allow you to rotate the object.
But that’s a static image. The Graphic Designer can to much more and I’ll show you with a new example of three shots of the Amboise Castel in France (that’s the place where Leonardo da Vinci spent the last years of his life).
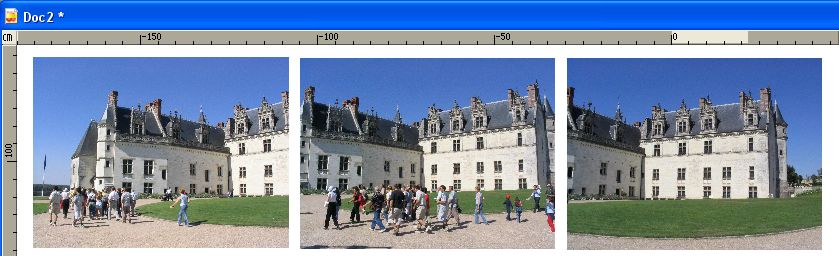
As you can see here, there are three incomplete images of the castle and two of them are full of people on the move, people who change their positions. But, it turns out that the Graphic Designer can handle that very well and create a great image of the castle with those people in it:
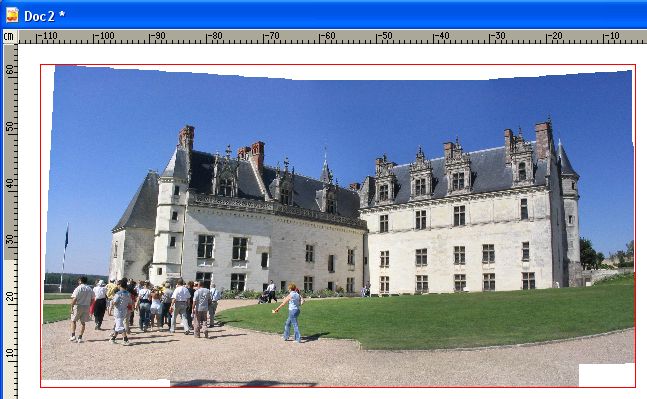
You can see a little distortion in the middle of the lawn, but all the rest is good and the people in the middle did not affect the final result.
And, the final example will show three images of the same painting called The Napoleon Coronation by David Jeacques Louis displayed at the Louvre in Paris. In the first image, you can see four bitmaps, but I only used the top three to create the montage (the fourth one is only for an overview of the actual painting).
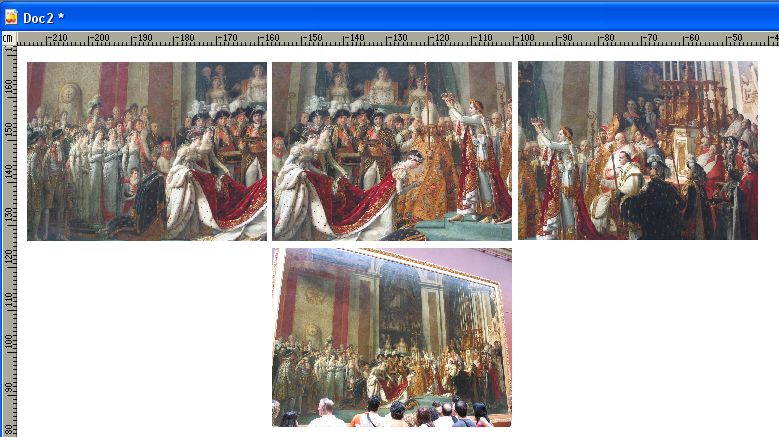
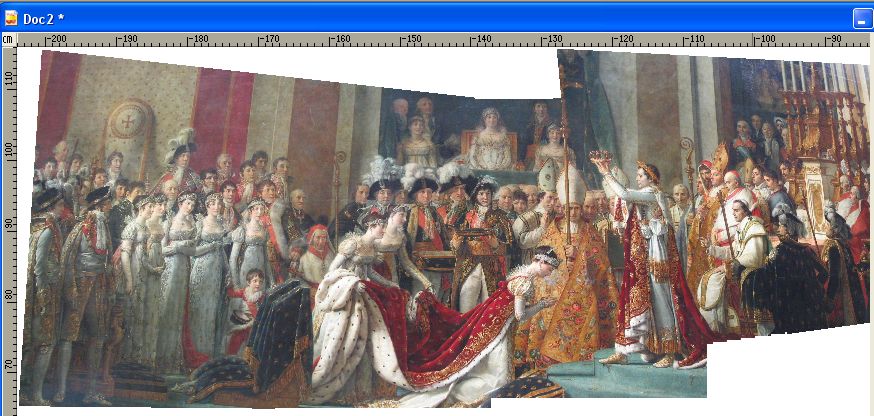
Although it shows some white spaces in the final result, the newly created bitmap is so close to the original painting that you can hardly spot any distortions (there is a little bending to the right of the left part of the bitmap).
You can export your documents to a variety of image formats (such as TIFF, PNG, JPEG, GIF, BMP, and Photoshop PSD), PDF, encapsulated PostScript format, and XAML. That is very important for the workflow because it allows you to use objects created with the Graphic Designer in the Interactive Designer and the Web Designer. The XAML export provides a series of settings, including saving the document as a canvas or resource dictionary (which allows you to access each object individually), rasterizing options, image strokes vectorization, and the like, and provides a preview, enabling you to see both the graphic representation of objects and the XAML code on the fly.
All in all, the Expression Graphic Designer is a very powerful tool that can produce amazing things in skilled hands. If you wonder what it has to do with you as a developer, remember that all good things come to those who wait. You will see this tool at work in a future article when you will do a face lifting to the calculator application from the previous article.