Introduction
Building a Web API that is to be accessible only by a purpose-built UWP app for Windows 10 can be achieved by taking several routes. One of those possible routes is making use of a product known as Identity Server, and in this article, we’ll look at the latest version; Identity Server 4.
What we’ll do is set up Identity Server to protect a Web API, built using ASP.NET Core 1.1, which will grant access to a simple UWP project. These are the three elements that will make up this article, and we’ll also divide each part into three separate projects in Visual Studio.
Let’s begin with building our Identity Server.
| Note: This article was written using Visual Studio 2015 Update 3, .NET Core 1.1, and Identity Server 4 v1.0. |
Identity Server 4
Identity Server 4 is indeed a well-constructed product that is highly customisable, open source, and, out of the box, can service several possible needs. However, for the sake of this article, our need is simple, so let’s look at some of the code in our project…
I’ve created an empty ASP.NET Core project, and added the following dependency…
"IdentityServer4": "1.0.0"
Then, in the Configure method in my startup.cs, I’ve removed most of the generated code, and made the following changes:
public void Configure(IApplicationBuilder app,
   IHostingEnvironment env,
   ILoggerFactory loggerFactory)
{
   loggerFactory.AddConsole();

   app.UseIdentityServer();
}
We then need to turn our attention to your ConfigureServices method. My code looks something like this…
public void ConfigureServices(IServiceCollection services)
{
   services.AddIdentityServer()
   .AddTemporarySigningCredential()
   .AddInMemoryApiResources(new List<ApiResource>
   {
      new ApiResource("codeguruapi",
         "Example Code Guru Web Api with
         Identity Server")
   })
   .AddInMemoryClients(new List<Client>
   {
      new Client
      {
         ClientId = "uwpclient",

         AllowedGrantTypes =
            GrantTypes.ClientCredentials,

         ClientSecrets =
         {
            new Secret("jds8£$Asd!d;j3".Sha256())
         },

         AllowedScopes = { "codeguruapi" }
      }
   });
}
And, that’s it. This is all we need to do for the scope of this article with regards to setting up Identity Server. Before we run this program, I would like to point out a line of note from above. And this line is—
AllowedGrantTypes = GrantTypes.ClientCredentials
What we are doing here is specifying our authentication flow. And, what we want is to allow the UWP app (our client), to access the Web API—which is identified in the ‘AllowedScopes’—by presenting the client id and secret when authenticating with Identity Server.
If you now open a command line at the location of our project, type
dotnet run
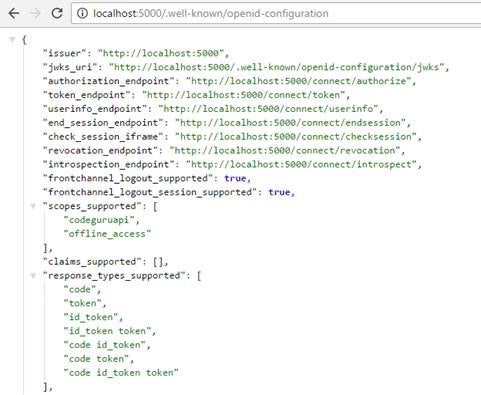
And then go to our browser, navigate to http://localhost:5000/.well-known/openid-configuration. You should see something like this, letting us know what we’ve done is working.
Figure 1: The response from Identity Server
| Note: If you’re using Chrome and your JSON isn’t formatted as in Figure 1, don’t despair. There are a number of JSON formatters available in the Chrome Web Store. |
Before we move on to your Web API, I would like to bring your attention to the documentation for Identity Server, that you may find here.
There are many getting started guides, examples, and much more. I recommend looking through this documentation at your convenience. But again, for this article, I’m focusing only on what we need so we may complete what we are setting out to do here.
The Web API
Our Web API is going to be simple. We need to create an ASP.NET Core Web API project from the templates available in Visual Studio (No Authentication). I’ve then utilized the template generated controller, but modified it to look like this…
[Authorize]
[Route("api/[controller]")]
public class ValuesController : Controller
{
   // GET api/values
   [HttpGet]
   public string Get()
   {
      return $"Some data from our web api :
         { DateTime.Now.Ticks }";
   }
}
Other than this representing a very simple end-point to give us a response, I’ve added the [Authorize] attribute to the controller. Then, to enable the authorization for this API, we need to add this package to our Web API project.
"IdentityServer4.AccessTokenValidation": "1.0.1"
I’ve also added the following code to the Configure method in the startup.cs before the app.UseMvc().
app.UseIdentityServerAuthentication(new
   IdentityServerAuthenticationOptions
{
   Authority = "http://localhost:5000",
   RequireHttpsMetadata = false,

   ApiName = "codeguruapi"
});
Note that I’ve set the authority to the URL of the Identity Server, but if you’ve changed the URL for this project, please go ahead and alter the preceding code as needed. However, because the default is localhost:5000 when running from the command line using Kestrel, we need to change our Web API’s URL so we don’t clash with the Identity Server. To do this, open the API’s program.cs, and add in an alternative URL of your choosing, like so…
var host = new WebHostBuilder()
   .UseKestrel()
   .UseUrls("http://localhost:80")
   .UseContentRoot(Directory.GetCurrentDirectory())
   .UseIISIntegration()
   .UseStartup<Startup>()
   .Build();
From the code above, I’ve gone with http://localhost:80, and to make sure the changes are effective, you may run the application from the command line by typing dotnet run, which should give you this result…
Figure 2: The Web API running under port 80
If you navigate to the URL via your browser, you should see an error. But, if you look at your console window, you should be seeing something like the following if logging is enabled…
Figure 3: The Web API responding with ‘Bearer was not authenticated’
If everything looks correct to you, you’re all set and you have everything except the UWP application, which we’ll move on to now.
UWP
These Universal Windows Platform applications, to me, represent a good option for desktop applications running on Windows 10 in an enterprise setting. The Windows Store offers several options targeted specifically at the enterprise; they are there for you to take advantage of.
For this example, I’ve created an empty UWP project from the templates in Visual Studio. Then, I’ve added this package to the project…
"IdentityModel": "2.1.1"
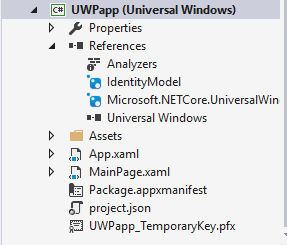
After its installation, I have a UWP like the following.
Figure 4: The UWP project
To allow us to see some output at runtime, I’ve gone ahead and edited my MainPage.xaml to look like this:
<Grid Background="{ThemeResource
 ApplicationPageBackgroundThemeBrush}">
   <TextBlock x_Name="outputTextBlock"
      HorizontalAlignment="Center"
      VerticalAlignment="Center"/>
</Grid>
Then, all we need to do is to call the API from our UWP app. We can do this by adding the following code to our MainPage.xaml.cs.
public MainPage()
{
   this.InitializeComponent();

   CallApi();
}

async void CallApi()
{
   var accessToken = await GetAccessTokenAsync();

   using (var httpClient = new HttpClient())
   {
      httpClient.SetBearerToken(accessToken);
      httpClient.BaseAddress =
         new Uri("http://localhost");

      var response = await httpClient
         .GetStringAsync("api/values");

      outputTextBlock.Text = response;
   }
}

async Task<string> GetAccessTokenAsync()
{
   var discoveryClient = await DiscoveryClient
      .GetAsync("http://localhost:5000");
   var tokenClient = new
      TokenClient(discoveryClient.TokenEndpoint,
      "uwpclient", "jds8£$Asd!d;j3");

   var tokenResponse = await
      tokenClient.RequestClientCredentialsAsync
      ("codeguruapi");

   if (tokenResponse.IsError)
   {
      // Do something if there's an error
   }

   return tokenResponse.AccessToken;
}
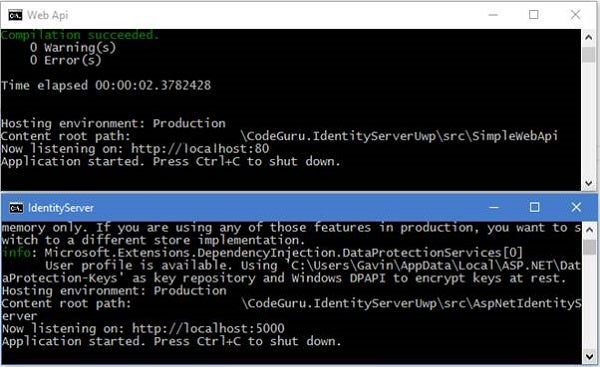
Now, all we need to do is run all three applications in tandem. Using dotnet run from the command line, start both of the ASP.NET Core applications. If everything is going to plan, you should have two console windows that are showing you something like this…
Figure 5: The Identity Server and Web API running
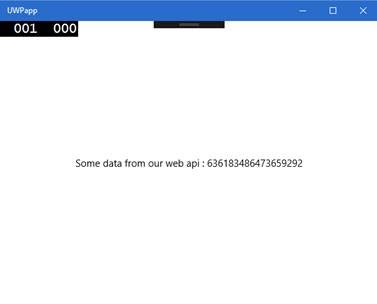
All that remains is to run the UWP app, and observe the results. Figure 6 shows the output from my app for you to compare against.
Figure 6: The UWP app running
Conclusion
Now that we’ve come to the end of this article, what have we covered? We’ve seen how to set up a Web API that is protected by Identity Server, through which a UWP app authenticates, and in turn is allowed access to the Web API. If you have any questions about this article, you may find me on Twitter @GLanata.


