

Introduction
I’ve been an advocate of web standards for some time now and I’m frequently surprised to find new ways to simplify seemingly unrelated tasks. This article discusses how web standards can be used in ASP.NET control development to simplify some development tasks, build lighter weight and accessible controls, and increase layout flexibility.
Background
This article assumes that you have a basic understanding and knowledge of Web Standards. If you need a primer, there are a ton of references out there; one of my favorite is A List Apart.
Typical Scenario
You’ve probably built a glorified sign-in page before using nested tables and lots of spacer images to control layout (see Traditonal.aspx in the accompanying source code) and a handful of properties to control how it is rendered. It may have even looked something like this:
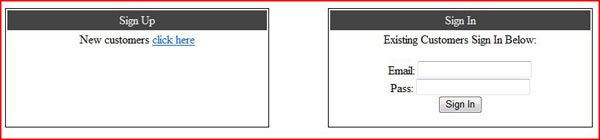
Your HTML code probably resembled this:
<table>
   <tr>
      <td>
         <table>
            <tr>
               <td></td>
            </tr>
            <tr>
               <td></td>
            </tr>
         </table>
      </td>
      <td></td>
      <td>
         <table>
            <tr>
               <td></td>
            </tr>
            <tr>
               <td></td>
            </tr>
         </table>
      </td>
   </tr>
</table>
Like all good developers, you built a web control to handle its functionality so you could reuse it across sites. I’ve added a property named LayoutDirection to control swapping the two boxes left and right positions.
When it comes to custom control rendering of such controls, you probably often find yourself with if-else blocks scattered throughout your rendering code.
private void BuildControlTree()
{
   Controls.Add(new LiteralControl(@"
      <table style=""width: 100%"" cellspacing=""0""
             cellpadding=""0"">
      <tr> <td style=""width: 45%"">"));

   if(LayoutDirection == Direction.Standard)
      BuildNewCustomers();
   else
      BuildExistingCustomers();

   Controls.Add(new LiteralControl(@"</td>
      <td style=""width: 10%""> </td>
      <td style=""width: 45%;text-align:right;"">"));

   if(LayoutDirection == Direction.Standard)
      BuildExistingCustomers();
   else
      BuildNewCustomers();

   Controls.Add(new LiteralControl(@"</td></tr></table>"));
}
This has the following drawbacks:
- Your code is cluttered with excess HTML.
- Making changes is prone to errors because you often have to cut up the fragments further and matching tags properly in a code view can be difficult.
- Adding properties to control the layout usually results in scattered if-else blocks.
- Styling options are not very flexible without a property for each option/
- Difficult to navigate and use on mobile devices such as a Blackberry.
Using Web Standards
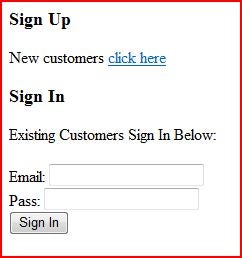
I always like to start with a barebones structure and then apply styling afterwards. The goal is to keep the presentation nearly identical to the original. All you need here is a DIV for each box and something to designate a title (I choose the H3 tag in this case).
Your final HTML markup should look something like (See Standards.cs and WebStandards_Bare.aspx):
<div>
   <div id="signupdiv">
      <h3>Sign Up</h3>
      <p>New customers <a href="#">click here</a></p>
   </div>
   <div id="signindiv">
      <h3>Sign In</h3>
      <p>Existing Customers Sign In Below:</p>
      Email: <input type="text" /><br />
      Pass: <input type="text" /><br />
      <input type="submit" value="Sign In" />
   </div>
</div>
The rendered output looks like this:
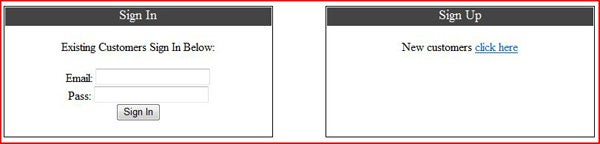
Now, all you need to do is apply some styling to get it looking right. For simplicity, I assigned each DIV an ID in the web control and referenced it in CSS by ID. In the real world, you would probably want to expose properties to control the CSS class assigned to the DIV. Your final CSS looks like the following:
#signupdiv, #signindiv {
   width: 45%;
   border: 1px solid #000;
   padding: 1px 1px 0 1px;
   text-align:center;
   height: 175px;
}
#signupdiv
{
   float:left;
}

#signindiv
{
   float:right;
}

#signupdiv h3, #signindiv h3
{
   color: #fff;
   background: #444;
   text-align:center;
   width: 100%;
   height: 25px;
   font-weight:normal;
}
Remember how in the traditional model I added a property named LayoutDirection to the web control so I could swap the left and right boxes? That’s no longer needed thanks to the floating techniques available. Not only did you remove an entire property block from your code, you replaced it with two lines of external CSS code!
Side-By-Side Comparison
You’ve accomplished identical layouts using both techniques, so how do they stack up next to each other? For simple tasks such as this, I often like to look at two factors: number of lines of code, size of rendered output. I know that line counting isn’t a practical measurement for most projects, but in this case I think it’s a good gauge of simplicity.
| Traditional | Standards Based | % Change | |
|---|---|---|---|
| Web Control Lines of Code | 128 | 55 | -57% |
| Rendered HTML Page Size | 1,899 bytes | 1,224 bytes | -35% |
| Easily viewable on Blackberry handheld | No | Yes | N/A |
| Easily viewable without style sheet? | No | Yes | N/A |
Points of Interest
If you have been paying attentionm you might point out that I’ve excluded the size of the external CSS document (which, by the way, is 361 bytes). The reason for this is that because it will be cached by the browser; it only needs to be downloaded once.