


Introduction
In the rush to get the first version of Windows Phone out, Microsoft did not include a lot of features in the initial launch of the Windows Phone platform. Many useful things, like copy/paste, were missing; another notable absentee feature was support for a local database.
Application developers were expected to use server-side databases to achieve their desired results. Fortunately for us, open source efforts from the developer community delivered support for SQLite to the Windows Phone, allowing the platform to have local database support before it was officially launched in Windows Phone Mango.
Getting the SQLite Library
The SQLite client for Windows Phone is available at http://sqlitewindowsphone.codeplex.com/
At the time of writing the article, version 0.6.1 was available (download link is http://sqlitewindowsphone.codeplex.com/releases/58255/download/191978).
The download (available under the LGPL license) includes the source code. When you extract the contents of the download, you will notice that it contains 2 Visual Studio Projects, (a) Community.CsharpSqlite.WP (which contains the code for the wrapper), and (b) a test project CSharpSqlite.TestProject (which contains test code).
For application developers targeting local database support, the binary, which is compiled from the project “Community.CsharpSqlite.WP” is necessary.
How SQLite on Windows Phone Works
SQLite on Windows Phone uses the feature of isolated storage as is data repository.
Hands-On
Open the downloaded code and compile the code for the SQLite Client for Windows Phone. Copy the binary file “Community.CsharpSqlite.WP.dll” to a temporary location.
Now Create a Visual Studio project called “WLSQLiteDemo” of type Windows Phone application, from the available templates under Silverlight for Windows Phone, under Visual C#.
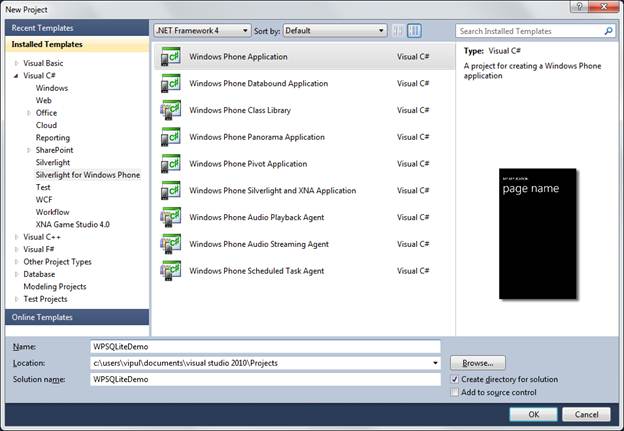
Create a Visual Studio Project
When prompted for the target Windows Phone OS version, select WP OS7.1
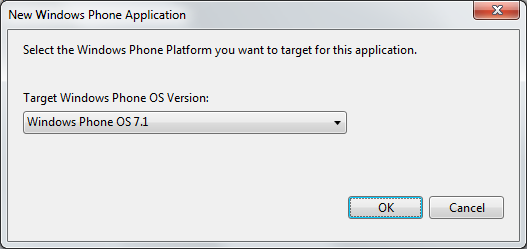
Target Windows Phone OS Version
On the MainPage.xaml file, add four button controls titled, (a) “Create/Open”, (b) “Populate”, (c), “Clear”, and (d) “Close”.
Now, add the SQLite client file as a reference from the project settings. The file should be in the temporary location we mentioned above.
In the code behind for MainPage.xaml (the file MainPage.xaml.cs), add the following line to make the SQLite library available on the page.
// MainPage.xaml.cs
using System;
using System.Collections.Generic;
using System.Linq;
using System.Net;
using System.Windows;
using System.Windows.Controls;
using System.Windows.Documents;
using System.Windows.Input;
using System.Windows.Media;
using System.Windows.Media.Animation;
using System.Windows.Shapes;
using Microsoft.Phone.Controls;
using SQLiteClient;
Now we need to add the event handler for the button click events. But before we do that, we need to add a variable of type SQLiteConnection, which we will use in the application.
public partial class MainPage : PhoneApplicationPage
    {
        SQLiteConnection mySQLiteDB = null;

        // Constructor
        public MainPage()
Now, we can add code to establish the connection to the SQLite database under the click event handler for the button “Create/Open”.
private void buttonOpen_Click(object sender, RoutedEventArgs e)
        {
            if (mySQLiteDB == null)
            {
                mySQLiteDB = new SQLiteConnection("MyTestDB");
                mySQLiteDB.Open();

                buttonOpen.IsEnabled = false;
                buttonClear.IsEnabled = false;
                buttonPopulate.IsEnabled = true;
                buttonClose.IsEnabled = true;
            }
        }
The above code will ensure to open the connection only when a connection object does not exist. It also sets the initial visibility state of the other UI controls on the page.
Next, we need to create a table and populate data. We will achieve this using the SQLiteCommand object.
We will first create a table that will contain an ID, a name and a zipcode. We will then populate this table with dummy data.
private void buttonPopulate_Click(object sender, RoutedEventArgs e)
        {
            SQLiteCommand cmd = mySQLiteDB.CreateCommand("Create table RegisteredStudents (id int primary key,name text,zipcode numeric(7))");
            int i = cmd.ExecuteNonQuery();
            int id = 0;
            string name = "Name" + id;
            int zipcode = 98000;
            for (int j = 0; j < 10; j++)
            {
                id++;
                name = "Name" + id;
                zipcode = 98000 + id;
                cmd.CommandText = " Insert into RegisteredStudents (id, name, zipcode) values (" + id + ",\"" + name + "\"," + zipcode + ")";
                i = cmd.ExecuteNonQuery();
            }
            buttonPopulate.IsEnabled = false;
            buttonClear.IsEnabled = true;
        }
In the code snipped above, we created a table called RegisteredStudents and added 20 rows in the table. We also updated the visibility of the UI controls on the page.
The next step involves cleaning up of the database. Here we can again use SQLiteCommand object and fire off a SQL script to drop the table.
We will do that in the click event handler for the “Clear” button.
private void buttonClear_Click(object sender, RoutedEventArgs e)
        {
            SQLiteCommand cmd = mySQLiteDB.CreateCommand("drop table RegisteredStudents");
            int i = cmd.ExecuteNonQuery();

            buttonPopulate.IsEnabled = true;
            buttonClear.IsEnabled = false;
        }
In the code snippet above, we also change the visibility of the buttons for “Clear” and “Populate”
Finally, as part of application cleanup, we have provided the ability to drop and dispose the connection. This will help preserve system resources.
private void buttonClose_Click(object sender, RoutedEventArgs e)
        {
            if (mySQLiteDB != null)
            {
                mySQLiteDB.Dispose();
                mySQLiteDB = null;
                buttonOpen.IsEnabled = true;
                buttonClear.IsEnabled = false;
                buttonPopulate.IsEnabled = false;
                buttonClose.IsEnabled = false;
            }

        }
Now, build and compile your applications. If you want, you can add some TextBox controls and bind them to the database fields (this exercise is left to the reader) to see that you are creating a real data-bound application.
If you are having issues compiling code, you can download a sample of working code below.
Congratulations, we just built a Windows Phone application using SQLite as a local database store. Woohoo!!!!
Summary
In this article, we learned how to create a local database store on Windows Phone using SQLite client libraries. I hope you have found this information useful.