

Introduction
In the world of networking, a socket is defined as an
endpoint of bidirectional inter-process communication flow across the Internet.
The sockets provide a way for delivering data packets to a process based on a
combination of local and remote IP addresses and port numbers.
The first version of the Windows
Phone operating System, Windows Phone 7, did not include support for
sockets. However, the latest version of Windows Phone OS, Windows Phone 7.5
supports sockets and this enables Windows Phone developers to create rich mobile
applications, which can communicate over TCP and UDP sockets.
Let us look at an example of a Windows Phone application that
uses sockets for communication.
Hands On
Create a new “Silverlight
for Windows Phone,” project of type “Windows Phone application,” called WPSocketDemo.
Add a Windows Phone Class project to the generated solution and call it “SocketLibrary”.

Figure 1: New Silverlight Project
Make sure the target Windows Phone OS version in the project
properties is “Windows Phone OS 7.1”.

Figure 2: Silverlight SocketLibrary
In SocketLibrary, create a class called “SocketLibrary” and
add the following members to the SocketLibrary class.
Socket s = null;
static ManualResetEvent done = new ManualResetEvent(false);
Now, add a method to establish a TCP connection.
public bool EstablishTCPConnection(string host, int port)
        {
            s = new Socket(AddressFamily.InterNetwork, SocketType.Stream,
ProtocolType.Tcp);
            SocketAsyncEventArgs socketEventArg = new SocketAsyncEventArgs();
            socketEventArg.RemoteEndPoint = new DnsEndPoint(host, port);
            socketEventArg.Completed += new
EventHandler<SocketAsyncEventArgs>(delegate(object o, SocketAsyncEventArgs e)
                {
                    done.Set();
                });
            done.Reset();
            s.ConnectAsync(socketEventArg);
            return done.WaitOne(10000);
        }
Note that in the EstablishTCPConnection, we create an
instance of the socket class. We will be reusing this Socket class variable in
other methods also. We set the ManualResetEvent when the Completed event is
fired on the socket class.
Now, add a method to send and receive data over TCP socket.
public bool Send(string data)
        {
            if (s != null)
            {
                SocketAsyncEventArgs socketEventArg = new SocketAsyncEventArgs();
                socketEventArg.RemoteEndPoint = s.RemoteEndPoint;
                socketEventArg.UserToken = null;

                socketEventArg.Completed += new
EventHandler<SocketAsyncEventArgs>(delegate(object o, SocketAsyncEventArgs e)
                    {
                        done.Set();
                    });

                socketEventArg.SetBuffer(Encoding.UTF8.GetBytes(data), 0,
Encoding.UTF8.GetBytes(data).Length);
                done.Reset();
                s.SendAsync(socketEventArg);
                return done.WaitOne(10000);
            }
            return false;
        }


public string Receive()
        {
            string received = "";
            if (s != null)
            {
                SocketAsyncEventArgs socketEventArg = new SocketAsyncEventArgs();
                socketEventArg.RemoteEndPoint = s.RemoteEndPoint;

                socketEventArg.SetBuffer(new byte[1024], 0, 1024);
                socketEventArg.Completed += new
EventHandler<SocketAsyncEventArgs>(delegate(object o, SocketAsyncEventArgs e)
                {
                    if (e.SocketError == SocketError.Success)
                    {
                        received = Encoding.UTF8.GetString(e.Buffer, e.Offset,
e.BytesTransferred).Trim('\0');
                    }
                    done.Set();
                });


                done.Reset();
                s.ReceiveAsync(socketEventArg);
                done.WaitOne(10000);
            }
            return received;
        }
Finally, add a method to close the socket when we are done
using it.
public void CloseSocket()
        {
            if (s != null)
            {
                s.Close();
            }
        }
Now that we have the SocketLibrary class all coded up, we
next add the UI elements in the main project “WPSocketDemo” to exercise the
socket class.
Add four textboxes and a button to the Main Page as shown
below.
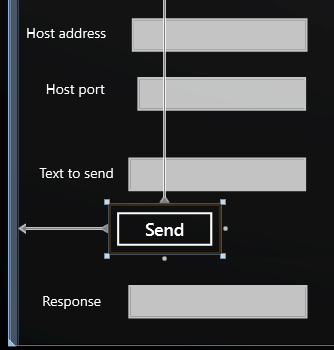
Figure 3: Add the UI elements
Now wire up the click event on the Send button and add the
following code.
private void buttonSend_Click(object sender, RoutedEventArgs e)
        {
            bool retVal;
            SocketLibrary.SocketLibrary sl = new SocketLibrary.SocketLibrary();
            retVal = sl.EstablishTCPConnection(textBoxHostAddress.Text,
int.Parse(textBoxHostPort.Text));
            retVal = sl.Send(textBoxTextToSend.Text);
            textBoxResponse.Text = sl.Receive();
            sl.CloseSocket();
        }
If you are getting build errors, make sure you add the reference
to the SocketLibrary project in the WPSocketDemo project. If you have trouble
following along, you can download sample code below.
Now build and run the application.
In the Hostaddress text box, enter your local IP address (if
running in the emulator). (e.g. 192.168.0.10)
In the Host Port textbox, enter a valid port number. E.g. 67
In the “text to send” textbox, enter the text you want to
send over the socket.
Now click Send and you will find that the Response Textbox
echoes out the string we sent over the TCP socket connection.
If you are having trouble at this stage, make sure you have
enabled TCP services on your Windows Machine by selecting “Simple TCP
Services” from “Turn Windows features On or Off” from Control Panel->Programs
and Features.
Viola, we have a Windows Phone application using sockets for
communication.
Summary
In this article, we learned how to use sockets in Windows
Phone 7.5 application.