

Microsoft Visual Studio Team Suite (VSTS) seamlessly integrates the development environment with a suite of robust testing products that make developers more efficient when testing their applications. Ease of use and integration with the IDE are two critical factors to look for when examining a software testing product and VSTS offers both. VSTS provides the capability to generate skeleton code for unit tests with just a couple of mouse clicks, and without having to ever leave the IDE. This means that developers can create more effective unit tests faster, and because they never even have to leave the IDE, developers create their tests in an environment they are used to, without requiring a third-party tool. Because of this familiarity, developers will be more likely to use the tools to create rigorous tests to ensure the quality of their software.
One of the new capabilities provided by VSTS is data-driven testing. With data-driven tests, developers can connect their unit and Web tests to data sources that can be used to drive their test cases. This article will discuss data-driven testing for both unit tests and Web tests and how your organization can realize the benefits of these capabilities.
Data-Driven Unit Tests
One common test scenario involves the tricky business rules surrounding the validity of data input provided by a user. For example, a business rule such as A customer cannot have an address that is a P.O box unless they are outside the U.S. might be a requirement given to the development team by business users. Normally, a developer would have to spend time coding a unit test that validates this specific business rule. However, with data-driven unit testing, you can model the input to your application using an outside data source and then can use this data to drive your testing.
The sample application that has been created for this article is a contact manager Web application that provides some basic functionality such as adding a new contact, viewing, a list of current contacts and deleting a contact. You will learn how to use data-driven testing to validate the business rules of this application by using both unit tests and Web tests by simulating user input into the system.
Generating Unit Tests with VSTS
For this example, I want to create unit tests for my ContactInfoManager class that provides the functionality for adding, removing, and retrieving ContactInfo objects. The four methods I want to generate unit tests for are: Add(), DeleteByID(), GetNumContacts(), and GetAllContacts().
To generate the Unit Test skeleton code, right-click in my code file and select “Create Unit Tests.” as shown in Figure 1.
Figure 1: Create Unit Tests
Then, select the methods to generate unit tests for and the project to output the tests to (See Figure 2).
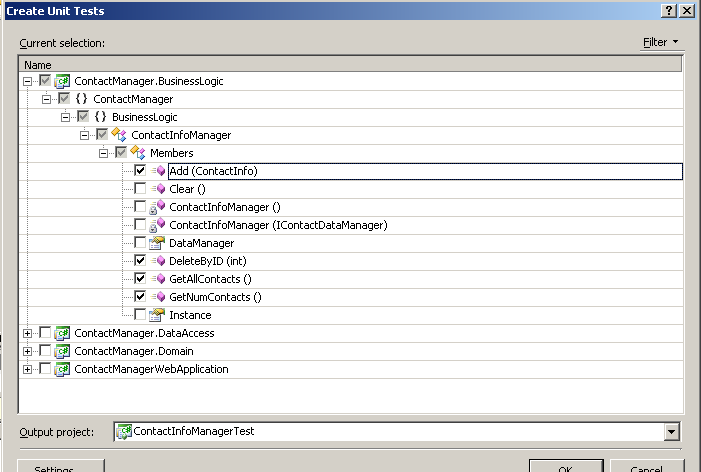
Figure 2: Choosing Methods to Generate Test Cases
After clicking OK, four test methods are added to the ContactInfoManagerTest project in the ContactInfoManagerTest.cs file. (If the project is not already created, VSTS will prompt you to create it.) By default, each of them has an Assert.Inconclusive() method as their last statement. If your team is using Test Driven Development, you might find that this behavior is incongruous with the TDD mantra of Red-Green-Refactor because an inconclusive assertion always displays a yellow icon instead of a red icon that TDD practitioners normally expect. Thankfully, this behavior can be disabled by clicking the “Settings” button, and un-checking the “Mark all tests inconclusive by default” checkbox.
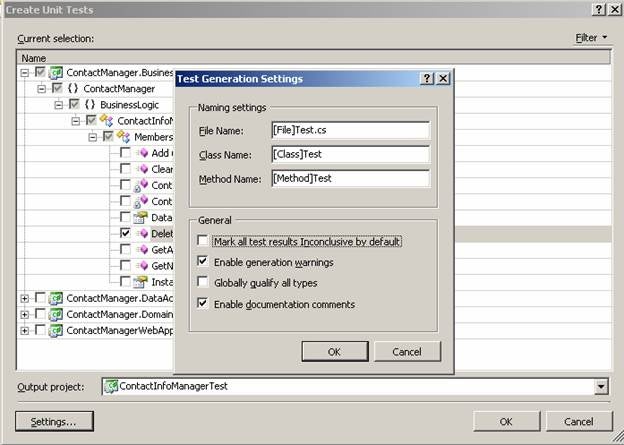
Figure 3: Generating Unit Test Code
After clicking OK, VSTS generates the skeleton code for these unit tests and adds them to the test project. Execute the tests from within the Test Manager by clicking the “Play” button.

Figure 4: Test Manager Button
Because the code for the methods under test has not yet been implemented, all the tests will fail.

Figure 5: Failed Tests
VSTS will generate skeleton code for the unit tests; however, it is still up to the developer to implement the unit tests effectively. For information on how to write a meaningful unit tests, please see this MSDN article.
The Application under Test
The application under test is a Contact Manager application. The specific functionality under test exists in two classes, ContactInfo and ContactInfoManager. The ContactInfo class encapsulates all of the data for a single contact (Name, address, and so forth). The ContactInfoManager class encapsulates the business logic surrounding the contact manager application. The class diagrams for ContactInfo and ContactInfoManager are below.
Figure 6: Class Diagrams of ContactInfo and ContactInfoManager
I want to use data driven tests to verify that only invalid contact info records will be rejected by the application. I also want to ensure that valid contact info records will always be accepted and added. In this application, the validity of the ContactInfo object is determined by several simple rules:
- The ContactInfo object is not null.
- The name property of the ContactInfo object is not null and has a length > 0.
- If a phone number is present, it must be exactly 10 numeric characters.
- If a zip code is present, it must be exactly 5 numeric characters.
- If a state is present, it must be the 2 character abbreviation.
Now, I will create two test methods to verify these rules, one called TestValidContactInfo(), which verifies that valid contact info records are always added to the system, and another called TestInvalidContactInfo(), which verifies that invalid records are rejected by the system. These methods build a ContactInfo object from the data provided in the aforementioned tables, and then pass this object to the ContactInfoManager‘s Add() method. The Add() method handles the validation of the ContactInfo object and is implemented to return the ID of the ContactInfo object if it is successfully added, or -1 if the record is rejected.
Connecting the Unit Tests to a Data Source
Before going any further implementing the unit tests, the tables that will be used to drive my tests need to be created. In a SQL Server 2005 database, I have created two tables (ValidContactInfo to be used by the TestValidContactInfo() unit test and InvalidContactInfo to be used by the TestInvalidContactInfo() unit test). As you can see in Figures 7 & 8, each table’s columns correspond directly to one of the ContactInfo object’s properties. The ValidContactInfo table is populated with data values that are valid and should always be accepted and added to the application.
Figure 7: Valid Data
The InvalidContactInfo table is populated with values that are invalid and should be rejected by the application.

Figure 8: Invalid Data
Note: In this case, I have used a SQL Server 2005 Database as my data source. However, you can use a variety of different data sources such as Access files, any ODBC data source, or an Oracle Database.
Now that the tables have been created and populated, I want to connect their corresponding unit tests to them. Unit tests can be connected to a data source from the Test Manager view by clicking on the test to be bound to a data source and then modifying the “Data Connection String” and “Data Table Name” values in the Unit Test Properties window to point to the desired data source and table.
Figure 9: Unit Test Properties
This adds a DataSource attribute to the unit test method. Also, you can decorate the test methods with the DataSource attribute yourself, if you so choose.
![]()
Figure 10: Data Source Attribute
Now that the unit tests are connected to their data sources, it is time to write the code to implement the tests.
The TestValidContactInfo unit test uses data from its table to build ContactInfo objects that are passed to the Add() method of the ContactInfoManager class. This test verifies that valid contact information is always successfully added to the application. Unit tests access the data in their data source through the TestContext.DataRow property that stores the value of the current row in the data source as you iterate through all of the rows and is of type System.Data.DataRow. The source listing below illustrates how the ContactInfo object is populated with values from the current row in the data source.
[DataSource("System.Data.SqlClient",
            "Data Source=VSTS;Initial Catalog=ContactManagerWebTest;
             Integrated Security=True", "ValidContactInfo",
            DataAccessMethod.Sequential), TestMethod()]
public void TestValidContactInfo()
{
   ContactInfoManager manager = ContactInfoManager.Instance;
   ContactInfo ci = new ContactInfo();
   ci.Name = TestContext.DataRow["Name"].ToString().Trim();
   ci.AddressLine1 =
      TestContext.DataRow["AddressLine1"].ToString().Trim();
   ci.AddressLine2 =
      TestContext.DataRow["AddressLine2"].ToString().Trim();
   ci.City     = TestContext.DataRow["City"].ToString().Trim();
   ci.Email    = TestContext.DataRow["Email"].ToString().Trim();
   ci.Phone    = TestContext.DataRow["Phone"].ToString().Trim();
   ci.State    = TestContext.DataRow["State"].ToString().Trim();
   ci.ZipCode  = TestContext.DataRow["ZipCode"].ToString().Trim();
   ci.HomePage = TestContext.DataRow["HomePage"].ToString().Trim();

   //manager will return a new id for this Contact
   int contactId = manager.Add(ci);

   //assert that it is not -1
   Assert.IsFalse(contactId == -1);
}
The TestInvalidContactInfo unit test builds ContactInfo objects and passes them to the Add() method of the ContactInfoManager class. This test will be used to verify that no invalid contact information can be added to your system.
[DataSource("System.Data.SqlClient",
            "Data Source=VSTS;Initial Catalog=ContactManagerWebTest;
             Integrated Security=True",
            "InvalidContactInfo", DataAccessMethod.Sequential),
            TestMethod()]
public void TestInvalidContactInfo()
{
   ContactInfoManager manager = ContactInfoManager.Instance;
   ContactInfo ci = new ContactInfo();
   ci.Name = TestContext.DataRow["Name"].ToString().Trim();
   ci.AddressLine1 =
      TestContext.DataRow["AddressLine1"].ToString().Trim();
   ci.AddressLine2 =
      TestContext.DataRow["AddressLine2"].ToString().Trim();
   ci.City     = TestContext.DataRow["City"].ToString().Trim();
   ci.Email    = TestContext.DataRow["Email"].ToString().Trim();
   ci.Phone    = TestContext.DataRow["Phone"].ToString().Trim();
   ci.State    = TestContext.DataRow["State"].ToString().Trim();
   ci.ZipCode  = TestContext.DataRow["ZipCode"].ToString().Trim();
   ci.HomePage = TestContext.DataRow["HomePage"].ToString().Trim();

   int contactId = manager.Add(ci);
   int invalidContactId = -1;
   Assert.IsTrue(contactId == invalidContactId);
}
The tests are based off of the requirement that the Add() method returns a unique ID of the newly inserted ContactInfo. If the ContactInfo is invalid, and thus not added, the method returns -1.