In Part 1 of this series, you created the Framework for your Drawing Application, but it’s by no means perfect yet. A lot of improvements still need to be made. In this article, you will:
- Include the capability to first draw, then fill, the drawn objects
- Include a marquee while drawing, just so you have a visible cue of the diameters of the current drawing
- Refine the triangle logic because in Part 1, the triangle wasn’t as it should be, and didn’t really draw according to the mouse movements
Enough talk. It’s time to start!
Enable the Filling of Already Drawn Shapes
At the moment, you can draw outline shapes, and draw Filled shapes, but you cannot Fill an already drawn shape with a different color; that’s all about to change now. The first step is to add a Context Menu Object to frmTools. (If you have not downloaded the code from Part 1, you should do so first).
Adding A Context Menu
- Open frmTools in the Form designer.
- In the Toolbox (On the Windows Forms tab), scroll down until you find the Context Menu Object. Double-click it to add it to frmTools.
- In the Properties Window, name the Context Menu cmCanvas.
- Make sure the cmCanvas is still selected. If a Context Menu is selected, the menu will appear at the top of the form. Click Context Menu at the top of the form.
- Add the following items to the menu:
- On frmTools, select the button named butCFillColor, and set the ContextMenu property to cmCanvas.
- You may change the Image property to a better picture indicating that this button contains a sub menu. In the included project, you will notice that I have changed the picture to PaintBucket2.png; it looks almost the same as the original except that it now contains a small black box in the bottom right corner—to indicate to the users where to click.
| Control Name | Properties | ||||||
|---|---|---|---|---|---|---|---|
| mnuCOutline |
|
||||||
| mnuCFillDraw |
|
||||||
| mnuCDrawFill |
|
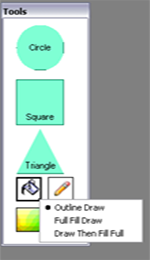
Speaking of clicking, add the necessary code to frmTools to set the proper ToolTips and enable the ContextMenu actions.
Adding code to frmTools to activate the new ContextMenu
- In frmTools_Load, replace the following line:
tipCanvas.SetToolTip(butCFillColor, "Draw A Filled Shape")
With:
tipCanvas.SetToolTip(butCFillColor, "Fill Options")
'Private Sub butCFillColor_Click(ByVal sender _
'As System.Object, ByVal e As System.EventArgs) _
'Handles butCFillColor.Click
   'How Many Times Is This Tool Clicked?
   'sFillClicked = sFillClicked + 1
   'If This Tool Is Clicked Once ...
   'If sFillClicked = 1 Then
   ' 'Load A Different Picture (Change State)
   ' butCFillColor.Image = Image.FromFile("PaintBucket.png")
   ' 'Display A Different ToolTip, To Indicate State /
   ' 'Tool Change
   ' tipCanvas.SetToolTip(butCFillColor, "Return to Outline
   ' Color")
   ' 'Fill Is Clicked, Fill The Objects Based On blnFillClicked
   ' blnFillClicked = True
   'Else
   ' 'Fill Is Not Clicked Anymore, Return To Original Button /
   ' 'Tool State
   ' sFillClicked = 0
   ' blnFillClicked = False
   ' butCFillColor.Image = Image.FromFile("PaintBrush.png")
   ' tipCanvas.SetToolTip(butCFillColor, "Draw A Filled Shape")
   'End If
'End Sub
Private Sub butCFillColor_MouseDown(ByVal sender As Object, _
   ByVal e As System.Windows.Forms.MouseEventArgs) _
   Handles butCFillColor.MouseDown
   If e.Button = MouseButtons.Left And e.X > 28 And e.Y > 28 Then
      butCFillColor.ContextMenu.Show(butCFillColor, _
                                     New Point(e.X, e.Y))
   End If
End Sub
Here, you are determining where the MouseButton was pressed, so that you then can show the context menu.
Private Sub mnuCOutline_Click(ByVal sender As System.Object, _
   ByVal e As System.EventArgs) Handles mnuCOutline.Click
   blnOutlineDrawClicked = True
   blnFillDrawClicked    = False
   blnDrawFillClicked    = False
   mnuCOutline.Checked   = True
   mnuCFillDraw.Checked  = False
   mnuCDrawFill.Checked  = False
End Sub
Private Sub mnuCFillDraw_Click(ByVal sender As System.Object, _
   ByVal e As System.EventArgs) Handles mnuCFillDraw.Click
   blnOutlineDrawClicked = False
   blnFillDrawClicked    = True
   blnDrawFillClicked    = False
   mnuCOutline.Checked   = False
   mnuCFillDraw.Checked  = True
   mnuCDrawFill.Checked  = False
End Sub
Private Sub mnuCDrawFill_Click(ByVal sender As System.Object, _
   ByVal e As System.EventArgs) Handles mnuCDrawFill.Click
   blnOutlineDrawClicked = False
   blnFillDrawClicked    = False
   blnDrawFillClicked    = True
   mnuCOutline.Checked   = False
   mnuCFillDraw.Checked  = False
   mnuCDrawFill.Checked  = True
   blnCircleClicked      = False
   blnTriangleClicked    = False
   blnSquareClicked      = False
   blnDrawClicked        = False
   blnEraserClicked      = False
End Sub
The filling subs
The next step is to do the actual filling of the shapes once they are drawn. For this, you’ll need to add the following two sub procedures to frmCanvas. The first sub is called CanvasFloodFill. The whole object of this function is to do the actual filling of the shapes. Take a closer look:
Private Sub CanvasFloodFill(ByVal FillBmp As Bitmap, _
                            ByVal cffX As Integer, _
                            ByVal cffY As Integer, _
                            ByVal cffNewCol As Color)
'Get Old Pixel Color
Dim cffOldCol As Color = FillBmp.GetPixel(cffX, cffY)
'If Old Color Equals The New Color Exit
If cffOldCol.ToArgb = cffNewCol.ToArgb Then Exit Sub

'Create A Stack For All The Points
Dim FloodStack As New Stack(1000)
'Put Current Pixel On Stack
FloodStack.Push(New Point(cffX, cffY))
'Set Current Pixel To New Color
FillBmp.SetPixel(cffX, cffY, cffNewCol)

'While There Are Items In The Stack
Do While FloodStack.Count > 0
   'Remove & Return Point At Top Of Stack
   Dim FillPt As Point = DirectCast(FloodStack.Pop(), Point)
   If FillPt.X > 0 Then CanvasGetSetPixel(FillBmp, FloodStack, _
      FillPt.X - 1, FillPt.Y, cffOldCol, cffNewCol)    'Left
   If FillPt.Y > 0 Then CanvasGetSetPixel(FillBmp, FloodStack, _
      FillPt.X, FillPt.Y - 1, cffOldCol, cffNewCol)    'Top
   'Right
   If FillPt.X < FillBmp.Width - 1 Then CanvasGetSetPixel(FillBmp, _
      FloodStack, FillPt.X + 1 _, FillPt.Y, cffOldCol, cffNewCol) _
      FillPt.Y + 1, cffOldCol, cffNewCol)    'Bottom
Loop
FloodStack.Clear()    'Clear Stack
End Sub
The next sub is called CanvasGetSetPixel. This procedure identifies the current pixel’s colour, and then whether the current pixel is the same as the old colour—in other words, replace the current colour with the new colour.
Private Sub CanvasGetSetPixel(ByVal gspBmp As Bitmap, _
                              ByVal GetSetStack As Stack, _
                              ByVal gspX As Integer, _
                              ByVal gspY As Integer, _
                              ByVal gspOldCol As Color, _
                              ByVal gspNewCol As Color)
'Get Current Pixel Color
Dim gspClr As Color = gspBmp.GetPixel(gspX, gspY)
'If Current Color Equals Old Color
If gspClr.ToArgb = gspOldCol.ToArgb Then
'Push Next Point To Top Of Stack
   GetSetStack.Push(New Point(gspX, gspY))
'Set New Pixel Color
   gspBmp.SetPixel(gspX, gspY, gspNewCol)
End If
End Sub
These two subs work in conjunction with one another. The one sub creates a Stack onto which you can put all the pixels that need to be replaced. The next sub determines which pixels to replace. Not really as complicated as it looks.
To use these subs, you need to call the CanvasFloodFill sub (which in turn calls the CanvasGetSetPixel sub) inside the picCDraw_MouseDown event.
If blnDrawFillClicked Then
   'Get Current Color
   Dim old_color As Color = bImage.GetPixel(e.X, e.Y)
   'New Color = Selected Color
   Dim new_color As Color = cColor
   If e.Button = MouseButtons.Left Then
      'Fill Shape With New Color If Left Clicked
      CanvasFloodFill(DirectCast(picCDraw.Image, Bitmap), _
                                 e.X, e.Y, new_color)
   Else
      'Fill Shape With Old Color If Right Clicked
      CanvasFloodFill(DirectCast(picCDraw.Image, Bitmap), _
                                 e.X, e.Y, old_color)
   End If
End If
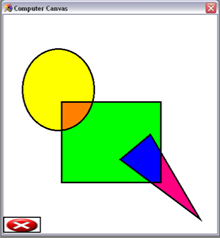
When run, the user is now able to fill the drawn shapes. He/she will select either choose to draw in Outline mode or in Full Fill mode. The user cannot draw with Draw then Fill mode! Once the user has drawn a shape, he/she needs to select the Draw then Fill option. Once selected, he/she can just click once inside the section he/she wants filled. If the user wants to draw again, he/she must select Outline Draw or Full Fill Draw again. Large drawn objects will take a bit longer to fill than smaller shapes.