By Thiru Thangarathinam
Themes are rich skin templates available in ASP.NET 2.0 that allow you to define the look of pages and controls, which can then be applied to all the pages in your application to provide consistency for the entire application. A skin is a set of properties and templates that can be used to standardize the size, font, and other characteristics of controls on a page. A theme incorporates multiple skins and stylesheets to specify the overall look and feel of a Web site. Themes and skins will be simple to package, transfer, and apply to other Web sites. Themes are extremely flexible in that they can be applied to an entire Web application, page, or individual control. Theme files are stored with the extension .skin, and all the theme files for a Web application are stored in a special folder named Themes. ASP.NET 2.0 ships with several themes out of the box. It is also possible for you to create custom theme files. In the next section, we will see how to use pre-defined themes supplied with ASP.NET 2.0.
How Themes Work
A theme can consist of a combination of a css file and one or many skin files to control how ASP.NET server controls are rendered. These files are all contained within a folder, the name of which determines the theme. This folder, in turn, resides within a parent Themes folder. Any subfolders of the Themes folder act as themes for a site. For example, if you have a folder called ControlsTheme within the Themes folder, you can apply that theme to a page using the following declaration.
<%@ pagetheme="ControlsTheme"language="C#"%>
Once you place the theme attribute in the page directive, all the controls in that page automatically inherit the theme.
Using Pre-Defined Themes
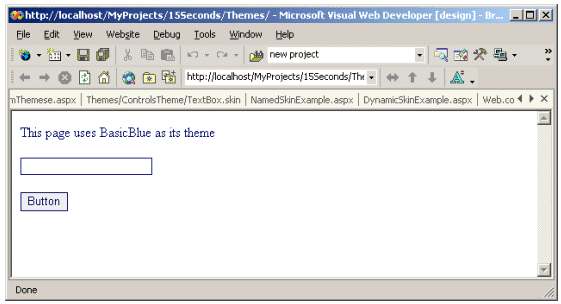
ASP.NET ships with some standard themes that you can try out for yourselves, including ones such as BasicBlue and SmokeAndGlass. Let us take a look at an example to understand how to use one of the pre-defined themes in an ASP.NET page.
<%@ pagetheme="BasicBlue"language="C#"%>
<html>
<headrunat="server">
<title>Using Pre-defined Themes</title>
</head>
<body>
<formrunat="server">
<asp:labelid="Label1"runat="server"width="232px">This page uses
BasicBlue as its theme</asp:label>
<br/><br/>
<asp:textboxid="TextBox1"runat="server">
</asp:textbox>
<br/>
<br/>
<asp:buttonid="Button1"runat="server"text="Button"/>
<br/>
</form>
</body>
</html>
Navigating to the above page using the browser results in the following output.
Creating Custom Themes and Applying Them to the Pages
There are times when the built-in themes supplied with ASP.NET 2.0 may not meet your needs. In that case, you may want to create custom themes and apply them consistently to all the pages in your Web application. Creating custom themes in ASP.NET is a very simple process. All you need to do is create a special folder named Themes and place all your skins under that folder. Once you place the required .skin files under the Themes folder, they automatically become available to all the pages in the Web site.
Creating Custom Themes
This section explains how to create custom themes and use them in an ASP.NET pages. To create custom skins, you need to create .skin files and save them under the theme folder, which represents a specific theme. Skins look a bit like ASP.NET files in that they contain server control definitions and are used to alter the visual appearance of ASP.NET elements.
Here are the steps for creating custom themes.
- In Visual Studio.NET Whidbey, create a new folder named Themes by right clicking on the Web site name and selecting New Folder from the context menu. Note that the name “Themes” is pre-defined and must only be used to hold custom themes.
- Once the Themes folder is created, right click on the Themes folder and select New Folder from the context menu to create a folder named ControlsTheme. The name of the folder is the name of the theme that will be used in different ASP.NET pages to refer to this theme.
- Now, right click on the ControlsTheme folder and select Add New Item from the context menu. In the Add New Item dialog box, select Text File from the list and enter the name of the file as Label.skin. As you can see from the name of the file, this will be used to hold the style and formatting for a label control. Once the Label.skin is created, add the following code to the Label.skin file.
<asp:labelrunat="server"width="300px"height="24px"font-bold="True" font-overline="True"font-size="Medium"forecolor="Green"backcolor="Silver"/>
- Note that the above code does not contain the id attribute for the label control since that needs to be specified in the pages that use the themes. The above line of code will automatically apply the specified formatting to any asp:label elements that are placed on a page to which the ControlsTheme is applied. The control definitions must include a runat=”server” attribute, but they should never include an id attribute. Also, the style attributes for a control can be set to standard styles, or linked to the styles defined in a CSS sheet.
- Now that we have created a skin for the label control, let us create a skin file for the button control as well. To do this, again right click on the ControlsTheme folder and select Add New Item from the context menu. In the Add New Item dialog box, specify the name of the .skin file as Button.skin. After the file is created, modify the file contents to look like the following.
<asp:buttonrunat="server"forecolor="RoyalBlue"backcolor="Silver"/>
- So far, we have created the styles for a button control and a label control. Now that we have created these custom skins file, we can apply these consistently to all the pages in the Web site, providing a consistent look and feel for the entire Web application. Note that we have not specified the id attribute in the control declarations since the control that is actually inheriting this style will have its own id attribute.
Applying Custom Themes to an ASP.NET Page
Once you create the custom themes, applying them to individual ASP.NET pages is very simple. Basically you need to follow the same process that we used for applying built-in themes to an ASP.NET page. For the purposes of this example, let us create an ASP.NET Page named CustomThemes.aspx and modify the code in the page to look like the following.
<%@ page theme="ControlsTheme"
language="C#" %>
<html>
<head runat="server">
<title>Applying Custom Themes to an ASP.NET Page</title>
</head>
<body>
<form
runat="server">
<asp:button id="Button1" runat="server"
text="This button inherits the style
specified in the Button.skin file" />
<br/><br/>
<asp:label id="Label1" runat="server">This
Label inherits the style specified in the Label.skin file</asp:label>
</form>
</body>
</html>
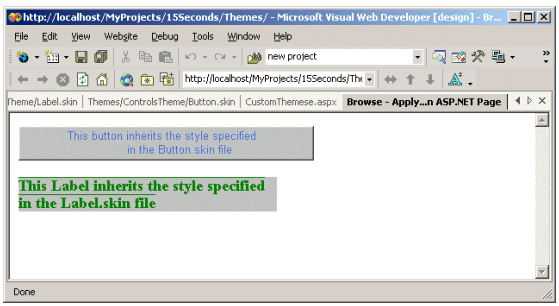
The above code is very simple and straightforward. We start by specifying the name of the theme as the value of the theme attribute. Then we have a label control and a button control in the page. As you can see, we haven’t set any style attributes for these controls. But since we have already specified the skins for the button and the label control in the ControlsTheme folder, the controls in the page will automatically inherit the style settings specified in the skin files. If you navigate to the above page from the browser, you will see the following output.
The skins that we have created so far are called Control Skins, meaning that they automatically apply to all controls of the same type. For example, if you create a default control skin for a label control, the skin applies to all label controls on pages where you are using the theme. Control skins can be further classified into default skins and named skins. The skins we have created earlier are an example of default skins in which the skin is matched exactly by control type. For example, a button skin applies to all the button controls in the page. Named skins are skins for which you must assign a skinid identifier and then use that in different pages to reference it. This approach is very flexible in that you can add multiple entries for the same type of control to a skin file, uniquely identifying each one using a skinid attribute. This means you can have more than one style for a label control on a page. Let us demonstrate this by looking at an example. For this example, let us add one more skin named TextBox.skin to our ControlsTheme. After the file is created, we will add the following lines of code to it.
<asp:textbox skinid="lightGrayBackColor"
runat="server" font-bold="True" font-size="Small"
forecolor="RoyalBlue" backcolor="LightGray"
font-italic="True"/>
<asp:textbox skinid="whiteBackColor"
runat="server" font-bold="True" font-size="Small"
forecolor="DarkGoldenrod" backcolor="GhostWhite"
font-italic="True"/>
The above code contains the style for the textboxes. However, this is different from the previous skins (label.skin or button.skin) in that this skin file contains multiple styles for a textbox control. Each style is uniquely identified by the skinid attribute. The page that uses the above skin can uniquely identify each of the textbox styles by specifying the skinid attribute. Let us look at an example that illustrates this.
<%@ pagelanguage="C#"theme="ControlsTheme"%>
<html>
<headrunat="server">
<title>Named Skins Example</title>
</head>
<body>
<formrunat="server">
<asp:textboxid="TextBox1"skinid="lightGrayBackColor"
runat="server"width="392px">
This
control uses the lightGrayBackColor
Skinid
</asp:textbox> <br/><br/><br/>
<asp:textboxid="TextBox3"skinid="whiteBackColor"runat="server"
width="392px">
This
control uses the whiteBackColor skinid
</asp:textbox>
</form>
</body>
</html>
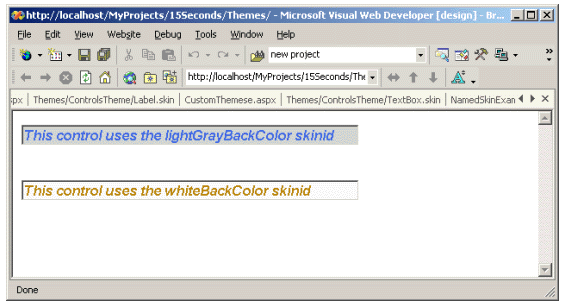
The above code starts by specifying the Theme attribute in the Page directive. Then it declares two textboxes with each one containing different text. As you can see from each of the textbox declarations, they now contain a new attribute named skinid and the value of this attribute matches up with the value of the skinid attributes specified in the TextBox.skin file. Now if you navigate to the above page using a browser, you will see the following output.
As you can see from the above example, named skins offer us the flexibility to create multiple styles for the same control and then differentiate them by using the skinid attribute.
Accessing Themes Programmatically
There are times where you may want to programmatically set the theme for an ASP.NET page depending on certain parameters. For example, in a library management Web site, you might want to provide one theme for the visitors of the Web site and provide a completely different theme for the administrators of the Web site. You can easily accomplish this by setting the Theme property of the Page object to an appropriate value at runtime. The following code example shows how to set the Theme attribute of the page at runtime.
<%@ pagelanguage="C#"%>
<html>
<headrunat="server">
<scriptrunat="server">
void
Page_PreInit(object sender, System.EventArgs e)
{
Page.Theme = "ControlsTheme";
}
</script>
<title>Dynamic Named Skins Example</title>
</head>
<body>
<formrunat="server">
<asp:textboxid="TextBox1"skinid="lightGrayBackColor"
runat="server"width="392px">
This
control uses the lightGrayBackColor skinid
</asp:textbox> <br/><br/><br/>
<asp:textboxid="TextBox3"skinid="whiteBackColor"
runat="server"width="392px">
This
control uses the whiteBackColor skinid
</asp:textbox>
</form>
</body>
</html>
The above code is very similar to our previous example except that in this case, we set the Theme attribute for the Page at runtime using the Page.Theme property. Note that you can set the Theme attribute only in the Page_PreInit event.
Configuring Themes Using the web.config File Settings
So far we have configured the Theme attribute using the Page directive. We have also seen an example where we set the theme of the page at runtime. Even though both of these approaches are very useful, you need to perform this in each and every page. This can be very tedious and can result in a lot of duplication of code, especially when all the pages in the Web site use the same theme. In that case, you can obviate the need to specifying the theme attribute in every page by setting the theme attribute in the pages element (that is present under system.web) in the web.config file. For example, the following line of code in the web.config file specifies that all the pages in the Web site will use the ControlsTheme as their theme.
<pages theme="ControlsTheme" />
All the pages in the application will use the above theme specified in the web.config file unless a Theme attribute appears in the Page declaration, in which case, the selected theme for that page will override the theme specified in the web.config file.
Themes and CSS
To apply a default stylesheet for a theme, all you need to do is create a .css file within the appropriate theme folder in the Themes directory. For example, you could place a css file called DefaultStyle.css within the Themes\DefaultStyle folder. When you specify the DefaultTheme in the theme attribute of the @page directive in a page, the DefaultStyle.css file is automatically applied. Note that you can still apply a stylesheet manually in the HTML by specifying the Link element in the head tag. You can actually place more than one stylesheet file within a theme folder – in which case ASP.NET will attempt to apply all stylesheets in that theme folder to the site, combining definitions contained in all the CSS files. Themes versus CSS Style Sheets Themes are similar to CSS style sheets in that both themes and style sheets define a set of common attributes that apply to any page where the theme or style sheet is applied. However, themes differ from style sheets in the following ways:
Conclusion
This article has examined what themes are and how they can be used to provide a consistent look and feel for an entire Web application. We have also seen how to extend built-in themes by creating custom themes that can go a long way in customizing the look and feel of a Web site. Also covered was how to set the Theme property of the Page object at runtime using the Page.Theme property and how to set the theme for an entire Web site using the entries defined in the web.config file. Finally, the article looked at how to use existing CSS style sheets in conjunction with ASP.NET 2.0 themes, which makes it possible to leverage existing investments in CSS style sheets.
About the Author
Thiru has many years of experience in architecting, designing, developing and implementing applications using Object Oriented Application development methodologies. He also possesses a thorough understanding of software life cycle (design, development and testing). He is an expert with ASP.NET, .NET Framework, Visual C#.NET, Visual Basic.NET, ADO.NET, XML Web Services and .NET Remoting and holds MCAD for .NET, MCSD and MCP certifications. Thiru has authored numerous books and articles. He can be reached at thiruthangarathinam@yahoo.com.


