

By Paul Glavich
In an increasing number of the web applications I have had to design
and work on, the client has requested the best of both worlds when it comes to
authentication. Ideally, they would like their intranet users to be able to
seamlessly logon on to the system (windows integrated authentication) and make
authorization decisions based on their domain roles, as well as be able to
have external parties log onto the system using standard forms
authentication. In this article, I will show you one way of achieving this
goal.
Note: This method assumes that cookies are allowed and enabled on the client
browsers.
Assumed Knowledge
This article assumes the reader is familiar with the setup of forms
authentication in ASP.Net, windows principal objects, role based
authorisation, reflection, and is also familiar with the setup of Windows
integrated authentication using the Internet Information Services (IIS) snap-in
management console.
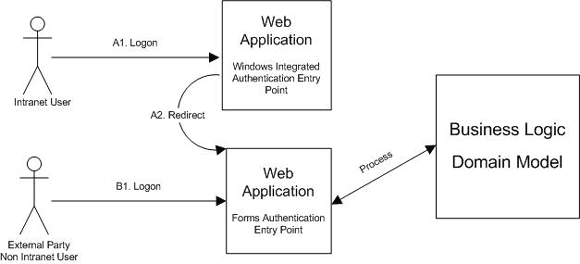
A Common Model
In order for this mixed model authentication scenario to work, and also to make
it easy on developers, a common and familiar security model is required for
authentication, and subsequently authorisation. If we were trying to emulate
windows integrated authentication from a forms authentication based site, it
would be extremely difficult, if not impossible to accurately mimic, and obtain
a users roles from the domain in a seamless manner. It would be much easier to
let windows/IIS provide a users roles for us in an appropriate principal
object, and to extract those roles, and mimic a forms authentication process.
This method means that to the application, all users have authenticated via the
forms authentication method, but that intranet users will have a larger and
more specific set of roles attached with their principal object. The diagram
below illustrates this.
Basic Setup
In ASP.Net, you cannot have a single application with different modes of
authentication. For this to work we will need to have 2 applications, or
in IIS terms, 2 virtual directories. These act as 2 different entry points to
the same application. One is a very simple application that uses windows
integrated authentication, the other is the complete/main application using
forms authentication. The windows authorisation site exists only for the
purposes of extracting an intranet users roles and passing them to the forms
authentication site. To examine this in more detail, we will begin by giving a
detailed explanation of the Windows Integrated authorisation site/entry point.
Windows Integrated Authentication Site
As mentioned above, this site exists only to extract role information from an
intranet user, and pass it along to the forms authentication site. Forms
authentication (for our purposes) uses cookies as the method of indicating an
authenticated user. It can be configured to use cookieless mode, but we will
only be using cookies in this scenario. So we will need to peform 3 main
functions :
- Authenticate the user (Performed automatically for us by IIS and in combination with the web.config)
- Extract a users roles to pass to main application.
- Supply a valid forms authentication ticket to the forms authentication entry point so that the site believes we are a valid authenticated user.
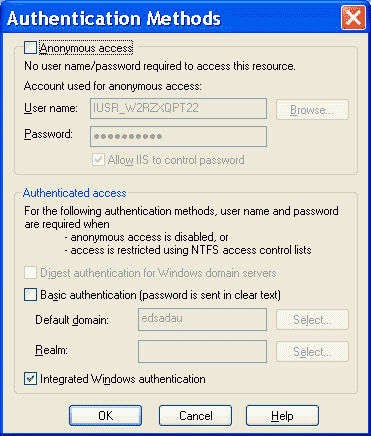
Step 1 – Authenticate the User
Accomplishing step 1 is easy. When creating the virtual directory using the IIS
MMC snap-in, ensure that ‘Anonoynous Access‘ is disabled
(not checked) and that ‘Integrated Windows Authentication‘ is
checked/enabled as shown in the diagram below:
Modifying the Web.Config
We also need to ensure that the Web.Config file of our windows authentication
entry point application is set up correctly. Below is a sample of a Web.Config
file. The important part is the ‘authentication’ element. It must have its
‘mode’ set to ‘Windows’.
<system.web>
   .....
   <authentication mode="windows">
   .....
</system.web>
You might be thinking, in order to get access to a windows principal with roles,
we will need to use impersonation. Well actually, no we dont. I too at first
thought this, and it still obviously will work fine if we do enable
impersonation, but the principal is still passed to our application at an early
stage for us to work with. Within the ‘Application_AuthenticateRequest’ event
in the Global.asax file of our application is where we will be
extracting the role information. If we needed to work with the principal, and
have it attached to our currently running thread, then impersonation would be
required.
Important Note: This application needs to exist in a virtual directory, that is
a sub-directory or sub-application of the main forms authentication
application. The reason for this is that both applications will need to have
the same HOST name. Cookies are generated and named according to the host name
they apply to. Specifying the same cookie name in code, but using
different host names will cause 2 different cookies to be generated because of
the different host names. The diagram below shows an example of how the
virtual directories should be setup in the IIS manager.
Step 2 – Extracting the users role information
Extracting the users role information involves a bit of reflection magic.
Bascially, we use reflection to look inside the principal object that is
provided to us by Windows/IIS when the user is authenticated. Please note that
this involves reflecting over specific properties of the principal object and
is not guranteed to work in future versions of .Net. It does work, and has been
tested in production environments using .Net Version 1.1 (V1.1.4322).
The most logical place to extract the role information from the principal is the ‘Application_AuthenticateRequest’
event. Briefly, we look at a particular string array within the principal to
extract any role information from the principal. There are some tricks to watch
out for, which we will cover shortly. Listed below is some code that will
extract the role from a principal object.
private static string[] GetRoles(IPrincipal princ)
{
Type type = princ.GetType();
// Note: This code sets the 'MAGIC_NUMBER' field of the principal object.
FieldInfo field2 = type.GetField("MAGIC_NUMBER", BindingFlags.Instance | BindingFlags.NonPublic | BindingFlags.Static);
field2.SetValue(princ,40); // This value can be any number but defaults to 23.
princ.IsInRole("DummyRole"); // This call is required so that the subsystem goes and retrieves a list of roles.
// Without this call, the principal object does not contain any roles in its internal
// variables, and thus the code below that uses reflection to get the value of this variable
// will fail and return NULL.
FieldInfo field = type.GetField("m_roles", BindingFlags.Instance | BindingFlags.NonPublic);
String[] roles = (String[]) field.GetValue(princ);
return roles;
}
And we obviously need to call this routine from the ‘Application_AuthenticateRequest’
event as in the code shown below:
protected void Application_AuthenticateRequest(Object sender, EventArgs e)

{

   WindowsIdentity ident = WindowsIdentity.GetCurrent();

   WindowsPrincipal wind_princ = new WindowsPrincipal(ident);
string[] roles = GetRoles(wind_princ);
...
...
}
You will notice in the ‘GetRoles’ method above, we set a ‘MAGIC_NUMBER’. This
number determines how many roles the user can have before the roles are stored
in a hashtable in the principal object, instead of a string array. This is done
for performance reasons but the important part is, that if your intranet users
are on a domain and happen to have more than this ‘MAGIC_NUMBER’ number of
roles, then the string array you are getting the users roles from will be
empty. By default, this ‘MAGIC_NUMBER’ is set to 23. The code in the method
above provides the ability to change this ‘MAGIC_NUMBER’ to any value you like.
For our purposes, we will change it to something higher to make sure we get all
the roles in our string array.
Step 3 – Simulating a valid forms authentication ticket and supplying the users
role information
Now we need to put all this together. We need to take the role information we
have extracted from the principal, and pass it over to our forms authentication
entry point application, and tell that entry point we have a valid autenticated
user.
The Windows authentication entry point site has extracted the role information.
Now it only needs to create a forms authentication ticket, store the roles in
the user data, and issue the ticket. The ticket must have the same path and
name across both the forms authentication site and the windows authentication
site. The code below shows the code that should be placed in the ‘Global.asax –
Application_AuthenticateRequest’ event for the storage of the roles and the
redirection.
protected void Application_AuthenticateRequest(Object sender, EventArgs e)
{
//NOTE: Because we are encrypting some information and passing it to another site, the MACHINE.CONFIG file needs
// to have the <machinekey> element set to a static value. By default, this value is autogenerated for each web
// application on the machine and will therefore fail if you try and pass encrypted tickets/data between
// web apps.
WindowsIdentity ident = WindowsIdentity.GetCurrent();
WindowsPrincipal wind_princ = new WindowsPrincipal(ident);
string[] roles = GetRoles(wind_princ); // See method above for implementation of this method
string roleData = String.Join(";",roles);
FormsAuthenticationTicket ticket = new FormsAuthenticationTicket(1,"your_ticket_name",DateTime.Now,DateTime.Now.AddMinutes(30),false,roleData,"/");
string encTicket = FormsAuthentication.Encrypt(ticket);
// NOTE: The name of the HttpCookie must match what the FormsAuth site expects.
Response.Cookies.Add(new HttpCookie("YourCookieName",encTicket));
// Ticket and cookie issued, now go to the FormsAuth site and all should be well.
Response.Redirect("http://localhost/TestFormsAuthSite/IntoSite.aspx");
}
As you can see, we encrypt this ticket using the forms authentication standard
routines. For this to work across applications, modifications must be made to
the machine.config file to ensure encryption keys are not auto-generated for
each application. The modification required is shown below:
<!--     Your old machine.config entry will resemble the line below  -->

<!--     <machineKey validationKey="AutoGenerate,IsolateApps" decryptionKey="AutoGenerate,IsolateApps" validation="SHA1" /> -->
<!-- You NEED to change that entry to resemble something like the line below. Note: The validationKey/decriptionKey should be your own -->
<machineKey validationKey="357356792679345184568256876535689056434617489465" decryptionKey="357356792679345184568256876535689056434617489465" validation="SHA1"/>
Lastly, the ‘Global.asax’ file in the forms authentication entry point site must
be modified, so that the ‘Application_AuthenticateRequest’ event knows how to
decipher a valid ticket issued by the windows authentication entry point site,
and assign these roles to the current principal. The web.config of this site
must also be setup to have matching attributes (ie. name) as what the Windows
Authorisation site is issueing. The code below demonstrates this :
Web.Config
<authentication mode="Forms">

   <forms name="YourCookieName"   <!-- This cookie name matches what the Windows Auth site creates  -->

      loginUrl="forms_login.aspx"
protection="All"
timeout="30"
path="/" <!-- This same path as what the Windows auth site uses when creating the cookie/auth ticket -->
requireSSL="false"
slidingExpiration="true">
</forms>
</authentication>
<authorization>
<deny users="?" /> <!-- Only allow authenticated users. Add your application and domain specific access roles here -->
</authorization>
Application_Authenticate Event (Forms Auth site)
protected void Application_AuthenticateRequest(Object sender, EventArgs e)

{

   bool cookieFound = false;
HttpCookie authCookie = null;
HttpCookie cookie;
for(int i=0; i < Request.Cookies.Count; i++)
{
cookie = Request.Cookies[i];
if (cookie.Name == FormsAuthentication.FormsCookieName)
{
cookieFound = true;
authCookie = cookie;
break;
}
}
// If the cookie has been found, it means it has been issued from either
// the windows authorisation site, is this forms auth site.
if (cookieFound)
{
// Extract the roles from the cookie, and assign to our current principal, which is attached to the
// HttpContext.
FormsAuthenticationTicket winAuthTicket = FormsAuthentication.Decrypt(authCookie.Value);
string[] roles = winAuthTicket.UserData.Split(';');
FormsIdentity formsId = new FormsIdentity(winAuthTicket);
GenericPrincipal princ = new GenericPrincipal(formsId,roles);
HttpContext.Current.User = princ;
}
else
{
// No cookie found, we can redirect to the Windows auth site if we want, or let it pass through so
// that the forms auth system redirects to the logon page for us.
}
}
Final Considerations
The Forms authentication site must also contain code for users who are logging
in via the standard logon page. Typically, you would assign a single role of
low privilege to identify the user as a non-intranet user (eg. external to the
organisation) and assign that role to a principal and attach it to the
HttpContext in similar fashion to the code above.
At this point, your application can make role checks against the principal
attached to the HttpContext in a standard manner. The application does not have
to worry about where the user came from, standard role checks are all that is
needed, and can therefore tailor the user experience based on the different
roles.
Conclusion
The technique I have described here is not trivial, and requires reasonable
knowledge of the forms authentication system that .Net uses. The advantage is
great though. You can now let both intranet users and external parties access
the same application in a consistent manner with the standard role based access
checks being applied to determine a users functionality and origin. The code to
do this is not great and the setup can be tricky, but this technique does work
and is currently being used in a number of ways within our organisation to
great effect.
If you are having difficulty with the concept or its implementation, I can be contacted
at glav@aspalliance.com.
Happy coding…