

WSE 2.0 Specifications and How to Program Them Using .NET
WSE 2.0—Web Service Enhancements: This is nothing but a .NET class Library for building or applying the WSE Specifications to baseline Web services. The WSE specifications are:
- WS-Security
- WS-Trust
- WS-Policy
- WS-Secure Conversation
- WS Addressing
- WS Messaging
- WS-Attachments
You also can call WSE 2.0 to build a Web service without using HTTP protocol.
Today’s Web services are secured by SSL (Secure Socket Layer) using HTTPS protocol. This works very well when communication is Point-to-Point (P2P). But, some limitations exist when you develop scalable distributed applications; specifically, when you develop an application that crosses security domains. For example, if SOAP messages are routed to one or more intermediaries before reaching the final destination and the entire route uses SSL, the ultimate receiver still has to communicate with the sender to authenticate the sender of the SOAP message. That pattern is difficult to scale well.
This is where WSE comes into the picture to develop better scalable and secured Web services. For this, WSE uses WS-Security. This specification adds security credentials to the SOAP message itself. When the SOAP message sender (client) sends a SOAP message to a Web service or SOAP requester in WSE, these credentials are called security tokens. These tokens are verified before executing the web service. WSE gives three options to secure Web services. They are adding security credentials to a SOAP message, digitally signing the SOAP message, and encrypting the SOAP message.
Now, let me show you how to add security tokens to your baseline Web service. These means basically that you are going to authenticate the user who calls your Web service.
Note: If you’re looking for an article on baseline Web service, please browse the following URL: http://www.csharp-corner.com/members/rsramadurai.asp.
Step 1
First, open Visual Studio .NET IDE and create a new ASP.NE Web service project. Give WebServiceSecurity as the project name. After creating the project, right-click on it and select WSE 2.0 Settings, as shown here
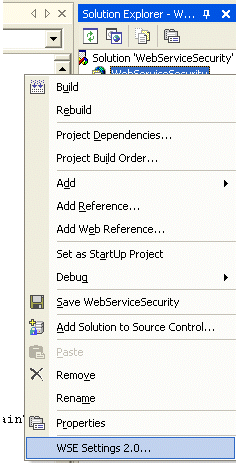
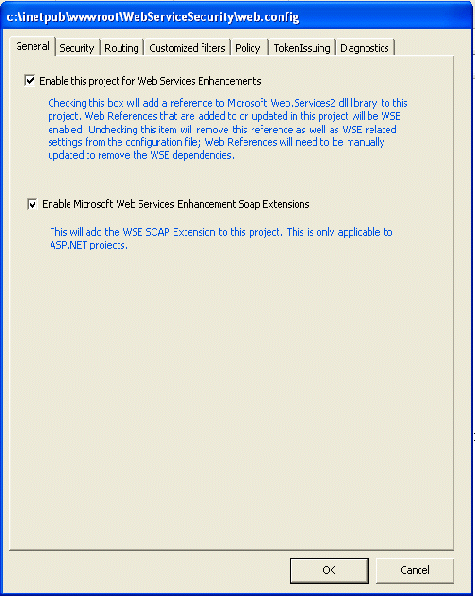
Step 2
This option will open a new dialog box, as shown below. Check both the checkboxes. Enabling the first checkbox makes this project enabled to use WSE; Microsoft.Web.Services2.dll will be added to the project and the following entry will be added to the Web.config file. In addition to this, the Web references that are created from this point on will include WSE 2.0 support in the proxy generations.
When you check the first check box, the following entry is added to the web.config file:
   <configSections>
      <section name="microsoft.web.services2"
               type="Microsoft.Web.Services2.Configuration.
                     WebServicesConfiguration, Microsoft.Web.
                     Services2, Version=2.0.0.0, Culture=neutral,
                     PublicKeyToken=31bf3856ad364e35" />
   </configSections>

<system.web>
When you check the second check box, the following entry is added to the web.config file:
   <webServices>
      <soapExtensionTypes>
         <add type="Microsoft.Web.Services2.WebServicesExtension,
                    Microsoft.Web.Services2, Version=2.0.0.0,
                    Culture=neutral,
                    PublicKeyToken=31bf3856ad364e35"
                    priority="1" group="0" />
      </soapExtensionTypes>
   </webServices>
</system.web>
Now, add the following WebMethod to the Service1.asmx file. In this method, you have used the RequestSoapContext class to request the SOAP message that sent your client with security tokens.
Once you get the SoapContext, check whether this request is only a SOAP request. If it is other then a SOAP request, such as a HTTP-GET, HTTP-POST throws the exception saying that only a SOAP request will be accepted. Once verified that the request is a SOAP request, check whether the request has any tokens. This can done in a loop throwing the tokens collections. If UserToken exists in this collection, get the user taken. Verify the UserName if that matches the Windows user name and then allow the user to execute the web service. Otherwise, just return.
[WebMethod]
   public  int  Add (int Num1  ,int Num2  )
   {
      int total=0;
      SoapContext soapCntxt = RequestSoapContext.Current;

      if (soapCntxt==null)
         throw new Exception("Only SOAP requests are permitted.");

      foreach(SecurityToken token in soapCntxt.Security.Tokens)
      {
         if(token is UsernameToken )
         {
            UsernameToken usertoken =(UsernameToken )token;
            if(usertoken.Username=="baba23")
            {
               if (usertoken.Principal.IsInRole(System.Net.Dns.
                   GetHostName()+ @"\Users"))
               total=  Num1+Num2;
            }
         }
      }
      return total;
   }
Now you have finished the Web service that can handle the SOAP request with securiry tokens based on this. It can authenticate the user and authorize it to execute the Web method.
Now, you need to test this Web service. Add one Windows Console Application to this solution to consume this Web service. Once added, right-click on it and select the WSE 2.0 Settings as shown above. But, this time, the Dialog box only has one check box enabled because this project is not a ASP.NET Web Service project, showing that you cannot apply SOAP extensions to it. So, check the first check box and say OK to the dialog box.
Now, you need to add a Web Reference. After adding it, when you look at the proxy class, which is generated by .NET, you can see the difference between a baseline Web service proxy class and a WSE-supported Web service proxy class.