


Before you start reading this Article, I suggest you to go through our first article in the series, Real-Time Web enablement with SignalR in .Net (Part I), in order to set the context right. It talks about SignalR and the general idea of its functionality and usability. In this installment we will look at the programming aspect of the usability scenarios and how to use it in real life setups.
Getting Started with SignalR
Your app should be on .Net Framework 4.0 or higher in order to use SignalR. You can find it on NuGet. To install SignalR in your .Net Application, click on Tools | Library Package Manager | Package Manager Console in your VS IDE and run the command:
install-package Microsoft.AspNet.SignalR
This command will add Server and Client side libraries in your application, making you ready to go.
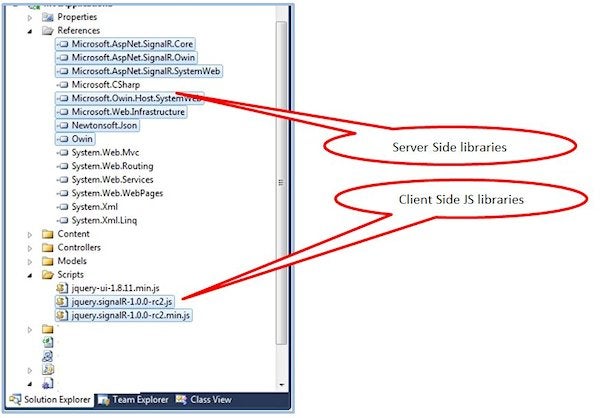
Add Server and Client side libraries
Follow these steps to get hands on with SignalR with one simple example.
Adding Reference to SignalR
Add reference to SignalR in your class file.
using Microsoft.AspNet.SignalR;
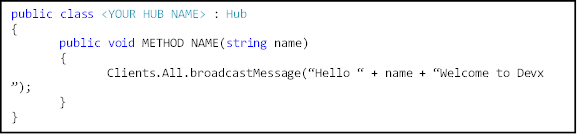
Implementing the Endpoint
The endpoint, or SignalR service, can be implemented using persistent connection or hubs. I will be implementing Hubs in the example.
Route Registration
Once the endpoint is implemented, we must register it in the routing system, which will allow us to access it. The best place to do this is in the Application_Start() of Global.asax, so that it runs during initialization of the application.

Implementing the Web Client
Implementing the web client begins by including a reference to the client library of this component on our page or view. In order to support older clients that do not natively support JSON deserialization, you will have to add a reference to the json2.js script library before referencing SignalR related script files.

Initiate the Connection
To initiate a connection from client to server, you need to start the hub in script. Along with initiating connection you would want to define the event that triggers the server push; it could be anything from a button click or some status change. To keep it simple, in the example it’s a button click on your page.
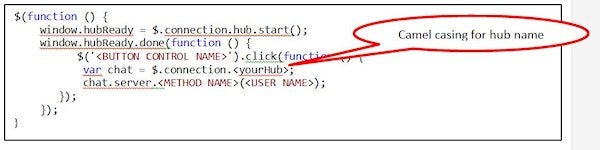
Defining Client Procedure to be Invoked by Server
If you recall from the “Implementing the endpoint” step, I had called a method broadcastMessage ()on all the clients. The definition of this method is done in the script at the client side as shown below.

Now run the application in multiple browser windows and click at the button control on one page. This will display “Hello <User Name> Welcome to Devx” in <YOUR HTML CONTROL> in opened browser windows, even for those that were not active.
So far so good, without worrying about the rawness of transport and real time web intricacies, you made your site RealTime web enabled in no time with SignalR. But is that all you wanted for your site, if not…then read on.
Unraveling Real World Problems with SignalR
Applications in the real world are not as easy as the example we saw just now. To implement real-time web with SignalR, you will have to play around with the connection ids of connected clients. And if authorization is enabled for a web site then you will have to write your own code and save the connection id along with logged in user details, as authorization is not offered here out of the box. Today authorization is more or less an integral part of web sites, and I am not taking up some unexplored topic here. Nevertheless, I would like to detail different strategies to help you choose the best one for your requirement.
Diverse Approaches for Managing Connection IDs
- DEPRECATED: In its initial releases, SignalR provided a way to override its Connection Factory where a programmer could assign a unique connection id to each connected client and that could be used while invoking the client method; however it is no longer supported.
http://stackoverflow.com/questions/9606569/signalr-set-clientid-manually - Now you will have to save the connection id along with the unique key of the authorized user in order to enable your code to invoke the method on the selected client. A very commonly used design is to maintain a user list on the server that plots connection IDs to users and registers the users as they connect and disconnect1, as proposed at the link http://forums.asp.net/t/1887454.aspx/1?How+to+manually+set+the+connection+id.
- For application sanity and keeping the app server memory free for processing, I personally suggest using DB tales instead of adding things up in some variable at the app server. The above mentioned concept can be implemented using a DB table we well. I will elaborate this approach in article and at the end suggest some enhancements based on the requirement.
Step 1: Boot up
Here I assume that:
1. You have installed SignalR lib in your .Net application, on framework 4.0 or higher(ref).
2. You have defined your end point by deriving your class from Hub (ref).
3. You have made the necessary changes to your Global.asax (ref).
Step 2: Change in DB Schema
Create one db table to save logged in user’s id along with connection id. Entity class would look something like what is shown below.

Step 3: Client and Connection
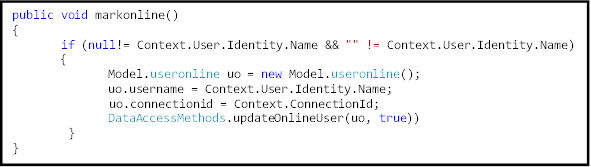
After including references to the SignalR client library as we did in previous example, you will have to initiate connection. When a client connects to Hub, you can invoke the method to save user information along with connection id. So here we write a client method, which is invoked when the master page or frame window loads.
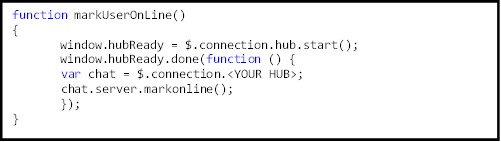
Heremarkonline() is a server side method in your Hub class, to store User and connection id info in the table.
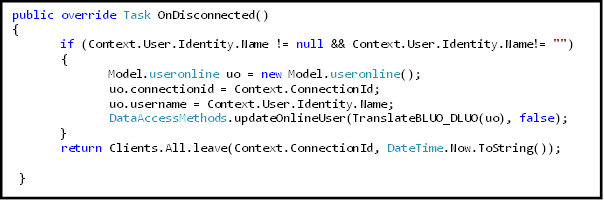
Once we are done with “Setting up the connection,” which includes saving rows to db schema, we should implement logic to clear the table as and when the user disconnects from application.
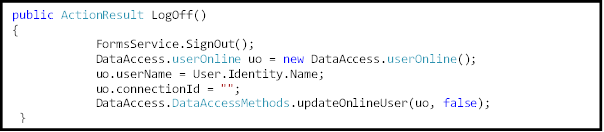
Now disconnection can happen in two manners. The user can close the browser or can log off. To handle both scenarios, you can write methods similar to those shown below.
In the class that derives from Hub, override onDisconnected().
And when a user logs off from the application, invoke a method similar to the one shown below.
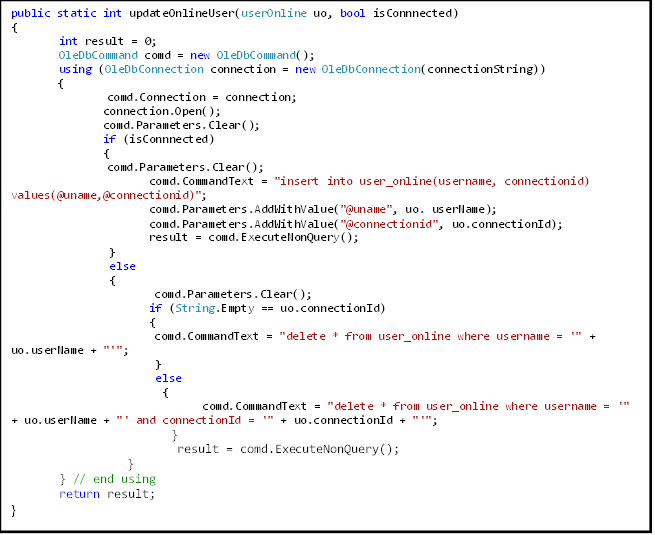
Step 4: Updating DB Schema
Code for updateOnlineUser()method is shown below.
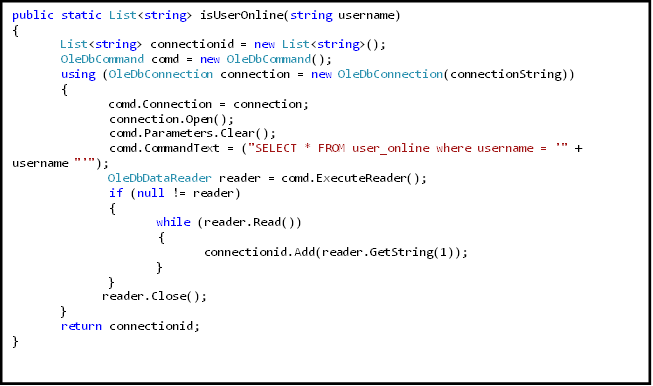
Step 5: Fetching a User’s Connection ID/s
Now write a code that fetches all connection ids for a specific user.
Step 6: Client-Server BI Directional RPC
Now whenever a server method is invoked, you can fetch list of available connection ids for the target user/s and invoke the method on available connection ids.
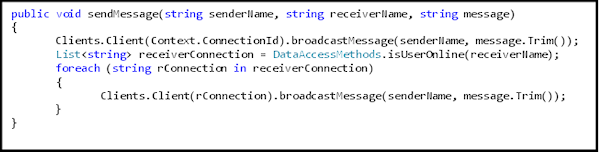
Where broadcastMessage is a client side method defined as:

The above mentioned code will work even If you have multiple connection id scenarios like notification, chat and Co-Create on the same screen, working parallel to each other.
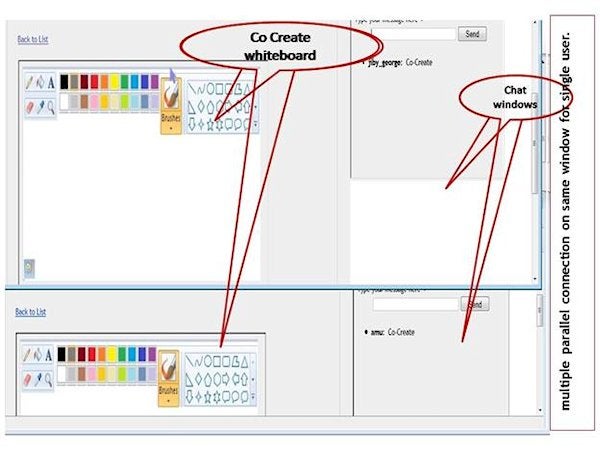
Multiple connection id scenarios
How to Make Multiple Connection ID Scenario More Scalable
Until now we were fetching all connection ids for a user and invoking client method on all of these. This way, methods meant for Chat would be called upon frame for co create or notification as well, which eventually slows down the application with unnecessary processing.
To make it better, you can store the origin of connection id along with it. When invoking markonline(), you can send a string say “source” as a parameter. For example from the Co-Create frame as markonline(“cocreate”) and from Chat window markonline(“chat”) and from the master page markonline(“master”) ; this will make your table look like this:
|
username |
connectionid |
Source |
|
User1 |
24b11640-XXXX-4069-XX96-8389223418ac |
cocreate |
|
User1 |
eaa2de3d-f7df-46ce-XXXX-32bdfe612794 |
master |
|
User2 |
8d2XXcc5-XX61-4f8d-a9f4-d3bcXXX1f14c |
cocreate |
|
User2 |
3b900a78-4c1e-4XX8-be2c-XXXXXXXX |
chat |
|
User3 |
XXXXXX-af57-4cc0-a2c0-4075947e3915 |
cocreate |
|
User3 |
7f946c23-XXXX-4b49-b7d8-ee97cac5eXXX |
chat |
|
User4 |
b2136fe5-XXXX-48d3-XXXX-047b77f34b09 |
master |
|
…… |
…… |
…… |
Now while fetching the list of connection ids from the table with isUserOnline(string username) method, you can specify source based on the method you are invoking it for by passing it as a where clause to the query. So when you want connection id for chat methods, you will fetch record only for source=”chat”.
How to Enhance Same Code for Multiple Sessions of Same User
Today a user can run the application from multiple devices as well. To make the above approach work for multiple session scenarios, you can store session id along with userid, source and connection id and fetch the result based on these parameters. This will ensure that when you invoke client method from the server, it reaches the destination it is meant to reach. Similarly, while deleting records when a user logs off or closes a browser window, you delete rows belonging to that session only.
Perspective
As I said earlier, SignalR and its usability looks very promising, and you saw how you can embed real time web in the application without getting your hands dirty. Yes, there are tricks, which you would have to play while working on selected list of connection ids however that is restricted to some “ifs” here and some “where” there but saves us from dealing with the rawness of communication APIs.
For me it’s a ![]() for SignalR.
for SignalR.
References
1. ASP.Net Forums. “How to manually set the connection id”.