

Introduction
Entity
Framework (EF) allows you to program against a model instead of dealing
with a database directly. In EF 4.0 (that ships with .NET 4.0)
you typically design a model from an existing database visually, using a
designer provided for that purpose. EF 4.1 builds on top of what EF 4.0 provided
and allows you to create models directly at code level. That means instead of
creating any database and then using a designer to define models, you create
plain .NET classes and then use EF 4.1 techniques to make them EF models. This
approach is referred as Code First
because you focus on the source code of the model classes first. Once the
models are ready Code First can also generate database tables out of those
model classes. In this tutorial you will learn the basics of developing an
application using Entity Framework Code First.
NOTE:
In order to work through the examples illustrated in this article you must have
Visual Studio 2010
with Entity Framework 4.1 installed on your computer. You can download and install EF 4.1 here.
What is Code First?
EF 4.0 provides two approaches for working with entities,
viz. Database
First and Model
First. In the former case you design a database before starting your
application development. Then you use Entity
Data Model Designer of Visual Studio to design a data model visually by
dragging and dropping tables from the database onto the designer (see Figure
1). In the case of Model First development you use Entity Data Model Designer
to design data model classes manually (see Figure 2). You then specify the
database connection to be used in the application. In any case you use Entity
Data Model Designer to generate your data model classes.
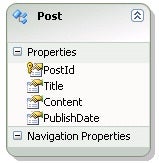
Figure 1: Figure 1 : Designing a model with Database First approach
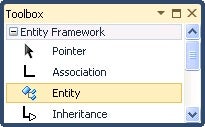
Figure 2: Designing a model with Model First approach.
EF 4.1 offers one more way of generating model classes –
Code First. In the Code First approach you won’t use any designer at all. You
will create plain .NET Framework classes and then use certain attributes and
associated techniques to make them Entity Framework Data Models (see Figure 3).

Figure 3: Creating a model with Code First
When you run the application that makes use of the Code
First technique for the first time the EF will create a new SQL Express
database, based on the model classes, for you. You can, of course, skip this
step and specify your existing database if you so wish.
Now that you have some idea about Code First, let’s develop
a sample application, step-by-step, that illustrates the entire process. In the
example that follows you will be dealing with a data model that represents a
blog post. The actual data resides in a SQL Server table named BlogPosts. You
can then read-write data to the table using the model class.
Creating a Model
Let’s assume that you are dealing with a data model that
represents a blog post and a blog post category. To begin developing the
models, create a new project of type Class Library and name it CodeFirstLib.
The class library project will contain two model classes, viz. BlogPost and
Category. These classes are shown below:
public class BlogPost
{
    public Guid Id { get; set; }
    public string Title { get; set; }
    public string Content { get; set; }
    public DateTime PublishDate { get; set; }
    public virtual Category Category { get; set; }
}

public class Category
{
    public Guid Id { get; set; }
    public string Name { get; set; }
    public virtual ICollection<BlogPost> BlogPosts { get; set; }
}
The BlogPost class defines five properties namely Id, Title,
Content, PublishDate and Category. Notice that Category property represents a
foreign key. The Category class has three properties – Id, Name and BlogPosts.
The BlogPosts property is a collection property because there can be multiple
blog posts belonging to a single category. Remember that under the default
scheme, the property that represents a primary key should have data type of int
or Guid. In the former case, EF 4.1 will translate the property as an identity
column in the database and in the latter case a Unique Identifier. You can, of
course, customize this behavior using certain attributes as we will discuss
later.
Creating a Data Context
Now that your model classes are ready, let’s proceed to
creating a data context. A data context allows you to query and work with the
entity data in your application. A data context is a class that inherits from
DbContext base class. The following class shows how a data context for our
example looks:
 public partial class BlogContext : DbContext
{
  public BlogContext():base("BlogDb")
  {
  }

  public DbSet<BlogPost> BlogPosts { get; set; }
  public DbSet<Category> Categories { get; set; }

}
The BlogContext class inherits from DbContext base class.
The constructor of the BlogContext class calls the base class constructor and
passes a desired database name to it. When you run the application for the
first time a database with this name is created for you. If you do not pass this
information, the name of the database will be the same as the fully qualified
name of the DbContext class (CodeFirstLib.BlogContext in our example).
The BlogContext class defines two public properties, viz.
BlogPosts and Categories. These properties are of type DbSet. The DbSet class
represents an entity set (in other words a database table) on which CRUD
(Create, Read, Update, Delete) operations can be performed.
Testing Database Generation
To test the code you wrote so far, add a new Console
Application to the same solution and add a reference to the CodeFirstLib
project you just created. Then key-in the following code in the Main() method.
using (var db = new BlogContext())
{
    Guid id = Guid.NewGuid();

    var cat = new Category { Id = id, Name = "ASP.NET" };
    var post = new BlogPost { Title="Title1", Content="Hello World!", PublishDate=new DateTime(2011,1,1), Category=cat};

    db.Categories.Add(cat);
    db.BlogPosts.Add(post);

    int i = db.SaveChanges();
}

Console.WriteLine("{0} records added...", i);
Console.ReadLine();
The above code creates a new instance of BlogContext data
context. It then creates an instance of Category and BlogPost classes
respectively. The newly created entity instances are added to the DbSets and
finally SaveChanges() method of the data context is called. The SaveChanges()
method persists the entity data into the database tables and returns the number
of records affected by the operation.
Now run the Console application. Since this is your first
ever run of the application, EF will create the database and tables for you
using SQL Express running on your machine. The name of the database created
will be BlogDb (as specified in data context constructor) and two tables –
BlogPosts and Categories – will also be created.
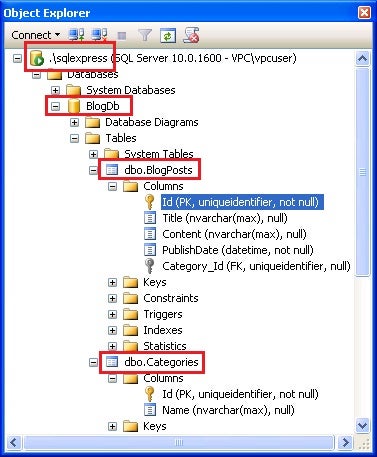
Figure 4: Database and tables created after the first run of
the application.
Notice how Id column of BlogPosts and Categories table is
marked as primary key. Also, notice that BlogPosts table has a foreign key
(Category_Id) defined.
Recreating the Database with Every Run
During the testing phase you may want to create the database
under consideration with each run of your application so that your application
runs on a clean slate. Additionally, you may want to add some test data into
the database while it is being created. Database re-creation is desirable under
one more scenario – when entities (and thus tables) change during development.
By default EF will create the database only during the first run of the
application and there after use the same database for further operations. To
alter this behavior you need to create what is known as a database initializer.
The initializer typically takes a form of a class inherited from
DropCreateDatabaseAlways class. As the name suggests, the
DropCreateDatabaseAlways class always re-creates the database. The following
code shows BlogContextInitializer that does just that.
NOTE:
You can also make use of DropCreateDatabaseIfModelChanges class in which case
the database will be re-created when models change.
public class BlogContextInitializer : DropCreateDatabaseAlways<BlogContext>
{
    protected override void Seed(BlogContext context)
    {
        Category cat1 = new Category { Id=Guid.NewGuid(), Name=".NET Framework" };
        Category cat2 = new Category { Id = Guid.NewGuid(), Name = "SQL Server" };
        Category cat3 = new Category { Id = Guid.NewGuid(), Name = "jQuery" };

        context.Categories.Add(cat1);
        context.Categories.Add(cat2);
        context.Categories.Add(cat3);

        context.SaveChanges();

    }
}
The BlogContextInitializer class inherits from
DropCreateDatabaseAlways base class and overrides Seed() method. The Seed()
method adds some sample data to the database being created. In the above
example you add three categories. Once the initializer is ready you need to add
the following line of code in the Main() method.
static void Main(string[] args)
{
    Database.SetInitializer<BlogContext>(new BlogContextInitializer());
    ...
    ...
Now you will find that with every run the database is
re-created and the Categories table is populated with sample data.
Using an Existing Database with Code First
In the above example, you allowed EF to create a database for
you. In many cases you may want to use an existing database rather than
creating a new one. This can be accomplished by specifying a database
connection string in the application configuration file (or web.config file) as
shown below:
<configuration>
  <connectionStrings>
    <add
      name="BlogDb"
      providerName="System.Data.SqlClient"
      connectionString="Server=.\SQLEXPRESS;Database=BlogDb;Trusted_Connection=true;"/>
  </connectionStrings>
</configuration>
Note that the name of the database connection string as
mentioned in the <connectionStrings> section and the one specified in the
data context class must match. If you do not specify anything in the data
context class, then the name of the data context itself is assumed. For
example, we passed string "BlogDb" in the data context class
(BlogContext) in which case EF will first check in the configuration file
whether any connection string with name BlogDb is defined; if so, EF will use
the database as mentioned in the connection string for further operation. If
there is no connection string defined it will proceed and create a new database
with name BlogDb under local SQL Express installation. If you do not pass
anything to the base class from the data context class then EF will first look
for a database connection string with name BlogContext in the configuration
file and if found will use that database for further operations.
Using Data Annotations to Specify Table and Key Information
In the above example we used default conventions of EF while
creating entity classes. You can use certain data annotations to customize this
behavior. For example, consider the BlogPost and Category classes shown below
that essentially do the same job as in the previous case but use some data
annotation attributes to specify table name, primary key and foreign key
information.
[Table("BlogPosts")]
public class BlogPost
{
    [Key]
    public Guid Id { get; set; }
    public string Title { get; set; }
    public string Content { get; set; }
    public DateTime PublishDate { get; set; }

    [ForeignKey("Category")]
    public Guid CategoryId { get; set; }

    public virtual Category Category { get; set; }
}

[Table("Categories")]
public class Category
{
    [Key]
    public Guid Id { get; set; }
    public string Name { get; set; }
    public virtual ICollection<BlogPost> BlogPosts { get; set; }
}
As you can see, the [Table] attribute explicitly specifies
the name of the table (BlogPosts and Categories respectively). On the same
lines, [Key] and [ForeignKey] attributes specify primary key and foreign key
information respectively.
Summary
The Entity Framework Code First allows you to make use of EF
features directly at code level, i.e. without designing any Entity Data Models.
This way you create entity classes as plain C#
classes. You then define a data context by inheriting from DbContext class.
Additionally, you can also use data annotation attributes such as [Key],
[ForeignKey] and [Table] to specify the respective pieces of information
explicitly. By default, EF creates a database under SQL Express when the
application is run for the first time. You can alter this behavior by creating
your own database initialization strategy. You can also use an existing
database instead of creating a new one by specifying database connection string
in the configuration file.