

When it comes to processes that can take manual labor out of development, build automation immediately springs into mind. In the world of Team Foundation Server, organizations using the product can use a wide set of functionality. This includes not only build automation, but also automating a complete set of virtual machines to help with testing. This fifth installment of the Microsoft ALM series explores these two options.
When organizations start using Team Foundation Server (TFS), they tend to start from version control. Perhaps they migrate their previous version control and start working with
Visual Studio and TFS based source code control. This is a good start, but leaves out major functionality in TFS. This underused functionality might prove highly useful for any development team. If you have been following this article series about Microsoft’s ALM solutions, you are already aware of the major parts.
One of the missing parts is build automation. With build automation, you can flexibly schedule your builds or use continuous integration where a new build is automatically started each time a team member checks new code in to version control. This functionality is also called team build.
In addition to getting your code built automatically, the team build functionality in Team Foundation Server can also automatically run your unit tests. This feature set was described in the fourth part of this Microsoft ALM series, also available on CodeGuru.
This article, the fifth part of the series, will focus on team build functionality in more detail. For instance, build configurations, architecture and setup are all topics of this article. Furthermore, this article will introduce you to Lab Management, which is a new testing feature in Team Foundation Server 2010. This feature is related to build and testing automation.
Team Build Architecture
When planning to use team build in your development organization, you need to be aware of its architecture. Shortly put, Team Foundation Server’s build consists of three parts: the central TFS installation with the SQL Server database, a build controller and finally, one or more build agents (Figure 1).
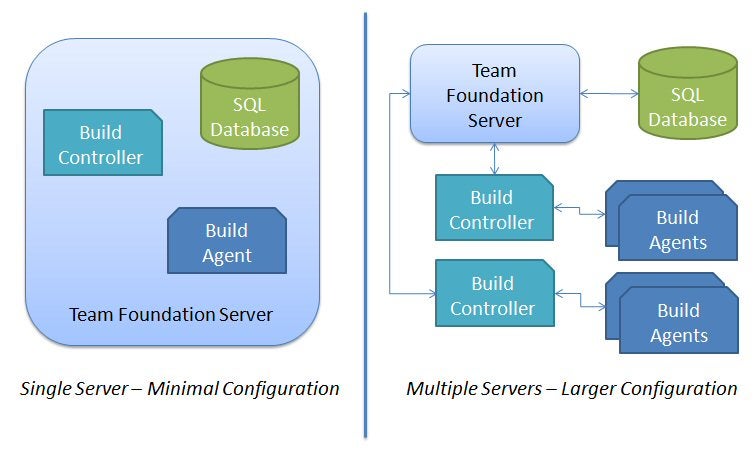
Figure 1: Two build architectures for organizations of different sizes
In this architecture, a build agent sits on a computer (physical or virtual) that does the actual building of the code. Your network can contain multiple agents. This in turn allows you to simultaneously build multiple projects. Having multiple build agents is thus useful if your organization contains many developers or you want to build your projects automatically after each check-in. Conversely, if you have a small team and infrequent build needs, you can usually get along perfectly fine with just one build agent.
Build agents wait for build commands from a build controller. A build controller can control one or more build agents, and manage their jobs and queue new builds. Depending on your organization size, you might need one controller per physical site, but again for smaller organizations with just a few team members, a single controller is often enough.
Team Foundation Server needs to know which build controllers and agents are available, and thus each node available for service is registered in the central SQL database. This way, the user can simply use the Team Explorer window to manage, queue and view the results of automated builds.
For testing purposes, you can also install a team controller and a team agent on the same computer where the central Team Foundation Server installation resides. Although this is not a recommended configuration for production, it serves well for the smallest installations and proof of concept (PoC) projects.
Setting up a Build System
To be able to use Team Foundation Server’s build functionality, you will need to install and configure it. When you install Team Foundation Server 2010, you have already installed the necessary bits on the central TFS computer, but these are missing the proper configuration.
When you are just getting started with TFS, the Initial build configuration is best done with a wizard. The way to get started is to launch the Team Foundation Server Administration Console (TFSAC), which allows you to manage your build architecture, among other things. One of the sections is Build Configuration, as shown in Figure 2.
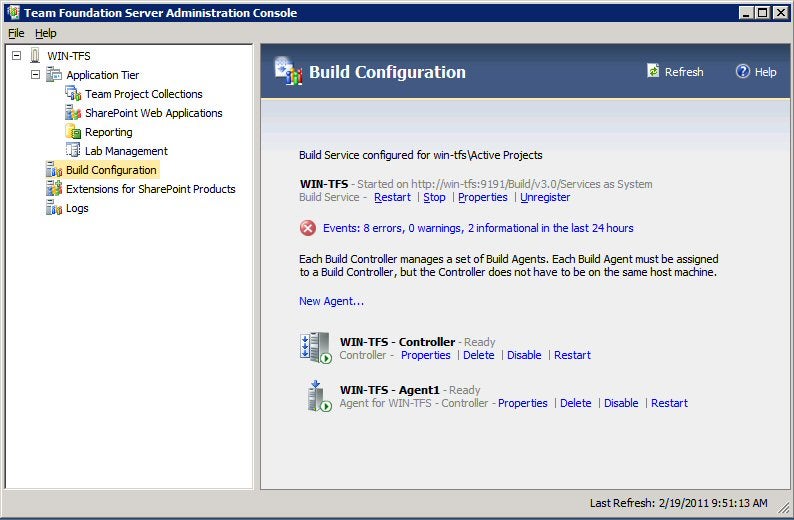
Figure 2: Build system configuration is done through TFS Administration Console
Initially, the administration console will greet you with a message saying that you have the build component installed, but not configured. If you are ready to do so, simple walk through the wizard, and then wait for Team Foundation Server to configure itself. After this configuration, the console will display configuration information and let you manage the system.
If you wish to expand your build architecture at a later stage – for instance by adding more build agents – you can simply take a suitable computer and install Visual Studio and any additional components or libraries. In addition to these requirements, you will also need the TFS build agent installed on the computer. This can be done via a DVD image titled "Visual Studio Agents 2010", available publicly and through MSDN downloads.
Working with agents and controllers is best done through the TFS Administration Console. The console contains a command called New Agent, with which you can simply point to an existing computer with the agent installation in place. Build controllers are set on team project collection basis.
Creating Build Definitions and Queuing Builds
Once the TFS build architecture has been set up and properly configured, you can start managing individual builds through the Team Explorer window in Visual Studio (Figure 3). The Team Explorer window shows the Builds node, which you can right-click to open a popup menu. The first step is to select the command "New Build Definition". This opens the dialog box shown in Figure 4.
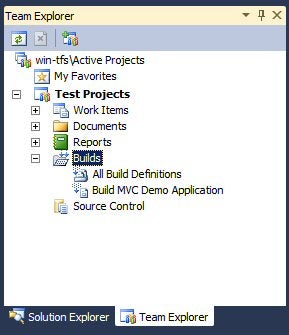
Figure 3: Visual Studio’s Team Explorer window provides access to the build functionality

Figure 4: Creating a new build definition requires setting several different options
This dialog box contains the main entries on the left. Through these, you can set different options of the build definition. A build definition basically is a configuration template for subsequent build requests for any given project (or projects) that should be built. If you specify a schedule for the build, TFS will automatically start building once the scheduled time is at hand. Shortly put, build definitions give TFS the information about which project(s) to build and when and how to build them.
TFS allows you to configure multiple build definitions per team project, and you can include a particular project in any number of build definitions. However, it is advisable to keep your build definitions uncluttered and properly named. Often, half a dozen build definitions can already get you far.
A build definition can have a trigger, which specifies when the build should start automatically, if ever (Figure 5). The available trigger options are:
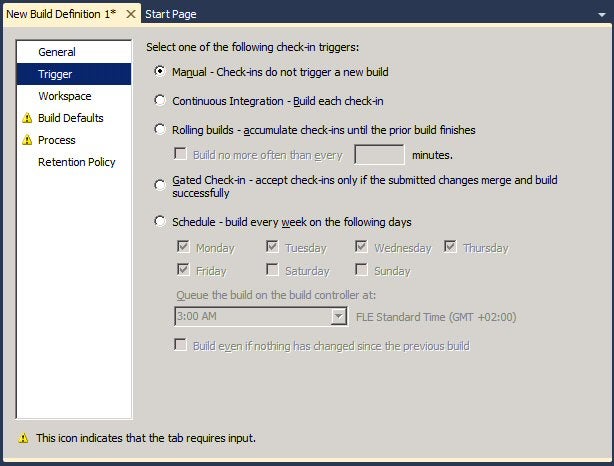
Figure 5: TFS provides a set of ready-made triggering options
In addition to specifying a trigger for the build definition, it is also important to specify which projects you want to build. This is done through the Workspace sheet of the build definition dialog box (Figure 6).
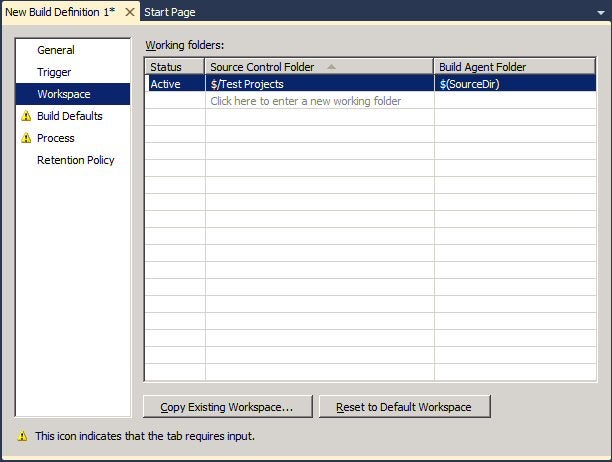
Figure 6: Workspace settings tell TFS which projects to build automatically
Once you have defined one or more builds, you can easily queue or start new instances of the build. For manually triggered builds, a queue operation is the only way to get the build running. For automatically triggered builds, you can either manually queue the build or wait until the trigger condition is satisfied.
Viewing Build Results
Once you have queued a build or waited until a trigger condition is satisfied, you are without doubt keen to see the results. To view these results, you can keep using Visual Studio. In the Team Explorer window, expand the Builds node, and right-click any of your build definitions. From the popup menu, choose the View Builds command. This will open up a view called Build Explorer shown in Figure 7 with two tabs: Queued and Completed.
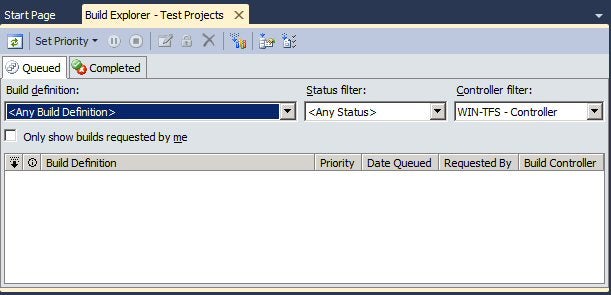
Figure 7: The Build Explorer within Visual Studio provides access to currently running builds and build history
Through these two tabs, you can see the currently active builds (if any), and also the already completed builds. If you want to see the results of any previous build, simply double-click any of the lines on the Completed tab. If the build you selected was building a regular code project, you will see the results in an html-like view with information about the projects built and any errors or warnings that occurred (Figure 8).
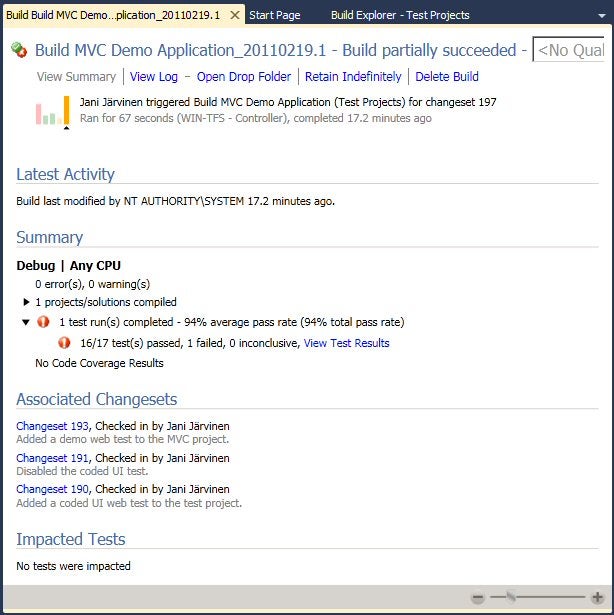
Figure 8: A build result shows how a build went, and whether any errors were generated
If the build contains test projects, for instance a unit test project for an ASP.NET MVC application, Visual Studio shows the test results below the report document. The test results view is the same view that Visual Studio would show if you were to run the unit tests directly from Visual Studio. If you are interested in more details, be sure to read the fourth article of this Microsoft ALM series.
In addition to working with Visual Studio, you can also view active builds and their results through Team Foundation Server’s Web Access feature. The Web Access feature provides an almost equal functionality set as Visual Studio, but you cannot define new builds from the web interface. You can queue builds and view their results, however.
Understanding Visual Studio Lab Management
Visual Studio Lab Management is a new feature Microsoft introduced in the 2010 version of the product. The core idea of Lab Management is simple: use virtualization technology to help with application testing. If you have been working with testing, you might have run into a situation where you need a clean computer to test. If you instead have a computer where you have already ran your tests, the new test run might not display correct results.
Virtualization supports two technologies to help in this situation. First, there is provisioning, the term for launching up virtual machines on request. Furthermore, virtual machines can be pre-configured with a base configuration. Secondly, virtual machines support snapshots, with which you can easily return back in time to a clean state. This "cleanliness" means a state of the virtual machine where no previous tests have been run. Thus, the hard disk, Windows registry and other operating system settings are still intact.
Lab Management is available in the highest editions of Visual Studio. In addition, it places a medium toll on the hardware and IT infrastructure in general, so it is not aimed at the smallest development shops. The persons setting up the system must be familiar with Windows Server 2008 R2, Active Directory configuration, Hyper-V virtualization, IIS web server management, Microsoft System Center Virtual Machine Manager – and TFS. If you feel your organization is up to the task, then you need to master one more tool: Visual Studio 2010 Test Manager.
The Test Manager (Figure 9) tool allows you to work with your virtual lab. This tool works in combination with the Team Foundation Server Administration Console tool so that initial configuration is done with both tools. The Test Manager contains a sub-section called Lab Management, which is dedicated to herding the virtual machines. Technically, Test Manager uses the features available in System Center Virtual Machine Manager (SCVMM).
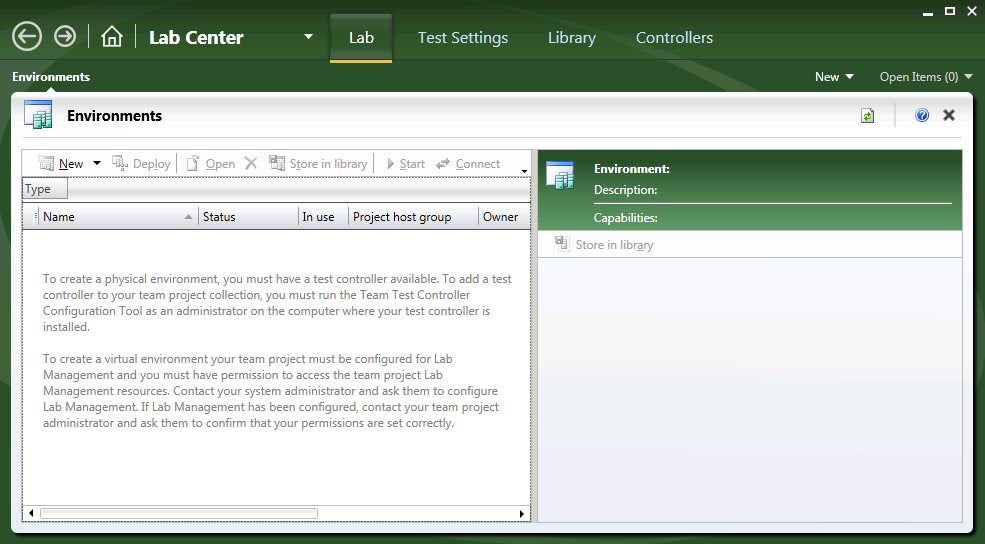
Figure 9: The Lab Management feature is managed mostly through the Test Manager application
Summary
In this article, you learned about Team Foundation Server’s automated build functionality and the architecture and features behind it. You learned what build controllers, build agents and build definitions are, and how they are required to make a build system tick.
You also learned when automated build functionality becomes useful, and how you could manage and customize it to your own needs. Again, Visual Studio’s Team Explorer window provides access to all the important features in a convenient fashion. You also saw how you can queue new builds and see their results. In addition to just compiling code, the build functionality in TFS can also automatically run your unit and other tests and collect the results for you into a single view.
Finally, you learned about the possibilities of Visual Studio Lab Management. Lab Management uses Hyper-V virtualization technology (with help from other Microsoft technologies) to provision new virtual machines to help in automated testing of applications. With Lab Management, you can further automate your organization’s testing processes. To help working with Lab Management in Visual Studio 2010, Microsoft has built a new utility called Test Manager. Getting familiar with Test Manager is needed if you wish to start using Lab Management.
Happy building and testing!
About the Author
Jani JC$rvinen is a software development trainer and consultant in Finland. He is a Microsoft C# MVP, a frequent author and has published three books about software development. He is the group leader of a Finnish software development expert group at ITpro.fi, former of a Finnish .NET user group and a board member of the Finnish Visual Studio ALM User Group. His blog can be found at http://www.saunalahti.fi/janij/. You can send him mail by clicking on his name at the top of the article.