

- Introduction
- Supported Geometry
- Is the Cursor Overlapping the Geometry?
- Known Problem
- Basic Formula to Obtain Red Points
- The Algorithm Behind This (Pseudo Code) FUNCTION DoSinglePoint(X: Integer, Y: Integer) ... Obtain the array of red points ... SET nRedPos = 0 FOR EACH Edge IN Edges IF Edge.X2 - Edge.X1 <> 0 THEN IF Edge.X1 > Edge.X1 THEN SET nPointX1 = Edge.X2 SET nPointY1 = Edge.Y2 SET nPointX2 = Edge.X1 SET nPointY2 = Edge.Y1 ELSE SET nPointX1 = Edge.X1 SET nPointY1 = Edge.Y1 SET nPointX2 = Edge.X2 SET nPointY2 = Edge.Y2 END IF IF X >= nPointX1 AND X < nPointX2 THEN SET nTempX = X - nPointX1 SET nTempY = ((nPointY2 - nPointY1) / (nPointX2 - nPointX1)) * nTempX ADD nTempY + nPointY1 TO RedPoints ARRAY SET nRedPos = nRedPos + 1 END IF END IF NEXT Edge ... Sort the array of red points into ascending order ... ... Only bother if the array does contain some points ... IF nRedPos > 0 THEN FOR i = 0 TO nRedPos + 1 FOR j = i TO nRedPos + 1 IF RedPoints[i] > RedPoints[j] THEN SET PrevPoint = RedPoints[i] SET RedPoints[i] = RedPoints[j] SET RedPoints[j] = PrevPoint END IF NEXT j NEXT i END IF ... Find out whether the mouse pointer is overlapping the geometry ... SET i = 0 SET bOver = FALSE WHILE i <= nRedPos DO IF Y > RedPoints[i] AND Y < RedPoins[i + 1] THEN SET bOver = TRUE END IF SET i = i + 2 END WHILE LOOP ... If the mouse pointer is overlapping the geometry, then ... IF bOver = TRUE THEN ... Do your selection stuff ... END IF END FUNCTION Implementation Obviously, this code will need to be adapted to work in your software, but code examples have been included for you to use. I have attached the same examples in both C++ and Visual Basic. I hope that this article has been of some interest to you and that it will help you in some way.
Introduction
For the last year, I have been working on a project that involves a lot of 2D and 3D geometry. I needed some technique for the user to select these geometries easily, i.e. using the mouse and clicking. The biggest problem was determining how the program knew if the cursor was overlapping the geometry. For a while, I used basic boundary-based selection but found that this was not adequate and I was unable to use any API-based regions.
So, I thought about x and y coordinates and how I can test them to see whether they were in an object. I was able to rule out x-coordinate testing, which saves on processing by using a simple rule. I developed the algorithm using Microsoft Visual Basic 6 and then implemented it within my program using Microsoft Visual C++ .NET 2003 Professional.
Supported Geometry
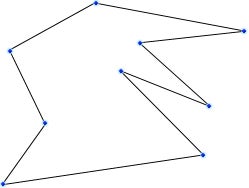
This algorithm can be used with any shape of geometry, provided that the vertex (or node) positions are known. Here is an example of the kind of geometry that we could be up against.
Is the Cursor Overlapping the Geometry?
So, how do we know whether the mouse pointer is overlapping our geometry? First, we will need to get the mouse pointer’s coordinates; in this article, I will show the mouse pointer on the illustrations.
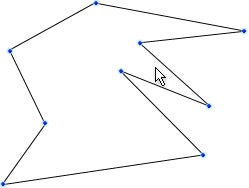
If the mouse is positioned here, obviously the object should be selected upon clicking. Before we can find out whether it is overlapping the object, we need to map the mouse position onto all of the lines of geometry. So, basically we want to find the positions of the red points shown on the next illustration.
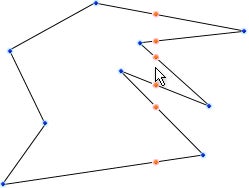
An important thing to note with the above illustration is that all of the red points are in pairs of two. So, if the mouse pointer is (vertically) in between a pair of points, the mouse must lie on top of the geometry. When these red points are calculated, there is one per edge within the geometry. If the cursor is not horizontally on the edge, its y-coordinate really does not matter.
In other words:
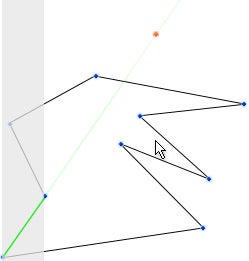
In the above illustration, I have extended the edge shown in green and added its associated red dot; but, as you can see, the mouse pointer has no relevance to this edge. The mouse would need to be somewhere in the shaded area for it to make any relevance. So, this is the basic theory behind determining whether the mouse pointer overlaps the object and we are only considering the y-coordinate of the mouse. It is possible to map the x-coordinates as well, but that isn’t necessary.
Known Problem
Whilst this technique works for most geometry, it will not detect a single line beneath the cursor.
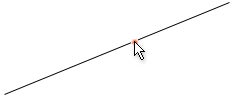
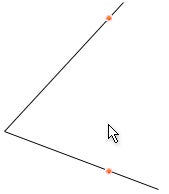
This obviously doesn’t work because there is only one point as opposed to a pair of two. You can solve this problem with additional code that tests for the mouse overlapping the line (only when there are non-joint edges), you could allow for the mouse to be out by a couple of pixels to make it easy to select the line. The following illustration is an example of a non-joint polygon; thus, because the mouse pointer is not on (or near) one of the two lines, it should not be selected.
Basic Formula to Obtain Red Points
In general, to obtain the y-coordinate of one of the red points, use this formula:
(x1, y1) – 1st vertex position on line
(x2, y2) – 2nd vertex position on line
a – x-coordinate of mouse position
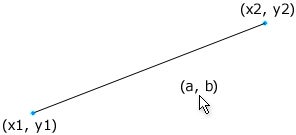
Gradient: m = (y2 – y1) / (x2 – x1)
X-Coordinate of red point: x = a
Y-Coordinate of red point: y = m * (a – x1) + y1
For those interested in the math, I derived the y-coordinates’ formula from:
![]()
With this formula, the (x, y) coordinate is that of the red dot; thankfully, we already know the x-coordinate because it is identical to that of the mouse pointer’s position.
The Algorithm Behind This (Pseudo Code)
FUNCTION DoSinglePoint(X: Integer, Y: Integer)
  ... Obtain the array of red points ...
   SET nRedPos = 0
   FOR EACH Edge IN Edges
      IF Edge.X2 - Edge.X1 <> 0 THEN
         IF Edge.X1 > Edge.X1 THEN
            SET nPointX1 = Edge.X2
            SET nPointY1 = Edge.Y2
            SET nPointX2 = Edge.X1
            SET nPointY2 = Edge.Y1
         ELSE
            SET nPointX1 = Edge.X1
            SET nPointY1 = Edge.Y1
            SET nPointX2 = Edge.X2
            SET nPointY2 = Edge.Y2
         END IF
         IF X >= nPointX1 AND X < nPointX2 THEN
            SET nTempX = X - nPointX1
            SET nTempY = ((nPointY2 - nPointY1) /
                          (nPointX2 - nPointX1)) * nTempX
            ADD nTempY + nPointY1 TO RedPoints ARRAY
            SET nRedPos = nRedPos + 1
         END IF
      END IF
   NEXT Edge

   ... Sort the array of red points into ascending order ...
   ... Only bother if the array does contain some points ...
   IF nRedPos > 0 THEN
      FOR i = 0 TO nRedPos + 1
         FOR j = i TO nRedPos + 1
            IF RedPoints[i] > RedPoints[j] THEN
               SET PrevPoint = RedPoints[i]
               SET RedPoints[i] = RedPoints[j]
               SET RedPoints[j] = PrevPoint
            END IF
         NEXT j
      NEXT i
   END IF

   ... Find out whether the mouse pointer is overlapping the geometry ...
   SET i = 0
   SET bOver = FALSE
   WHILE i <= nRedPos DO
      IF Y > RedPoints[i] AND Y < RedPoins[i + 1] THEN
         SET bOver = TRUE
      END IF
      SET i = i + 2
   END WHILE LOOP

   ... If the mouse pointer is overlapping the geometry, then ...
   IF bOver = TRUE THEN
      ... Do your selection stuff ...
   END IF
END FUNCTION
Implementation
Obviously, this code will need to be adapted to work in your software, but code examples have been included for you to use. I have attached the same examples in both C++ and Visual Basic. I hope that this article has been of some interest to you and that it will help you in some way.