

By Mansoor Ahmed Siddiqui
Two important programming operations/processes that help us create and maintain applications are called “Debugging” and “Tracing”.
Debugging allows us to observe and correct programming errors. Tracing is a form of Debugging that allows us to keep track of the health and sanitary conditions of our applications (It is a rather rigid and very specific definition).
It is very important to be able to dynamically control the behavior of our application and to keep track of some of the aspects of the application (i.e. how our application is performing, what errors are produced at runtime, how application performs at peak time, how to dynamically alter the behavior of our application, etc).
We will discuss in detail how Debugging and Tracing has been implemented in .NET and how to customize them according to our needs.
Download source code below.
Tracing in .NET
So how has tracing been implemented in .NET? In .NET we have objects called Trace Listeners. A listener is an object that receives the trace output and outputs it somewhere; that somewhere could be a window in your development environment, a file on your hard drive, a Windows Event log, a SQL Server or Oracle database, or any other customized data store.
You can think of a Trace Listener as a conduit for passing tracing information from your application to the output store. We write tracing information on Trace Listeners and Trace Listeners in turn output the tracing information to the target media.
Storing tracing information in a data store of some sort provides the flexibility of analyzing the data later on and helps us find the error and performance related patterns in our applications.
The System.Diagnostics namespace provides the interfaces, classes, enumerations and structures that are used for tracing, debugging, and other application and system diagnostic services. In this article, we will focus only on Tracing.
The System.Diagnostics namespace provides two classes named Trace and Debug that are used for writing errors and application execution information in logs. These classes are helpful during the development (to output debug messages, etc) and after deployment (to output performance related patterns, etc). These two classes are the same, except that the methods of the Trace class become part of the release build code whereas methods of the Debug class don’t become part of the release build executable.
When you create a new project, define the DEBUG symbol to enable output with the Debug class and the TRACE symbol to enable output with the Trace class. If you create a project in Visual Studio .NET, its Debug version will have these symbols defined.
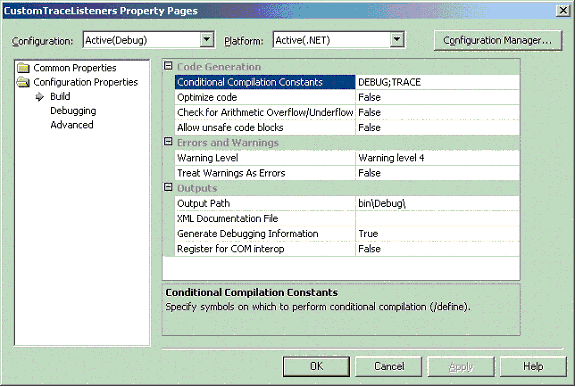
Figure 1
The System.Diagnostics namespace provides some Trace Listeners. The default Trace Listener is System.Diagnostics.DefaultTraceListener. Write and WriteLine methods of this class route the tracing information to the OutputDebugString and to the Log method of the attached debugger.
.NET framework also introduced the concept of Trace Switches. As the name implies, these are simply switches whose values can be controlled from outside of the application. What I meant by outside of the application is that once an application is compiled and converted to .exe or .DLL files, we don’t have to change our code in order to change the values of these switches; we can just update the corresponding entries in .config files and the corresponding switches in our applications will have the updated values. To be more precise,
Trace Switches are simple objects that can be controlled externally through the .config files.
We will learn more about Trace Listeners and Trace Switches as we progress through the article.
Following is a simple example of WriteLine method of the Trace and Debug classes.
Trace.WriteLine (“Hello 15Seconds Reader – Trace!”) ;
Debug.WriteLine (“Hello 15Seconds Reader – Debug!”) ;
When used in debug mode, both of these methods direct the tracing and debugging output to the output windows of the debugger; as shown in the following figure:
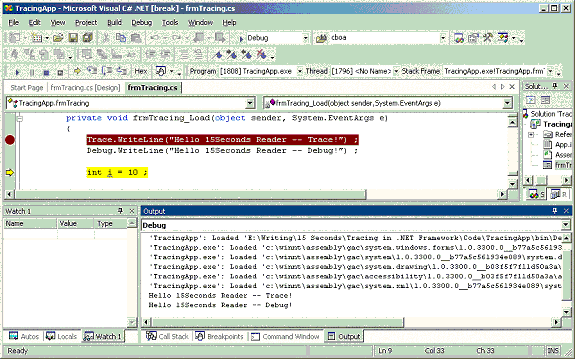
Figure 2
Trace Listeners
As I described earlier, Trace Listeners are objects that receive the tracing information, store it, and then route it to its final destination. Final destination of the tracing information is decided by the Trace Listener. .NET provides following Trace Listeners:
- DefaultTraceListener
- TextWriterTraceListener
All Trace Listeners are derived from the abstract TraceListener class. This class declares the methods that each potential Trace Listener should implement. If you want to inherit from this class then you must at least implement the Write and WriteLine methods.
Both Trace and Debug classes have a property called Listeners that holds a reference to a collection of listeners. The collection object is of type TraceListenerCollection and represents a collection of type TraceListener. That means trace information can be consumed by more than one listener and those listeners have the full control on where to direct the tracing information.
Both the Trace and Debug classes share the same TraceListenerCollection object; therefore, if you add a listener to Trace object, it will also be available to Debug object, and vice versa.
All Trace Listeners have the following functions. Functionality of these functions is same except that the target media for the tracing output is determined by the Trace Listener.
Method Name
Result
Fail
Outputs the specified text with the Call Stack.
Write
Outputs the specified text.
WriteLine
Outputs the specified text and a carriage return.
Flush
Flushes the output buffer to the target media.
Close
Closes the output stream in order to not receive the
tracing/debugging output.
DefaultTraceListener
This class is the default Trace Listener that is added to the TraceListenerCollection object of the Trace and Debug classes. The Fail method displays a message box provided that the application is running in user-interface mode.
This class is used when we want to see the tracing output in the Visual Studio Environmen. If we want to capture Trace messages outside of Visual Studio .NET, we must use other Trace Listeners.
TextWriterTraceListener
TextWriterTraceListener will redirect tracing output to an instance of the TextWriter class or to any object that is a Stream class, such as a log file, network stream, or console.
Consider the following code example.
1. FileStream objStream = new FileStream(“C:\\AppLog.txt”,
FileMode.OpenOrCreate) ;
2. TextWriterTraceListener objTraceListener =
new TextWriterTraceListener(objStream) ;
3. Trace.Listeners.Add(objTraceListener) ;
4. Trace.WriteLine(“Hello 15Seconds Reader — This is first trace
message”) ;
5. Trace.WriteLine(“Hello again — This is second trace message”) ;
6. Debug.WriteLine(“Hello again — This is first debug message”) ;
7. Trace.Flush() ;
8. objStream.Close() ;
This code demonstrates how to base a
TextWriterTraceListeneron a log file, how to add a listener to the list of listeners, and how to write trace information.
Line 1 is creating an object of type FileStream. This object points to the application log file at C:\AppLog.txt path.
Line 2 creates a TextWriterTraceListener object and passes the just created FileStream object as parameter. This statement makes the AppLog.txt file the final destination of the tracing and debugging information.
Line 3 adds the Trace Listener to the list of listeners.
Line 4 through Line 6 write different trace and debug messages.
Line 7 calls the Flush method on Trace object in order to flush the output buffer to the target media.
Line 8 closes the log file.
Once you execute the code, you should have Applog.txt file on your hard drive. The following diagram shows the Applog.txt file that will be created:

Figure 3
You can see how easy it is to store log information in a file.
EventLogTraceListener
EventLogTraceListener is used to route tracing and debug messages to the Windows event log. The beauty of this class is that it can even output tracing and debugging information to the event log of a remote computer. This makes this class useful for the machines that do not support the event log, such as Microsoft Windows Me.
Before using this class for writing tracing or debugging information to the event log, we must associate it with an event log. For that, this class provides a property called EventLog that can be used to get or set the event log that receives the output. Alternatively we can use the third constructor of this class for passing the name of the event source; this will automatically associate it to that event source.
Following code examples show both ways of doing it:
Example 1: Initializing EventLogTraceListener with the EventLog object
EventLogTraceListener objListener = new
EventLogTraceListener() ;
EventLog objLog = new EventLog(“EventLogName”) ;
objListener.EventLog = objLog ;
Example 2: Initializing EventLogTraceListener by using the constructor
EventLogTraceListener objListener = new
EventLogTraceListener(“EventLogName”) ;
Manipulating Trace Listeners Outside Code
You have built your application, put detailed tracing information into it ,and deployed it. The application is running fine and a very nice trace log file has been generated on your hard drive. In the meantime, one of your developers has developed a Trace Listener that actually stores the tracing information into a database, and you want to use it. What should you do? Change code? I would not recommend that.
Changing code is one way of manipulating Trace Listeners but .NET also provides another way of doing that. Instead of hard coding Trace Listeners into your code, you can add or remove them through the .config file of your application. For Windows Forms application, a config file is named applicationname.exe.config; for ASP.NET application, config file is named web.config (or machine.config for the machine level configuration).
The <listeners> element in the config file is where you can add and remove any or all listeners. Look at the following example; this example removes the default Trace Listener, which is DefaultTraceListener, and adds the EventLogTraceListener, which writes traces messages to MyEventLog event log.
<configuration>
 <system.diagnostics>
  <trace autoflush=”true” indentsize=”2″>
   <listeners>
    <remove name=”Default”/>
    <add name=”EventLogListener”
     type=”System.Diagnostics.EventLogTraceListener,System”
     initializeData=”MyEventLog”/>
   </listeners>
  </trace>
 </system.diagnostics>
</configuration>
Trace Switches
So far we have seen how to put tracing and debugging code into our application, but we have not seen how to control the tracing and debugging output or how to alter the tracing behavior of our application once it is in production.
This kind of control can be achieved by using Trace Switches. Trace Switches are objects that are derived from the Switch class. These objects can be controlled by an application’s configuration file, eventually eliminating the need to change, compile and distribute our code each time we want to change the tracing behavior.
We always assign name and description to switch objects. The name of the switch object is important because it is used to lookup the corresponding entry in the .config file.
There are two types of trace switches: BooleanSwitch and TraceSwitch. Both are explained in detail in the following sections. One important thing that most people don’t recognize is that the Tracing or debugging must be enabled in order to use the switches.
BooleanSwitch
BooleanSwitch, as the name implies, is a kind of on/off switch which can be either enabled (true) or disabled (false).
In order to use a BooleanSwitch in our code, we have to create an instance of it in our code. This instance should have the same name as one of the switches defined in our .config file. If the switch name in our code does not match with any of the switches in .config file, the switch will be disabled be default.
The following .config file shows an example of a switch, ShowErrors, which is enabled (value = “1”) and will be used in code for determining whether to output the error information.
<configuration>
 <system.diagnostics>
  <switches>
   <add name=”ShowErrors” value=”1″ />
  </switches>
 </system.diagnostics>
</configuration>
The following is an example of code that uses this switch to determine whether to output the error information to the console:
// Static class level declaration of BooleanSwitch object.
static BooleanSwitch blnSwitch =
new BooleanSwitch(“ShowErrors”, “Show errors to me”) ;
// If BooleanSwitch is enable, then report error/tracing info/etc.
if (blnSwitch.Enabled == true)
	Console.WriteLine(“Could not open connection to database”) ;
The value of the
valueattribute in
<add>tag determines the value of the
BoolenSwitch, therefore:
- value == “0” ==> Enabled == false
- value == “1” ==> Enabled == true
TraceSwitch
TraceSwitch class has more to offer as compared to the simple BooleanSwitch class. This class provides support for multiple levels instead of the simple on/off control offered by the BooleanSwitch class. TraceSwitch class works with the following tracing levels:
|
Tracing Level |
Configuration Value |
Description |
|
Off |
0 |
Outputs no messages to Trace Listeners |
|
Error |
1 |
Outputs only error messages to Trace Listeners |
|
Warning |
2 |
Outputs error and warning messages to Trace Listeners |
|
Info |
3 |
Outputs informational, warning and error messages to Trace |
|
Verbose |
4 |
Outputs all messages to Trace Listeners |
An instance of the TraceSwitch class is constructed just like the BooleanSwitch objects. Tracing is enabled for a TraceSwitch object through the Level property. When we set the Level property of a switch to a particular level (one of the values from the above table), it includes all levels from the indicated level down. For instance, if you set a TraceSwitch’s Level property to TraceLevel.Info, then all the lower levels, from TraceLevel.Error to TraceLevel.Warning, will be included.
The following code shows how to turn on the tracing for the error and warning messages only:
TraceSwitch objSwitch = new TraceSwitch(“ErrorAndWarningTrace”,
“This is the trace for Error and Warning messages”) ;
objSwitch.Level = TraceLevel.Warning ;
TraceSwitch class also exposes following properties:
- TraceError
- TraceWarning
- TraceInfo
- TraceVerbose
So what is the use of these properties? Well, if we have set the Level property of the TraceSwitch object to a particular level, for example, TraceLevel.Warning, TraceError and TraceWarning properties will return true whereas TraceInfo and TraceVerbose properties will return false.
This allows our code to check what type of messages to send to the listeners. These properties are used with the WriteIf and WriteLineIf methods of Trace and Debug classes.
The following code example shows how to control the tracing output by using the trace-level property:
Trace.WriteLineIf(objSwitch.TraceWarning, “This is a warning message”) ;
So the above statement will output the warning message, if and only if the tracing level of the
TraceSwitchis set to at least
TraceLevel.Warningor greater than this. If trace-level happens to be
TraceLevel.Errorthen this statement will not output anything.
Implementing Your Own Trace Listeners
Trace Listeners provided by .NET are sufficient for most of the applications. But what if you want to create your own custom Trace Listener?
.NET has provided us the flexibility of writing our own Trace Listeners in the form of the TraceListener class. Every Trace Listener is inherited from this class; therefore, in order to implement your own Trace Listener, you must inherit your Trace Listener class from this class.
TraceListener class has many virtual and abstract methods; at the very least, each inheritor of this class must implement the Write and WriteLine methods; other important methods are Fail, Close, and Flush. Inheritors are not supposed to implement these methods but it is a good idea to implement these methods. Descriptions of these methods are given in the beginning of the article.
Write and WriteLine methods are overloaded; following is a list of all the overloaded version of the Write method:
- public override void Write(string message)
- public override void Write(object o)
- public override void Write(string message, string category)
- public override void Write(object o, string category)
There is one-to-one mapping between the overloaded methods of Write and WriteLine. Can you guess why the TraceListener class has four overloaded methods for each of the Write and WriteLine methods? The answer is:
The Write, WriteIf, WriteLine, WriteLineIf methods of the Trace and Debug classes are also overloaded and have the same four versions of each of these methods. Since methods of Trace and Debug class call Write and WriteLine methods on Trace Listeners hence TraceListener has these overloaded methods.
Just to keep it simple, if you want to implement your own Trace Listener, simply derive your listener class from TraceListener class, implement at least the Write and WriteLine methods and you are done.
For this article, I have created a Trace Listener, DatabaseTraceListener, which actually stores trace and debug messages into a database.
The database is named TraceStore and has a table named Traces. The structure of the database table is as follows:

Figure 4
- TraceDateTime column stores the date and time of the trace message
- TraceCategory column stores the actual category of the trace message
- TraceDescription column stores the trace message
- StackTrace column contains the stack trace
- DetailedErrorDescription column contains the detailed error message which will be passed in second parameter of the Fail method.
Our custom Trace Listener implements the following functions:
- Write and all of its overloaded version
- WriteLine and all of its overloaded version
- Fail
- Flush
- Close
Using DatabaseTraceListener in your own application
In order to use our custom Trace Listener, we only need make some changes in the .config file. Once we are done with the changes, we can use Trace and Debug classes for writing trace and debug messages.
Configuration settings required in .config file
Our custom Trace Listener expects two custom application settings in .config file on the application. The following <appSettings> node should be added in .config file of the application:
<appSettings>
 <add key=”ConnectionString” value=”Data
            Source=localhost;uid=sa;pwd=;Initial Catalog=TraceStore” />
 <add key=”MaximumRequests” value=”2″ />
</appSettings>
ConnectionString
setting contains the connection string for the database and
MaximumRequestscontains an integer value that specifies the maximum number of trace messages to hold in the local cache before saving those messages into the database. We need
MaximumRequestssetting for efficiency purposes because it just does not make sense to connect to the database and save a trace message as soon as we receive it from the tracing methods. In order to avoid that, we cache trace messages in the local cache and save them into database once we reach the maximum number. After that we start caching trace messages again and the cycle continues.
Flush and Close methods simply save all the cached messages into the database.
Depending on the frequency of trace messages, you can adjust MaximumRequests setting. If your application writes a lot of trace messages, then you can set it to a higher number. Otherwise set it to a lower number.
Similarly, the following <system.diagnostics> node should be added into your application’s .config file:
<system.diagnostics>
  <trace autoflush=”true” indentsize=”2″>
   <listeners>
    <add name=”DBTL”, type=”CustomTraceListeners.DatabaseTraceListener,
                                                CustomTraceListeners”/>
   </listeners>
  </trace>
 </system.diagnostics>
Sample code
After performing the above changes in .config file, we are good to go for testing our listener. Type the following code somewhere in your application and check it out.
object obj1 = “Message from Trace.Write(object)” ;
object obj2 = “Message from Trace.Write(object, category)” ;
Trace.Write(“Message from Trace.Write(message)”) ;
Trace.Write(obj1) ;
Trace.Write(“Message from Trace.Write(message, category)”,”category1″) ;
Trace.Write(obj2, “category2”) ;
Trace.WriteLine(“Message from Trace.WriteLine”) ;
Trace.Fail(“Message from Trace.Fail”) ;
Trace.Fail(“Message from Trace.Fail”, “Detailed error message”) ;
Trace.Flush() ;
This code simply writes some trace messages. The calls to
Failmethod will display the following Assertion dialog box:
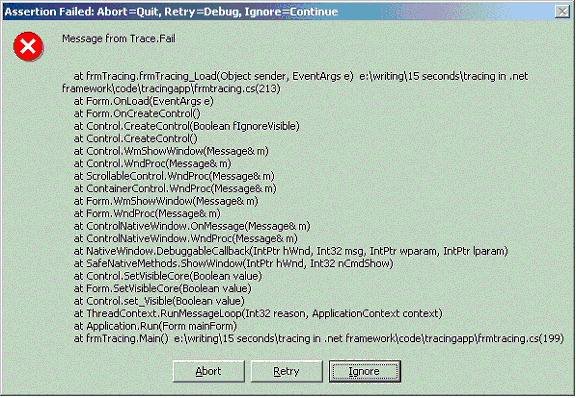
Figure 5
This is the default behavior of the Fail method. Press Ignore for further processing. Once this code is completely executed, Traces table should have the following rows in it:
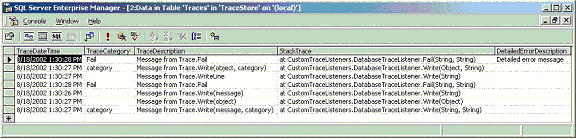
Figure 6
Tracing in ASP.NET
Ask any ASP developer how they debug/trace something in ASP. Classic ASP developers have to place Response.Write statements throughout their code in order to see certain values or to actually check the logic of the code. We all agree that it is simply a pain to debug/trace something in ASP. One of the problems of tracing by classic means (putting Response.Write statements in our code) is that once we are ready to ship our application, we must remove all those tracing statements from our code otherwise we will have unhappy users. It is a cumbersome process; similarly it is not a neat way of doing things.
With ASP.NET, Microsoft has bundled a new debugger for debugging ASP.NET files (.aspx, .asmx, etc), and has also incorporated a very flexible way of tracing. ASP.NET tracing is completely different. It is a much more refined form of tracing; it allows us to put tracing statements in our code without having to remove them once our application is deployed in a production environment.
The System.Web.UI.Page class provides a Sytem.Web.TraceContext object in the Trace property. In fact, you can consider the Trace object as an intrinsic page object, similar to Request, Response, Server, etc. It is accessible directly within our page code. This object allows you to write debug/trace statements that appear when you enable tracing for a page or for the entire application.
TraceContext class is also accessible through Control.Context.Trace property. The reason for it is that it allows us to include trace statements in custom server controls, or when we want to include trace statements from outside the ASP.NET page, for example, from the global.asax file.
Note: Don’t confuse the ASP.NET Trace object with the System.Diagnostics.Trace class. They are different; the former is only available in ASP.NET, whereas the later is available in both ASP.NET and Windows applications. We can still leverage the full functionality offered by System.Diagnostics namespace in our ASP.NET applications.
ASP.NET provides two types of tracing: page-level tracing and application-level tracing. We will see in detail how to implement these types of tracing later in the article.
System.Web.TraceContext Class or Trace object in ASP.NET
We know that the System.Web.TraceContext class manages the tracing output for ASP.NET pages. The following methods of this class are related to tracing:
|
Method |
Description |
|
IsEnabled |
This property returns true |
|
TraceMode |
This property is used to set the order in which trace |
|
Write |
This method writes custom trace messages to the trace |
|
Warn |
This method is same as that of Write method but all trace messages appear as red text. |
The following code shows how to write tracing statements in our ASP.NET applications:
// Simple trace statement
Page.Trace.Write(“This is trace statement”) ;
// Trace statement in red color.
Page.Trace.Warn(“This is the last warning for you”) ;
Page-level Tracing
We can enable tracing in ASP.NET on a per Web page basis. In order to do so, we use the Trace attribute of the @Page directive. The following statement will turn on tracing for a page.
<%@ Page Trace=”true” %>
We can also set the
TraceModeattribute of the
@Pagedirective to one of the following:
- SortByTime
Sorts the trace messages in the order they are processed on the server.
- SortByCategory
Sorts the trace messages according to the categories specified in Trace.Write and Trace.Warn methods.
So what information do we get when tracing is enabled? Well, look at the following figure; it shows a simple ASP.NET page that executes the following code:
Response.Write(“Hello 15Seconds Reader”) ;
Trace.Write(“Test Category 1″,”This is tracing message from ASP.NET”) ;
Trace.Warn(“Test Category 2”, “This is warning message from ASP.NET”) ;
As you can see, ASP.NET tracing provides following information:
- Request Details
This contains basic information, such as Session id, Request time, Request encoding, Request type, Request status and Response encoding.
- Trace Information
This contains page-level trace messages that were written to the tracing output by using the Trace.Write and Trace.Warn methods. - Control Tree
A list of controls on ASP.NET page and their hierarchy. For each control, this section details the id, type, render size, and view-state size.
- Cookies Collection
A list of all cookies, their values and size. These are all the cookies that client send to the server.
- Headers Collection
A list of all HTTP headers.
- Server Variables
A list of all server variables and their values.
You can easily see our trace messages listed in the Trace Information section of the trace output.
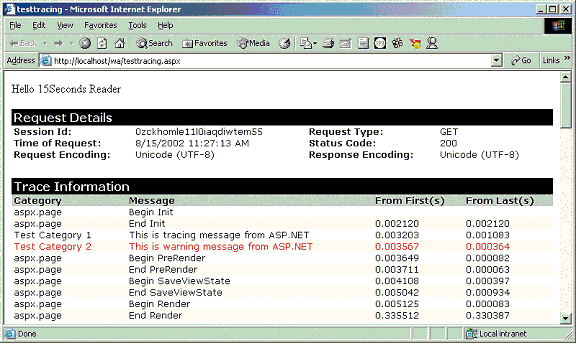
Figure 7
The beauty of this feature is that you can put as many tracing statements in your page as you want, and once you are done with tracing, just set the Trace attribute of @Page directive to false and no tracing output will be generated. You don’t have to manually remove tracing statements from your code.
Application-level Tracing
Page-level tracing works fine if we have to enable tracing for one or two pages, but it just does not make sense to enable tracing on each and every page of our application by using the @Page directive; this takes time. Similarly when we have to disable the tracing, then we would have to go to each and every page and specifically set the Trace attribute to false.
ASP.NET provides a solution to this problem with the application-level tracing. You can enable application-level tracing in the web.config file of your Web application by using the <trace> node.
The following <trace> node setting enables the application-level tracing for the Web application and sets the number of requests to 20.
<configuration>
 <system.web>
  <trace enabled=”true” requestLimit=”20″ />
</system.web>
</configuration>
<trace>
node has following attributes:
|
Attribute |
Description |
|
enabled |
This attribute should be true in order to enable the tracing for the application, |
|
pageOutput |
This attribute should be true if we want to display tracing information on both the That means, if pageOutput |
|
requestLimit |
This attribute specifies the maximum number of requests |
|
traceMode |
This is same as that of the TraceMode attribute of @Page |
|
localOnly |
This attribute specifies whether the trace.axd file is accessible from the local server only (true) or it can be accessed from |
So once we enable tracing for the whole application, ASP.NET will start storing traces for all requests up to the requestLimit attribute defined on the <trace> node.
If you want to see all the traces that ASP.NET has recorded for the Web application for which application-level tracing has been enabled, you would have to browse to the trace.axd file in that Web application. The generic URL for browsing to trace.axd file would be as follows:
http://<servername>/webapp/trace.axd
On my machine, when I browsed to test the Web site (/wa), it presented the following page:
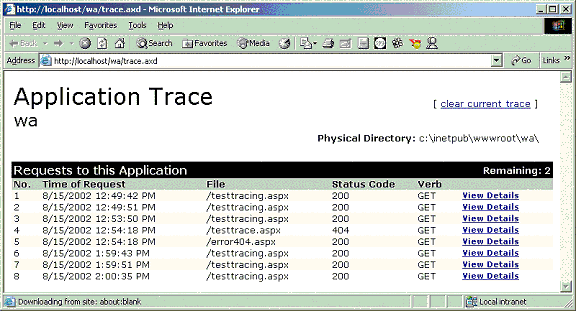
Figure 8
All requests, up to the maximum request limit, are stored in memory. Clicking on the View Details link on the right-hand-side column takes us to a page that actually shows the trace for that particular request.
One important thing that I noted while exploring ASP.NET tracing is that if we change .config file, it will recycle the application traces, means ASP.NET will clear the traces from memory.
So this is how tracing works in ASP.NET, but one should not use tracing for production applications because tracing can severally affect the application performance. If you want to capture tracing information in deployed ASP.NET applications, then consider using the classes found in System.Diagnostics namespace. All the details on the System.Diagnostics classes discussed in the beginning of the article will apply on ASP.NET applications also; we can fully utilize those classes in our ASP.NET applications.
Conclusion
In this article we have learned about tracing and how to use it. We also know how to create our own custom Trace Listeners. Tracing in .NET has been implemented in a very neat and object oriented way, and it is very flexible and customizable, thanks to .config files and custom listeners.
A word of caution for ASP.NET Web applications: enabling tracing during development is fine but enabling ASP.NET tracing (not System.Diagnostic tracing) in deployed application can severally affect the performance of your application. So take care when playing with ASP.NET tracing.
Generally speaking, it is a good practice to use tracing extensively during the development of your applications. Once you are about to release your applications, just filter out development-specific trace messages from your code (hint: use trace levels). Having some kind of trace helps tremendously when investigating errors or problems in an application.
About the Author
Mansoor Ahmed Siddiqui is a software consultant and technical writer working in the United States. He has a masters degree in computer science and been involved in software development since 1997. His areas of expertise include designing and developing Web-based applications, client-server applications, and n-tier applications, with a special focus on middle-tier and Win32 programming.
He has expertise in Microsoft. NET Framework, ASP.NET, C#, Visual Studio .NET, Web Services, ADO.NET, ASP, JavaScript, eXtensible Markup Language (XML), Simple Object Access Protocol (SOAP), Visual C++, Microsoft Foundation Class Library (MFC), Active Template Library (ATL), Visual Basic 6.0, ActiveX Data Objects (ADO), COM/DCOM/COM+, Microsoft Transaction Server (MTS), Microsoft Message Queue (MSMQ), SQL Server 7.0/2000, OMG’s Unified Modeling Language (UML), Rational Software Corp.’s Rational Rose, Java, Java Server Page (JSP), servlets, Enterprise JavaBeans (EJBs), Java 2 Platform Enterprise Edition (J2EE).
Currently, he is working with Visual Studio 7.0 and the Microsoft .NET platform. He is an MCSD and is Brainbench certified in different languages.
Apart from technical writing, other interests include listening to music, swimming, playing cricket and pool, and hanging out with friends. He can be reached at mansoorasiddiqui@hotmail.com and ICQ 151707288.