

Introduction
In computer vision, one usually needs access to video frames as they are streamed in order to analyze or process them in some way. This article shows how to obtain a single bitmap from a video stream using Microsoft Directshow. A prevous article showed how to do this by using Video for Windows. Video for Windows, however, is an old API that was meant for use with webcams; it is not capable of communicating with newer devices such as digital video cameras and newer data format standards such as MPEG. DirectShow was designed to address these limitations through extensibility; in other words, manufacturers of new devices can provide functionality for them through software objects that can be hooked together with existing objects.
In DirectShow, data is streamed by being passed between COM objects known as filters. Filters connect with one another in the standard way defined by COM. The manufacturer of the new device just needs to provide a filter that encapsulates its new behavior. A filter can also be written to intercept data, manipulate it in some way, and pass it on downstream. While writing filters requires knowledge of COM, no knowledge of COM is required to use existing filters such as those that come with DirectShow, as you are going to do in this article. Note that legacy VFW devices will work with DirectShow.
In DirectShow, data travels from source to sink through filters chained together to form a filter graph. The simplest filter graph will have two filters, a source filter connected to a renderer filter. Between these two, one might want to add a filter that transforms the data, for example, by removing color from it or changing its format. The connection points on a filter are known as input and output pins, and a filter can have several of them. For example, you can have an AVI splitter that receives data on one input pin, splits it into picture and sound data streams, which it outputs on two pins, one being an input to a video display and the other a sound player.
A component known as the Filter Graph Manager provides methods for connecting filters to form the filter graph; provides high-level control of the filter graph through commands such as run, stop, and pause; and notifies the application of events such as “capture complete.”
To summarize, a basic DirectShow application will take the following actions:
- Create the Filter Graph Manager.
- Create source and renderer filters, and any others to be placed between the two.
- Use the filter graph manager to connect the filters.
- Run the graph.
- Respond to events.
- Stop the graph.
- Release all COM objects.
Grabbing a Sample
The following is an outline of what is done in your particular example of grabbing a sample from a video stream, and how it is coded. Only the essentials are highlighted here. The picture can be made clearer by looking at CGrabBitmap::GrabBitmap() in GrabBitmaps.cpp in the demo project.
// Create the filter graph manager.
   CComPtr< IGraphBuilder >  pGraph;
   pGraph.CoCreateInstance( CLSID_FilterGraph );
// Create the source filter.
   CComPtr< IBaseFilter >    pSource;
// Get default video device. (See below for more on connecting to a
//                            capture device.)
   GetDefaultCapDevice(&pSource);
// Create the Sample Grabber filter. (See below for further
//                                    clarification on the workings
//                                    of the Sample Grabber.)
   CComPtr< ISampleGrabber > pGrabber;
   pGrabber.CoCreateInstance( CLSID_SampleGrabber );
   CComQIPtr< IBaseFilter, &IID_IBaseFilter > pGrabberBase( pGrabber );
// Add the filters to the filter graph.
   pGraph->AddFilter( pSource, L"Source" );
   pGraph->AddFilter( pGrabberBase, L"Grabber" );
// Connect the filters (See below for more on connecting filters)
   pGraph->Connect( pSourcePin, pGrabPin );
   CComPtr >IPin> pGrabOutPin = GetOutPin( pGrabberBase, 0 );
   pGraph->Render( pGrabOutPin );  // This call connects the renderer
                                   // filter to complete the graph
// Set up graph to grab just one sample.
   pGrabber->SetOneShot( TRUE );
// Wait to be notified that a sample has been obtained.
   CComQIPtr< IMediaEvent, &IID_IMediaEvent > pEvent( pGraph );
   long EvCode = 0;
   pEvent->WaitForCompletion( INFINITE, &EvCode );
Connecting to a Capture Device
The GetDefaultCapDevice() function in the demo works as follows:
- Creates a device enumerator, which lists all devices registered on the system.
- Uses this device enumerator to obtain an enumarator for the video input devices category.
- Goes through this list of video input devices and stops as soon as an available one is found.
- Obtains the filter that manages this device.
The Sample Grabber
The Sample Grabber filter operates in two modes. In the simpler mode, you set a buffer where a copy of the grabbed sample is placed. You use the more complex, more robust mode, in which a callback function is specified. This callback is called whenever a sample becomes available.
The way that callback mode works is rather convoluted. These are the steps:
- Implement a completely separate interface, ISampleGrabberCB, and define either its BufferCB() method or its SampleCB() method. (See GrabBitmaps.cpp in the demo project.)
- Create an object of ISampleGrabberCB:
- Indicate which callback method you have defined by calling ISampleGrabber::SetCallback():
ISampleGrabberCB cb;
grabber->SetCallback(&cb, 1);    // 1 as second arg indicates
                                 // BufferCB(),
                                 // 2 indicates SampleCB().
There are certain circumstances where the behavior of the Sample Grabber is flawed. For this reason, Microsoft provides an improved filter, strangely named the Grabber Sample, which one has to compile and register (by using regsvr32). It can be found in the {DirectX SDK Home Dir}\Samples\C++\DirectShow\Filters\Grabber folder. Although the Grabber Sample compiles and registers cleanly, none of the examples use it, so it may take some effort to figure out how it works. However, it’s worth the effort, for in addition to avoiding the bugs in the Sample Grabber, using the Grabber Sample does not involve implementing a separate interface.
Connecting Filters
Connecting filters involves a negotiation between output and input pins. This is necessary because, for example, it is possible for a downstream filter to request data in a format that the upstream filter does not support. It is also possible for an upstream filter to offer data that the downstream filter cannot handle. Negotiation allows such connections to be rejected. The steps for connecting two filters are as follows:
- Obtain the output pin of the upstream filter.
- Obtain the input pin of the downstream filter.
- Ask the filter graph manager to connect them.
- The Filter Graph Manager asks the output pin to connect with the input pin.
- If the output pin accepts the connection, and the input pin also accepts it, the connection succeeds.
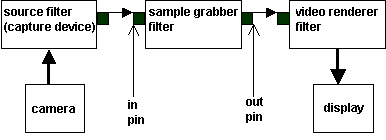
The filter graph for your example is illustrated in the figure below.
A Word about DirectShow Sample Code
Although DirectShow is packaged together with DirectX, Microsoft seems ambivalent in how tight this coupling should be. Initially, DirectShow was a separate technology known as ActiveMovie. Then, there was a move to make it part of DirectX as indicated by the name change. However, current downloads of DirectX do not include the DirectShow code samples. Instead, these are available separately in a download package known as Extras. The user has to copy them back inside the DirectX structure where they compile nicely (the docs expect you to find them there without telling you that you have to put them there yourself). This, I recall reading somewhere, is part of a move to completely separate DirectShow from DirectX in future.
A second thing to note about the samples is that the most recent versions are built using Visual Studio .NET and come with a .vcproj project file only, so you’re on your own if you have VC++ 6, but it can be done.
Class Usage
To use this class, you call CGrabBitmap::GrabBitmap()like this:
PBITMAPINFO pBitmap = NULL;
ULONG BitmapSize    = 0;
CGrabBitmap gb;
if(gb.GrabBitmap(&pBitmap, &BitmapSize))
{
   // use pBitmap
   // delete it
}
Have a look at main.cpp in the demo project to see how I used the class.
An executable is included. But, if you want to build the class yourself, you need to do the following:
- Download the DirectX SDK from http://msdn.microsoft.com/directx/directxdownloads/default.aspx.
- Also, download the Extras from that same page. The Extras include DirectShow base classes and samples.
- Copy the DirectShow folder from the Extras into {DirectX SDK Home Dir}\Samples\C++.
- Compile the baseclasses found inside the DirectShow folder in order to create strmbasd.lib (debug) or strmbase.lib (release).
- In you project settings, specify the basecalsses folder in the include path as well as {DirectX SDK Home Dir}.
- Also, link with the following libraries: strmbasd.lib, winmm.lib, odbc32.lib, odbccp32.lib, and quartz.lib. Remember that strmbasd.lib (or strmbase.lib for release version) is in the debug (or release) folder in the baseclasses folder.
That’s all! I have used this class with a DV camera connected via USB and via IEEE 1394 and with a USB webcam. It works well in all cases.