

Introduction
With Windows Phone 8, Microsoft introduced the programmatic ability to access contacts, calendar and appointments. In an earlier article Building a Windows Phone Application that Accesses Contacts, we learned how to build a simple Windows Phone application that can access contacts on a device. In this article, we will learn about support to access the calendar and appointments on a Windows Phone device running Windows Phone 8.0 or higher.
Windows Phone operating systems allow read-only access to a user’s calendar, which can allow a user to check for existing appointments without leaving their running application. However, to do that the application needs to build support to access the calendar and appointments.
Note that non-platform (not part of Windows Phone Operating system) applications only have read-only access to the calendar.
Calendar Basics
Windows Phone supports access to the calendar from the following sources:
- Windows Phone device
- Windows Live
- Exchange accounts configured on the device
Access to the calendar is enabled by using the Appointments class in the Microsoft.Phone.UserData namespace.
The Appointments class has the SearchCompleted event, which is fired when a search for appointments completes.
To have access to the calendar, the Windows Phone application will need to declare the capability ID_CAP_APPOINTMENTS in the application manifest file WMAppManifest.xml.
The Appointments.SearchAsync API is used to search for a specific appointment by providing a filter. The AppointmentsSearchEventArgs object is returned as part of SearchCompleted delegate.
Hands On
Let us build a sample Windows Phone application that accesses the calendar, and search for appointments using a simple criteria.
At the time of writing this article, Visual Studio 2013 was available as an MSDN download so I have been using that for authoring the article.
Create a new Visual Studio Windows Phone project titled WPCalendarDemo.

New Project
Open up the application manifest file from Solution Explorer.

WMAppMainfest.xml
Double click WMAppManifes.xml and navigate to Capabilities and check the box for ID_CAP_APPOINTMENTS to declare the capability.
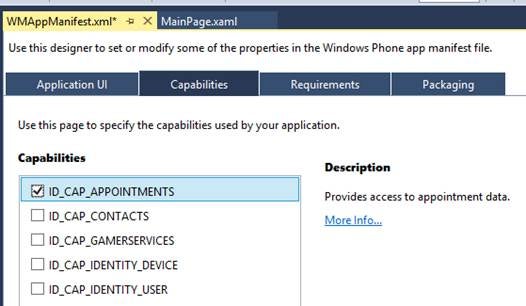
Check the box for ID_CAP_APPOINTMENTS to declare the capability
In our test application, we will have a few controls to provide the criteria to search for appointments. We will also have a ListBox control to display all the appointments that match the search criteria, which we will add in XAML code directly later.
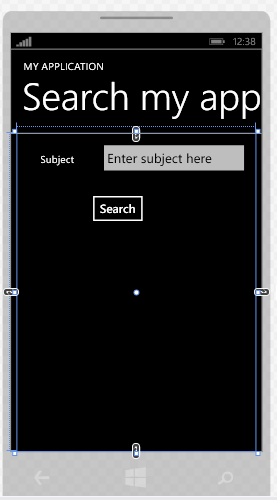
Seardh my app
Here is the XAML that is generated when we add the controls shown above.
<phone:PhoneApplicationPage
    x:Class="WPCalendarDemo.MainPage"
    xmlns="http://schemas.microsoft.com/winfx/2006/xaml/presentation"
    xmlns:x="http://schemas.microsoft.com/winfx/2006/xaml"
    xmlns:phone="clr-namespace:Microsoft.Phone.Controls;assembly=Microsoft.Phone"
    xmlns:shell="clr-namespace:Microsoft.Phone.Shell;assembly=Microsoft.Phone"
    xmlns:d="http://schemas.microsoft.com/expression/blend/2008"
    xmlns:mc="http://schemas.openxmlformats.org/markup-compatibility/2006"
    mc:Ignorable="d"
    FontFamily="{StaticResource PhoneFontFamilyNormal}"
    FontSize="{StaticResource PhoneFontSizeNormal}"
    Foreground="{StaticResource PhoneForegroundBrush}"
    SupportedOrientations="Portrait" Orientation="Portrait"
    shell:SystemTray.IsVisible="True">

    <!--LayoutRoot is the root grid where all page content is placed-->
    <Grid x:Name="LayoutRoot" Background="Transparent">
        <Grid.RowDefinitions>
            <RowDefinition Height="Auto"/>
            <RowDefinition Height="*"/>
        </Grid.RowDefinitions>

        <!-- LOCALIZATION NOTE:
            To localize the displayed strings copy their values to appropriately named
            keys in the app's neutral language resource file (AppResources.resx) then
            replace the hard-coded text value between the attributes' quotation marks
            with the binding clause whose path points to that string name.

            For example:

                Text="{Binding Path=LocalizedResources.ApplicationTitle, Source={StaticResource LocalizedStrings}}"

            This binding points to the template's string resource named "ApplicationTitle".

            Adding supported languages in the Project Properties tab will create a
            new resx file per language that can carry the translated values of your
            UI strings. The binding in these examples will cause the value of the
            attributes to be drawn from the .resx file that matches the
            CurrentUICulture of the app at run time.
         -->

        <!--TitlePanel contains the name of the application and page title-->
        <StackPanel x:Name="TitlePanel" Grid.Row="0" Margin="12,17,0,28">
            <TextBlock Text="MY APPLICATION" Style="{StaticResource PhoneTextNormalStyle}" Margin="12,0"/>
            <TextBlock Text="Search my appointments" Margin="9,-7,0,0" Style="{StaticResource PhoneTextTitle1Style}"/>
        </StackPanel>

        <!--ContentPanel - place additional content here-->
        <Grid x:Name="ContentPanel" Grid.Row="1" Margin="12,0,12,0">
            <TextBlock HorizontalAlignment="Left" Margin="44,35,0,0" TextWrapping="Wrap" Text="Subject" VerticalAlignment="Top"/>
            <TextBox x:Name="textBoxSubject" HorizontalAlignment="Left" Height="72" Margin="154,10,0,0" TextWrapping="Wrap" Text="Enter subject here" VerticalAlignment="Top" Width="292"/>
            <Button x:Name="buttonSearchAppointments" Content="Search" HorizontalAlignment="Left" Margin="133,107,0,0" VerticalAlignment="Top" RenderTransformOrigin="-1.268,0.255" />

        </Grid>

        <!--Uncomment to see an alignment grid to help ensure your controls are
            aligned on common boundaries.  The image has a top margin of -32px to
            account for the System Tray. Set this to 0 (or remove the margin altogether)
            if the System Tray is hidden.

            Before shipping remove this XAML and the image itself.-->
        <!--<Image Source="/Assets/AlignmentGrid.png" VerticalAlignment="Top" Height="800" Width="480" Margin="0,-32,0,0" Grid.Row="0" Grid.RowSpan="2" IsHitTestVisible="False" />-->
    </Grid>
 </phone:PhoneApplicationPage>
We will now add a ListBox, which will contain the results of the appointments search query.
We will add it directly in XAML since Visual Studio 2013 prefers to use LongListSelector over ListBox.
The XAML will be changed as below:
<!--ContentPanel - place additional content here-->
        <Grid x:Name="ContentPanel" Grid.Row="1" Margin="12,0,12,0">
            <TextBlock HorizontalAlignment="Left" Margin="44,35,0,0" TextWrapping="Wrap" Text="Subject" VerticalAlignment="Top"/>
            <TextBox x:Name="textBoxSubject" HorizontalAlignment="Left" Height="72" Margin="154,10,0,0" TextWrapping="Wrap" Text="Enter subject here" VerticalAlignment="Top" Width="292"/>
            <Button x:Name="buttonSearchAppointments" Content="Search" HorizontalAlignment="Left" Margin="133,107,0,0" VerticalAlignment="Top" RenderTransformOrigin="-1.268,0.255" Click=/>
            <ListBox Name="listBoxSearchResults" ItemsSource="{Binding}" Height="400"  ScrollViewer.ManipulationMode="Control" Margin="24,179,0,28"  >
                <ListBox.ItemTemplate>
                    <DataTemplate>
                        <TextBlock Text="{Binding Path=Subject, Mode=OneWay}"   />
                    </DataTemplate>
                </ListBox.ItemTemplate>
            </ListBox>
        </Grid>
Next, we will implement the Search button click event. This method will create an instance of the Appointments class and call the SearchAsync API, passing in the duration for which we want to filter the appointments.
Note that for the case of this demo, I have provided a window of 1 day (today).
The Click event handler for the Search button is implemented as below.
private void buttonSearchAppointments_Click(object sender, RoutedEventArgs e)
        {

            Appointments appointments = new Appointments();
            appointments.SearchCompleted += appointments_SearchCompleted;

            appointments.SearchAsync(DateTime.Today, DateTime.Today.AddDays(1), "All appointments today");
        }
Finally, we will implement the event handler for the Search completion event.
Here, if there is no subject filter criteria, we will set the data content of the ListBox to the Results property of the AppointmentsSearchEventArgs object.
If there is a subject on which to filter appointments, we will parse through the IEnumerable <Appointment> collection (e.Results) and check if the subject matches the filter criteria. If it does, we will manually add it to the ListBox items collection.
void appointments_SearchCompleted(object sender, AppointmentsSearchEventArgs e)
        {
            listBoxSearchResults.DataContext = null;
            listBoxSearchResults.Items.Clear();
            if (textBoxSubject.Text.Trim() == "" || textBoxSubject.Text == "Enter subject here")
            {
                listBoxSearchResults.DataContext = e.Results;
            }
            else
            {
                foreach (Appointment a in e.Results)
                {
                    if(a.Subject.Contains(textBoxSubject.Text.Trim()))
                    {
                        listBoxSearchResults.Items.Add(a);
                    }
                }
            }

        }
Our application is now complete. You cannot run this on the Windows Phone emulator since the emulator does not come with a default account, and hence I did the testing on an actual device.
Further Enhancements
Note that this example can be further extended by building an UI for the “Appointment” and showing the appointment details when a particular appointment is tapped. That exercise is left as an exercise for the user. Use the Microsoft.Phone.UserData.Appointment class for this.
Note that the Appointment class http://msdn.microsoft.com/en-us/library/windowsphone/develop/microsoft.phone.userdata.appointment(v=vs.105).aspx contains the following properties.
- Account
- Attendees
- Details
- StartTime
- EndTime
- IsAllDayEvent
- Location
- Organizer
- Status
- IsPrivate
- Subject
Note that if you want to access Attendees, it is recommended to also declare the ID_CAP_CONTACTS capability in addition to ID_CAP_APPOINTMENTS.
Summary
In this article, we learned how to integrate the calendar and appointments in a Windows Phone application.
I hope you have found this information useful. You can download the source code of the walkthrough discussed in this article below.
About the author
Vipul Patel is a Program Manager currently working at Amazon Corporation. He has formerly worked at Microsoft in the Lync team and in the .NET team (in the Base Class libraries and the Debugging and Profiling team). He can be reached at vipul.patel@hotmail.com