


Visual Basic has come a long way since the introduction of .NET into the BASIC Language. It is difficult to imagine a world without the .NET Framework, but there once was. In the olden days, it was so difficult doing any sort of image manipulation in Visual Basic. This is where Photoshop has earned my respect.
With the advent of the .NET Framework, applying image filters has become relatively easy, as you will learn in this article. You will learn how to create the following image filters:
- Grayscale
- Sepia tone
- Negative
- X-tay
- Edge
Let the games begin.
Practical
Open Visual Studio and create a new Visual Basic Windows Forms project. Design your form to resemble Figure 1.
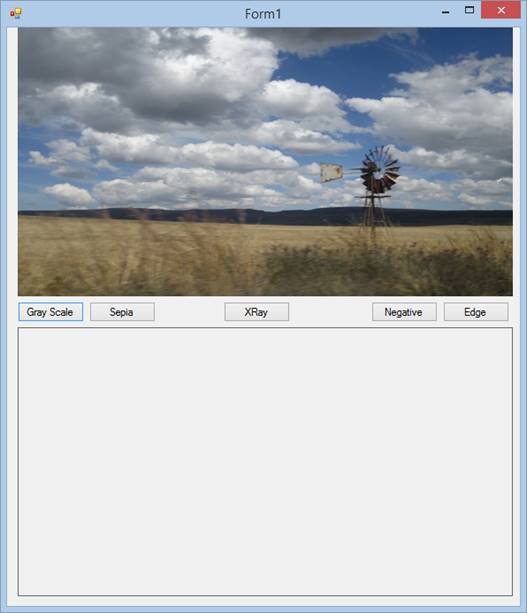
Figure 1: Design
I am including the picture of the windmill in this project, but you are welcome to use your own. There should be two pictureboxes and five buttons. Keep in mind that my object names will be different from yours.
The beautiful picture (well, at least I think it is) of the windmill was taken by me in April 2017 whilst on a road trip through South Africa’s beautiful Free State province. I digress.
Add the necessary namespace to do image manipulation:
Imports System.Drawing.Imaging
Grayscale
A grayscale (black-and-white, or monochrome) image is one in which the value of each pixel is a single sample representing only a certain amount of light, meaning that the image is composed exclusively of shades of gray, from weak to strong.
Add the following code behind the button labeled ‘Grayscale’:
   Private Sub bGray_Click(sender As Object, e As EventArgs) _
         Handles bGray.Click

      Dim iX As Integer
      Dim iY As Integer

      Dim bmpImage As Bitmap 'Source '

      bmpImage = New Bitmap(picOriginal.Image)

      Dim intPrevColor As Integer

      For iX = 0 To bmpImage.Width - 1

         For iY = 0 To bmpImage.Height - 1

            intPrevColor = (CInt(bmpImage.GetPixel(iX, iY).R) +
               bmpImage.GetPixel(iX, iY).G +
               bmpImage.GetPixel(iX, iY).B) \ 3

            bmpImage.SetPixel(iX, iY, _
               Color.FromArgb(intPrevColor, intPrevColor, _
               intPrevColor))

         Next iY

      Next iX

      picModified.Image = bmpImage

   End Sub
The picture from the first picturebox gets looped through. Each pixel gets modified to a lighter shade. Lastly, the bottom picturebox displays the results, as shown in Figure 2:
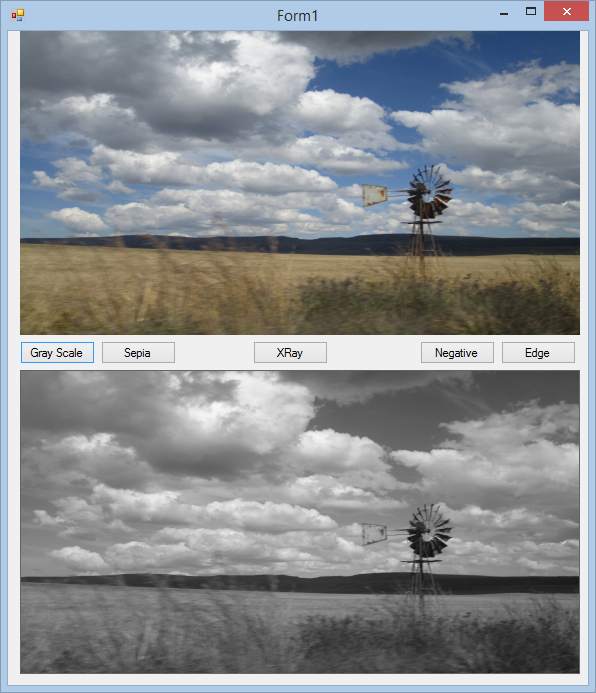
Figure 2: Grayscale
Sepia Tone
Sepia is a reddish-brown color. Sepia tones resemble the effect of aging in old photographs and of photographs chemically treated for archival purposes.
Add the following code for the ‘Sepia’ button:
   Private Sub bSepia_Click(sender As Object, e As EventArgs) _
         Handles bSepia.Click

      Dim bmpImage As Bitmap 'Source '
      bmpImage = New Bitmap(picOriginal.Image)

      Dim cCurrColor As Color

      For iY As Integer = 0 To bmpImage.Height - 1

         For iX As Integer = 0 To bmpImage.Width - 1

            cCurrColor = bmpImage.GetPixel(iX, iY)

            Dim intAlpha As Integer = cCurrColor.A
            Dim intRed As Integer = cCurrColor.R
            Dim intGreen As Integer = cCurrColor.G
            Dim intBlue As Integer = cCurrColor.B

            Dim intSRed As Integer = CInt((0.393 * intRed + _
               0.769 * intGreen + 0.189 * intBlue))
            Dim intSGreen As Integer = CInt((0.349 * intRed + _
               0.686 * intGreen + 0.168 * intBlue))
            Dim intSBlue As Integer = CInt((0.272 * intRed + _
               0.534 * intGreen + 0.131 * intBlue))

            If intSRed > 255 Then

               intRed = 255

            Else

               intRed = intSRed

            End If

            If intSGreen > 255 Then

               intGreen = 255

            Else

               intGreen = intSGreen

            End If

            If intSBlue > 255 Then

               intBlue = 255

            Else

               intBlue = intSBlue

            End If

            bmpImage.SetPixel(iX, iY, Color.FromArgb(intAlpha, _
               intRed, intGreen, intBlue))

         Next

      Next

      picModified.Image = bmpImage

   End Sub
You loop here again through the source image (which is the image in the first picturebox). Then, you calculate the transparency for each of the color values:
- Red: tr = 0.393(100) + 0.769(150) + 0.189(200)
- Green: tg = 0.349(100) + 0.686(150) + 0.168(200) = 171
- Blue: tb = 0.272(100) + 0.534(150) + 0.131(200) = 133
The result is shown next (see Figure 3):
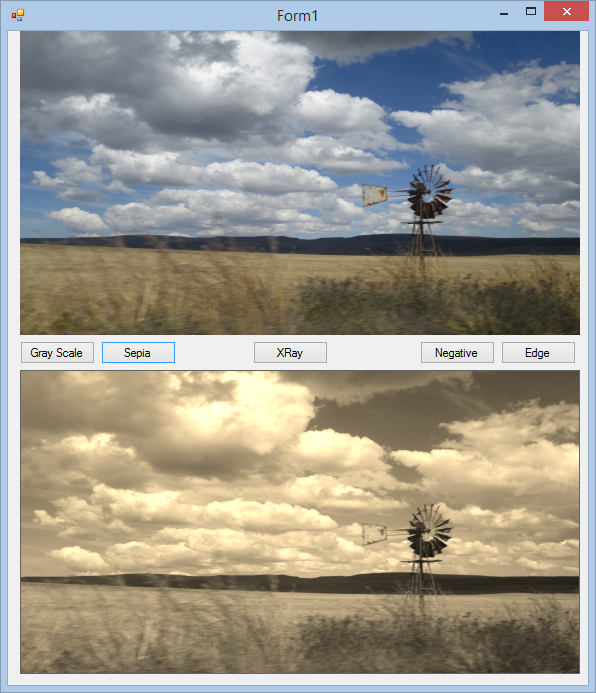
Figure 3: Sepia-toned image
Negative
Add the following code to create a Negative effect:
   Private Sub bNegative_Click(sender As Object, e As EventArgs) _
         Handles bNegative.Click

      Dim iaAttributes As New ImageAttributes

      Dim cmMatrix As New ColorMatrix

      cmMatrix.Matrix00 = -1 : cmMatrix.Matrix11 = -1 : _
         cmMatrix.Matrix22 = -1
      cmMatrix.Matrix40 = 1 : cmMatrix.Matrix41 = 1 : _
         cmMatrix.Matrix42 = 1

      iaAttributes.SetColorMatrix(cmMatrix)

      Dim bmpImage As Bitmap = picOriginal.Image

      Dim rect As New Rectangle(0, 0, bmpImage.Width, _
         bmpImage.Height)

      Dim graph As Graphics = Graphics.FromImage(bmpImage)

      graph.DrawImage(bmpImage, rect, rect.X, rect.Y, rect.Width, _
         rect.Height, GraphicsUnit.Pixel, iaAttributes)

      picModified.Image = bmpImage

   End Sub
Here, I have made use of a ColorMatrix object to reverse the original colors. The result is shown in Figure 4.

Figure 4: Negative
Edge
To determine the edges inside this image, I have opted to make use of the Sobel Edge algorithm. Sobel, sometimes called the Sobel–Feldman operator or Sobel filter, is used in image processing, especially for edge detection where it creates an image that emphasizes the edges.
Add the following code:
   Private Sub bEdge_Click(sender As Object, e As EventArgs) _
         Handles bEdge.Click

      'Sobel Edge'
      Dim tmpImage As Bitmap = New Bitmap(picOriginal.Image)
      Dim bmpImage As Bitmap = New Bitmap(picOriginal.Image)

      Dim intWidth As Integer = tmpImage.Width
      Dim intHeight As Integer = tmpImage.Height

      Dim intOldX As Integer(,) = New Integer(,) {{-1, 0, 1}, _
         {-2, 0, 2}, {-1, 0, 1}}
      Dim intOldY As Integer(,) = New Integer(,) {{1, 2, 1}, _
         {0, 0, 0}, {-1, -2, -1}}

      Dim intR As Integer(,) = New Integer(intWidth - 1, _
         intHeight - 1) {}
      Dim intG As Integer(,) = New Integer(intWidth - 1, _
         intHeight - 1) {}
      Dim intB As Integer(,) = New Integer(intWidth - 1, _
         intHeight - 1) {}

      Dim intMax As Integer = 128 * 128

      For i As Integer = 0 To intWidth - 1

         For j As Integer = 0 To intHeight - 1

            intR(i, j) = tmpImage.GetPixel(i, j).R
            intG(i, j) = tmpImage.GetPixel(i, j).G
            intB(i, j) = tmpImage.GetPixel(i, j).B

         Next

      Next

      Dim intRX As Integer = 0
      Dim intRY As Integer = 0
      Dim intGX As Integer = 0
      Dim intGY As Integer = 0
      Dim intBX As Integer = 0
      Dim intBY As Integer = 0

      Dim intRTot As Integer
      Dim intGTot As Integer
      Dim intBTot As Integer

      For i As Integer = 1 To tmpImage.Width - 1 - 1

         For j As Integer = 1 To tmpImage.Height - 1 - 1

            intRX = 0
            intRY = 0
            intGX = 0
            intGY = 0
            intBX = 0
            intBY = 0

            intRTot = 0
            intGTot = 0
            intBTot = 0

            For width As Integer = -1 To 2 - 1

               For height As Integer = -1 To 2 - 1

                  intRTot = intR(i + height, j + width)
                  intRX += intOldX(width + 1, height + 1) * intRTot
                  intRY += intOldY(width + 1, height + 1) * intRTot

                  intGTot = intG(i + height, j + width)
                  intGX += intOldX(width + 1, height + 1) * intGTot
                  intGY += intOldY(width + 1, height + 1) * intGTot

                  intBTot = intB(i + height, j + width)
                  intBX += intOldX(width + 1, height + 1) * intBTot
                  intBY += intOldY(width + 1, height + 1) * intBTot

               Next

            Next

            If intRX * intRX + intRY * intRY > intMax OrElse
               intGX * intGX + intGY * intGY > intMax OrElse
               intBX * intBX + intBY * intBY > intMax Then

               bmpImage.SetPixel(i, j, Color.Black)

            Else

               bmpImage.SetPixel(i, j, Color.Transparent)

            End If

         Next

      Next

      picModified.Image = bmpImage

   End Sub
The resulting image is shown in Figure 5.
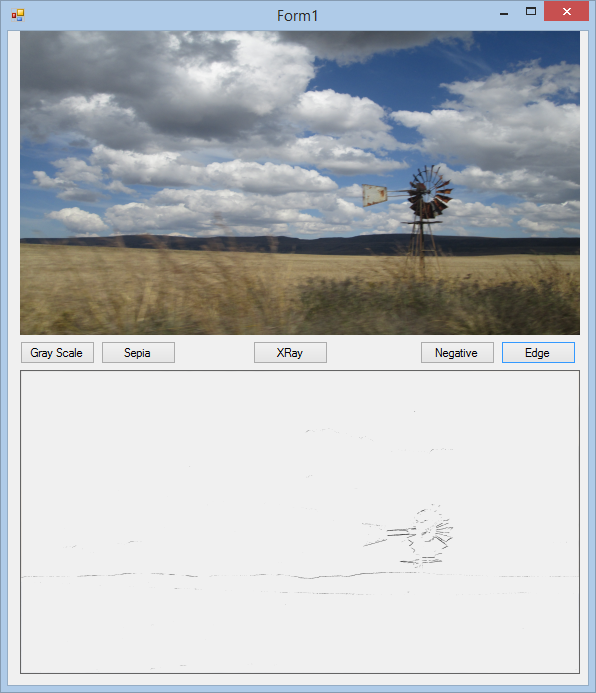
Figure 5: Edge
The picture had too much detail, so as you can see it was quite difficult obtaining all edges. I should have chosen a simpler image, but I wanted to brag about my beautiful country.
X-ray
The X-ray effect is simply a combination of the Grayscale effect and the Negative effect because an X-ray is a negative of a grayscale picture. Add the following code:
   Private Sub bXRay_Click(sender As Object, e As EventArgs) _
         Handles bXRay.Click

      Dim iX As Integer
      Dim iY As Integer

      Dim bmpImage As Bitmap 'Source '

      bmpImage = New Bitmap(picOriginal.Image)

      Dim intPrevColor As Integer

      For iX = 0 To bmpImage.Width - 1

         For iY = 0 To bmpImage.Height - 1

            intPrevColor = (CInt(bmpImage.GetPixel(iX, iY).R) +
               bmpImage.GetPixel(iX, iY).G +
               bmpImage.GetPixel(iX, iY).B) \ 3

            bmpImage.SetPixel(iX, iY, _
               Color.FromArgb(intPrevColor, intPrevColor, _
               intPrevColor))

         Next iY

      Next iX

      Dim iaAttributes As New ImageAttributes

      Dim cmMatrix As New ColorMatrix

      cmMatrix.Matrix00 = -1 : cmMatrix.Matrix11 = -1 : _
         cmMatrix.Matrix22 = -1
      cmMatrix.Matrix40 = 1 : cmMatrix.Matrix41 = 1 : _
         cmMatrix.Matrix42 = 1

      iaAttributes.SetColorMatrix(cmMatrix)

      Dim rect As New Rectangle(0, 0, bmpImage.Width, _
         bmpImage.Height)

      Dim graph As Graphics = Graphics.FromImage(bmpImage)

      graph.DrawImage(bmpImage, rect, rect.X, rect.Y, rect.Width, _
         rect.Height, GraphicsUnit.Pixel, iaAttributes)

      picModified.Image = bmpImage

   End Sub
The result is shown in Figure 6.
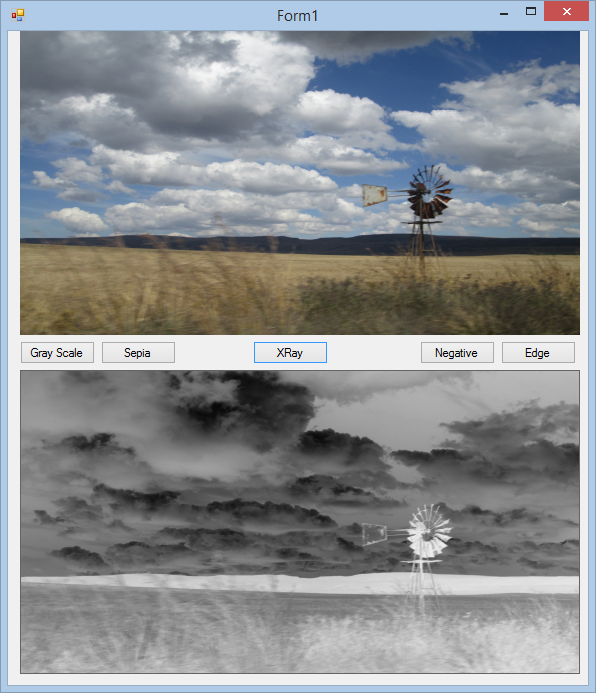
Figure 6: X-ray
Keep in mind: Some of the demonstrated effects do take a significant amount of time to process; I know this from experience. This article serves to explain just the basics and logic behind these effects; obviously, there are numerous ways to optimize the speed.
The code for this article is available on GitHub.
Conclusion
This was fun! On Codeguru, there are several graphics-related articles that I have written. Please feel free to have a look at them as well. Until next time, cheers!