

If you are a developer that uses C, C#, C++, or a similar language, then a shift to embedded programming could be much easier than you expect. In fact, with the purchase of a simple hardware board from Amazon or another store, you can get started quickly and cheaply.
Many people start their development in the embedded space by buying an Uno, Raspberry Pi, or similar board. These boards can range from about $15 up. The issue with starting with one of these boards is that while they contain the core processing (CPU) and connections, you generally have to buy additional sensors and hardware to start doing the fun stuff. To code an LED, a digital display, a button, a beeper, or more, then you have to buy them as well as possibly buy transistors, a breadboard and more. You then must wire the pieces together. While all of this is relatively inexpensive and easy to do, it still takes time away from experiencing the coding aspect of embedded systems.
If you are interested in dabbling in embedded coding to see if it is something of interest is to buy a board that includes a number of sensors already in place and connected. This allows you to then focus on writing the code and not worry about connecting wires to the right pins and ports. You can use such a board to get a basic feel for embedded coding as well as for learning to write code for several different sensors. If you find a board that is compatible with one of the mainstream boards, then the code you write will transfer to future, more complex projects.
Choosing a Board for Embedded Programming
One such board that can be bought on Amazon.com for around $15 (at the time of this writing, it was $14.90) is the EEEEE UNO R3 starter kit board. This small board is compatible with Arduino and comes with a variety of sensors and widgets, including:
- A 4 panel, 7 segment digital display
- Buzzer
- 4 LEDs
- 3 switches
- Adjustable potentiometer
- Reset button
- Connectors for servos (4) and sensor connections.
The board is also expandable, so if a sensor isn’t included that you want to code to, you might also be able to add it in a way similar to what you would do with Arduino and other boards. Once you buy this board, you’ll be able to download a development tool and get started immediately. This board is really two boards (a board and a shield), as shown in the following image.
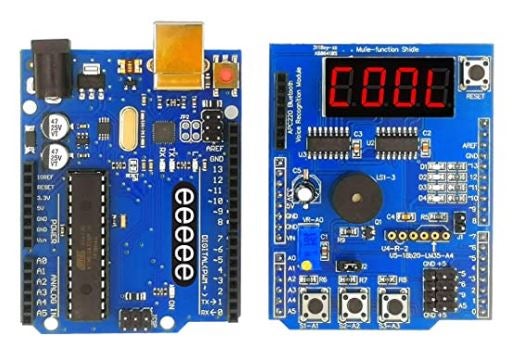
Most of the controls are on the shield board on the right; however, the main board on the left includes the processor and a USB port that can be used to connect the board to your computer for power and to upload programs to the board. The left board primarily has connectors; however, it does have an LED on pin 13. If you plug the board into your computer with the included USB cable, you’ll see the LED light up. There is actually a second LED that will light up on the board as well to show there is power.
The most basic embedded program that most people start with is to turn on and off an LED. Since the primary board has an LED light, we can do this without needing the second shield board.
Embedded Programming in C: First Steps
The first step is to load a development environment. This board is compatible with the Arduino, so you should be able to use any embedded tools that work with the Arduino platform. If you don’t have one, you can download the Arduino IDE from https://www.arduino.cc/en/software. Versions are available for Windows 7 and newer, Linux, and Mac OSX 10.10 or newer. The IDE can be downloaded at no cost, although there is an option to donate to the project. If you are considering embedded development, I’ll assume you can download and install an IDE, so that is not covered here.
The Arduino IDE is somewhat simplistic, but it provides what you need to get started. When you run the IDE on Windows, it will launch with a project shell ready to go as:
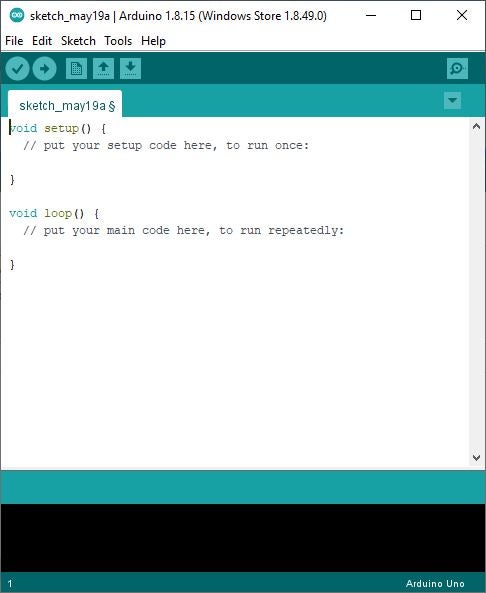
You’ll be able to put any initialization code into the setup() method, and your main code can be put into the loop() method. The loop() method code will run repeatedly as the comment tells you.
To show the board in action, we’ll add code to flash the LED on our board. The LED is connected to the board via a pin. We’ll initialize the pin for the LED light in the startup() method, and then we will add code to turn on the LED for a second, then turn it off for a second in the loop() function. Because this is in the loop, it will repeat, thus causing the LED to flash. The C code for this is:
#define MyPin 13

void setup() {
  // put your setup code here, to run once:
  pinMode(MyPin, OUTPUT);
}

void loop() {
  // put your main code here, to run repeatedly:
  digitalWrite(MyPin, HIGH); // turn the LED on (HIGH is the voltage level)
  delay(100); // wait for a 10th of a second
  digitalWrite(MyPin, LOW); // turn the LED off by making voltage LOW
  delay(100); // wait for a 10th of a second
}
You can enter this code into the Arduino IDE. The LED on the main board is associated to pin 13. As such, we will define a constant called MyPin to be 13 and then use the constant rather than hardcoding the PIN number in the code. The setup code associates the pin for output.
In the loop, we provide the output to our pin. In this case, we use digitalWrite() to set the voltage on the pin. Setting the voltage high will power the LED. Setting the voltage low will turn it off. Between turning the pin voltage on and off, we simply delay. In this case, we delay for a tenth of a second by passing a value of 100. If you wanted a longer, slower flash, you could change this to 1000 and have the LED on for a second, every other second.
Once entered, you can click the checkmark to verify the code is good to go. You’ll be prompted to save the folder, and then the file will be compiled. If there are no issues, you should get a Done compiling message along with information on the size of your program:

With the code verified, you can upload it to your board to run. You simply need to connect the board to your computer via the USB cord provided, as mentioned earlier. Once connected, click the right arrow button to upload the code. The upload process will compile the code again before proceeding. If this is the first time to upload a program, then you’ll be prompted to select the serial port where your board is connected:
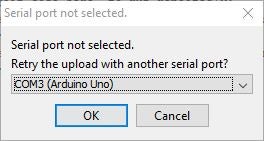
On my system, the board is connected to COM3. Select OK to continue. This will start the compiling and uploading processes. Once completed, the program should run on your board, and you should see the LED light flash on and off.
There are other LEDs on the board as well, including one on Pin 1. You can adjust the code to cause the second LED to flash as well. The following code has the LED on pin 2 go on and off at twice the speed of the one on pin 13:
#define MyPin 13
#define MyPin2 1

void setup() {
  // put your setup code here, to run once:
  pinMode(MyPin, OUTPUT);
  pinMode(MyPin2, OUTPUT);
}

void loop() {
  // put your main code here, to run repeatedly:
  digitalWrite(MyPin, HIGH); // turn the LED on (HIGH is the voltage level)
  delay(100); // wait for a second
  digitalWrite(MyPin, LOW); // turn the LED off by making the voltage LOW
  delay(100); // wait for a second

 digitalWrite(MyPin2, HIGH); // turn the LED on (HIGH is the voltage level)
  delay(200); // wait for a second
  digitalWrite(MyPin2, LOW); // turn the LED off by making the voltage LOW
  delay(200); // wait for a second
}
The result of verifying, compiling, and uploading the new listing is that two LEDs will now be flashing on your board.
As you can see, for roughly $15 US with no wiring, you were able to write and run an embedded program. While the functionality was limited – simply flashing a light – it was effective. You can modify the code to change the flashing frequency and speed of the light using standard C code.
The following starts with a fast flash and slows down. Once it reaches a half-second, the fast flashing starts again. As you can see, a simple C looping structure is used:
#define MyPin 13

void setup() {
  // put your setup code here, to run once:
  pinMode(MyPin, OUTPUT);
}

void loop() {
  // put your main code here, to run repeatedly:

  for (int x = 0; x < 500; x = x + 50)
  {
     digitalWrite(MyPin, x); // turn the LED on
     delay(x); // wait
     digitalWrite(MyPin, LOW); // turn the LED
     delay(x); // wait
  }
}
In the next article, we’ll take the kit mentioned above and combine the two boards:
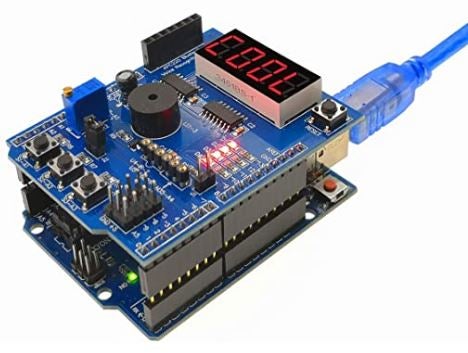
With the two boards connected, you’ll have access to the digital display screen, buzzer, buttons, and other sensors. In the following article, you will see how to code the buttons and buzzer – No additional hardware is required beyond the embedded board mentioned above that was under $15!