

There’s no doubt about it; ASP.NET MVC has made developing a web application child’s play, in this day and age. Add a front end framework such as Twitter Bootstrap into the mix, and you suddenly have the ability to make your application user interface look really great too. Unfortunately, there’s still one pain point that exists in an otherwise wonderful combination and that’s MVC form validation.
Anyone who’s done any work with ASP.NET MVC will know just how great the built in model validation and binding is. You create a model, you attach some attributes to describe its rules, and then you create a controller and a couple of actions to handle it, followed by a view or two. By using very minimum code, and a sprinkling of helpers in your Razor view, you have validation messages and input boxes that change colour and display appropriate error messages when something goes wrong, all without lifting a finger.
Unfortunately, the class names used to set the colours are not changeable, and are not a match for the visual styles used by bootstrap, which is a great shame because the bootstrap styles look really good, and really crisp. A quick trip to stack overflow will show you question after question where MVC users are asking for advice on how to make this all work in an easy and reliable manner, and there are all sorts of generally crazy solutions, most of which involve adding the bootstrap ‘Less’ source code files to your project and then modifying them to also be applied to the rule names used by ASP.NET MVC. Although this is a good long term solution, many times all you need is a quick bit of code for a one off use case to solve the problem, and writing a helper, or recompiling your own custom bootstrap build really is more of a hassle than it needs to be.
However, there’s one route that many people either fail to explore or dismiss as being impractical, and that’s JavaScript.
Unleash the Script
I can hear the cries already….
“But you can’t use JavaScript, What about graceful degradation?“
Well, yes, you have a point, but in all honesty, many sites these days manage quite happily to force people to use JS and don’t have a problem with it. As for the argument for scripters and screen scrapers? Well, you’re presenting a form for a hHuman to fill in, right? If someone’s trying to scrape that… they’re quite clearly doing it wrong. However, this post is not an argument for the merits of JS being enabled or not; this is just one approach you could decide to use if you want.
So how do we implement it?
Quite easily, as it happens.
If you’re using Bootstrap, you already have jQuery running because BS has a dependancy on it. All you need to do is look for the validation error classes to tell you which fields in the form currently have validation errors. Once you know which fields have errors, you just need to add/remove the appropriate BS classes to style things correctly.
Implementing the Code
The first thing to do is to create an empty MVC application. You can create one with other views and such like already in if you want, but I’ll be assuming the project is already empty. Note also that I’ll be writing this article from the point of view of using MVC5 and the .NET 4.5 runtime.
The first thing we need is a simple controller, The following code will create you a home controller with two simple actions: one to serve up the initial test form, and one to accept the post and validate it.
using System.Web.Mvc;
using BootstrapModelBinding.Models;

namespace BootstrapModelBinding.Controllers
{
   public class HomeController : Controller
   {
      public ActionResult Index()
      {
         return View();
      }

      [HttpPost]
      public ActionResult Index(TestObject myObject)
      {
         if (!ModelState.IsValid)
         {
            ModelState.AddModelError("",
               "There are form errors; please
               correct them to continue!");
            return View();
         }

         return View("NoErrors");
      }

   }
}
Next, we’ll create a couple of razor views. The first one will use the various HTML helpers to draw our form, and the second will simply just be a page with a message on that we can redirect to if the form has no errors.
Index.cshtml
@model BootstrapModelBinding.Models.TestObject

@{
   ViewBag.Title = "Index";

}

<div class="">

   <div class="page-header">
      <h2>Bootstrap Form Highlight Test</h2>
   </div>
   <p>Please fill in and submit the form below. Do try not
      filling bits in and causing errors to see the effect.</p>

   @Html.ValidationSummary(true)

   @using (Html.BeginForm("Index", "Home", FormMethod.Post,
      new { role = "form" }))
   {
      <div class="form-group">
         @Html.LabelFor(m => m.FirstName, new { @class = "control-label" })
         <div class="">
            @Html.TextBoxFor(m => m.FirstName, new { @class = "form-control" })
            <p class="help-block">@Html.ValidationMessageFor(m => m.FirstName)</p>
         </div>
      </div>

      <div class="form-group">
         @Html.LabelFor(m => m.Surname, new { @class = "control-label" })
         <div class="">
            @Html.TextBoxFor(m => m.Surname, new { @class = "form-control" })
            <p class="help-block"><spanstyle='color: background:yellow'>@Html.ValidationMessageFor(m => m.Surname)</p>
         </div>
      </div>

      <div class="form-group">
         @Html.LabelFor(m => m.EmailAddress, new { @class = "control-label" })
         <div class="">
            @Html.TextBoxFor(m => m.EmailAddress, new { @class = "form-control" })
            <p class="help-block">@Html.ValidationMessageFor(m => m.EmailAddress)</p>
         </div>
      </div>

      <div class="form-group">
         <spanstyle='background:yellow'>@Html.LabelFor(m => m.UkPhoneNumber, new { @class = "control-label" })
         <div class="">
            @Html.TextBoxFor(m => m.UkPhoneNumber, new { @class = "form-control" })
            <p class="help-block">@Html.ValidationMessageFor(m => m.UkPhoneNumber)</p>
         </div>
      </div>

      <div class="form-group">
         <div class="">
            <button class="btn btn-primary">Submit
               <span class="glyphicon glyphicon-log-in"></span></button>
         </div>
      </div>
   }

</div>
NoErrors.cshtml
@{
   ViewBag.Title = "No Errors";
}

<h2>No Errors</h2>
<p>Sweet.. you got here because your form had no errors.</p>
@Html.ActionLink("Click Here to try again", "Index", "Home")
Finally, we need a data model to test our form, so create the following class called ‘TestObject.cs’ in your models folder.
using System.ComponentModel.DataAnnotations;

namespace BootstrapModelBinding.Models
{
   public class TestObject
   {
      [Required(ErrorMessage = "You must provide your first name")]
      [Display(Name = "First Name")]
      public string FirstName { get; set; }

      [Required(ErrorMessage = "You must provide your surname")]
      [Display(Name = "Surname")]
      public string Surname { get; set; }

      [Required(ErrorMessage = "You must provide your email address")]
      [Display(Name = "E-Mail address")]
      [DataType(DataType.EmailAddress)]
      [EmailAddress]
      public string EmailAddress { get; set; }

      [Required(ErrorMessage = "You must provide your phone number")]
      [Display(Name = "UK Phone number")]
      [DataType(DataType.PhoneNumber)]
      [RegularExpression(@"((^\+{0,1}44\s{0,1})|^0|(\(0\)))\d{4}\s{0,1}\d{6}$")]
      public string UkPhoneNumber { get; set; }

   }
}
You’ll also need to set up a razor layout page. Depending on how you do things, this may be already created for you automatically, in an empty MVC application. However, you’ll likely need to add the following two files;
_ViewStart.cshtml (In Views)
@{
   Layout = "~/Views/Shared/_Layout.cshtml";
}
_Layout.cshtml (In Views\Shared)
<!DOCTYPE html>
<html>
<head>
<meta charset="utf-8" />
<meta name="viewport" content="width=device-width,
initial-scale=1.0">
<title>@ViewBag.Title | MVC Application</title>
<link href="~/Content/Site.css" rel="stylesheet"
type="text/css" />
<link href="~/Content/bootstrap.min.css"
rel="stylesheet" type="text/css" />
<script src="~/Scripts/modernizr-2.6.2.js"></script>
</head>
<body>
<div class="navbar navbar-inverse navbar-fixed-top">
<div class="container">
<div class="navbar-header">
<button type="button" class="navbar-toggle"
data-toggle="collapse" data-target=".navbar-collapse">
<span class="icon-bar"></span>
<span class="icon-bar"></span>
<span class="icon-bar"></span>
</button>
@Html.ActionLink("MVC Application", "Index", "Home",
new { area = "" }, new { @class = "navbar-brand" })
</div>
<div class="navbar-collapse collapse">
<ul class="nav navbar-nav"></ul>
</div>
</div>
</div>
<div class="container">
<div class="row">
@RenderBody()
</div>
<footer class="row">
<p>© @DateTime.Now.Year - My ASP.NET Application</p>
</footer>
</div>
<script src="~/Scripts/jquery-1.10.2.min.js"></script>
<script src="~/Scripts/bootstrap.min.js"></script>
</body>
</html>
You can probably cut some code out of the layout file if you need to, but that’s a good template to keep around for Bootstrap projects because it implements the minimum you need to get an app screen with menu bar up and running.
With all the files in place, you now need to add Bootstrap using NuGet.
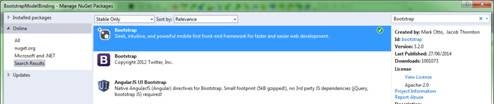
Figure 1: Adding Bootstrap
Make sure you get the more up to date (3.2.0 as of writing this) version, and not the older one below it. Also, make sure it’s the official one by Mark Otto and Co. There are a number of ‘Bootstrap’ packages on NuGet; a lot of them install extra stuff that’s really not needed.
With Bootstrap installed, compile and run your app, and you should hopefully see something like the following:
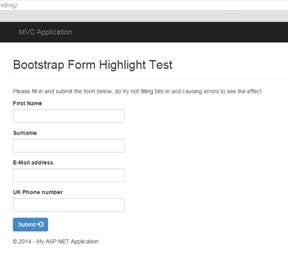
Figure 2: The Bootstrap Form Highlight Test
At this point, if all is working okay and you try to submit the form, you should see the following:
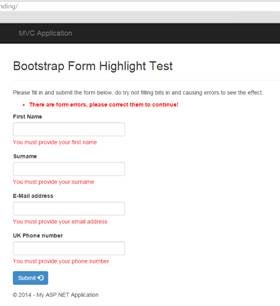
Figure 3: The Bootstrap Form Highlight Test, with form errors
As you can see, the actual Bootstrap-styled components don’t get styled to show an error condition, even though we’re using the HTML helpers to add them as expected. This is because BS re-writes many of the browser base styles so that when MVC tries to apply its own styles, Bootstrap actually overrides them. If you inspect the elements, however, you’ll see that the ‘red text’ you can see styled has a consistent class name that you can look for.
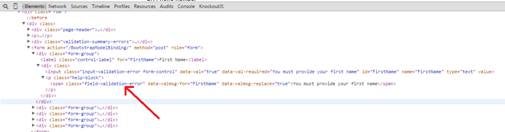
Figure 4: Looking for the consistent name
As you can see, there’s a span element with a class of ‘field-validation-error’ inside our BS help block’s p tag, which is in turn nested inside a form-group. If you look at the BS3 docs, all you need to do to change the input state is to apply the appropriate state class to each form-group that has an error. You can achieve this very easily by attaching a jQuery dom ready handler to your page that uses the JQ selector to find each of these fields. By attaching it to the DOM ready handler, you’ll be certain that it will run as soon as the page finishes rendering, thus the form will change instantly as soon as it’s re-displayed.
The other thing you also need to look for is the validation summary (in this case, at the top of the form) and apply the appropriate BS3 alert styles to it.
One last thing you’ll also notice. The red text below each field showing the error message will override the BS3 styles, so when searching for and adding the overall error class, you’ll also need to remove the class that applies this style; otherwise, that too will not take the BS3 form style colouring.
After explaining all that, the implementation is very easy.
Add a new JavaScript file to your project and add the following code to it.
$(function ()
{
   $('.validation-summary-errors').each(function ()
   {
      $(this).addClass('alert');
      $(this).addClass('alert-danger');
   });

   $('form').each(function ()
   {
      $(this).find('div.form-group').each(function ()
      {
         if ($(this).find('span.field-validation-error').length > 0)
         {
            $(this).addClass('has-error');
            $(this).find('span.field-validation-error').
               removeClass('field-validation-error');
         }
      });
   });

});
Link this file into a script tag in your layout file:
<script src="~/Scripts/CustomBsValidation.js"></script>
If you now build and run your project, and then try submitting an empty form again just as you did before, you should now see things are different
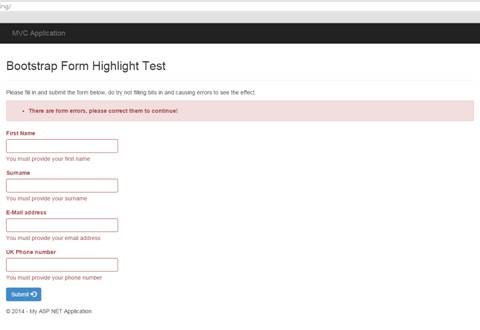
Figure 5: The Bootstrap Form Highlight Test, running correctly
And that’s all there is to it. A simple bit of JavaScript to find and alter things live, which for simple projects works well. You could easily extend this where needed to do things like enable the new validation state icons or you could even use the HTML helpers in razor to add extra attributes to the tags, which you could then look for and act on.
If there’s anything specific you’d like to see me write about in this column, please ping me on Twitter as @shawty_ds, or come and find me in the Lidnug (Linked .NET user group) on Linked-in that I help run; let me know your thoughts. You can also can use the comment form below this article to reach me.