

By Mansoor Ahmed Siddiqui
Security has always been a top issue for all kinds of applications, especially Web applications. Web apps are accessible to almost the entire universe and are open to attack.
Web Services is a current hot topic because of its interoperability, ease of consumption, use of standard Web protocols, seamless integration with heterogeneous systems, etc. Therefore more platforms are now incorporating Web Services into their architecture. And with that greater amount of use, the need for security also increases.
Since Web Services are part of ASP.NET, and these are hosted by ASP.NET runtime, anything relevant to ASP.NET will also be true for Web Services.
This article will discuss:
- Security concepts
- ASP.NET security
- How to control security by running the ASP.NET application worker process (aspnet_wp.exe) using an account with weaker privileges than the Local System account
- Different security schemes offered by ASP.NET and Internet Information Server (IIS), and how ASP.NET and IIS work together to provide security to Web apps, including Web Services
- Some code examples on how to use these security schemes for Web Services
Setting Up the Sample Applications
To install the applications:
I have created a project in C# (CSWebservices) that contains some Web Services. This project will be used for the demonstration of different security schemes. There is also a C# Web site (CSWebsite) that has some Web pages for invoking methods on our Web Services.
Creating Windows User Accounts
To test Windows security, a valid Windows account is needed. Create a user account called Test on your computer. You can do so by running the Computer Management application from Control Panel -> Administrative Tools -> Computer Management. In the Computer Management application, right click on the Users node under the Local Users and Groups node, select New User… option from the context menu, enter “Test” in the User name text box, enter some password in Password and Confirm password text boxes, uncheck the User must change password at next logon check box, and check the User cannot change password check box. Your screen should look like the following: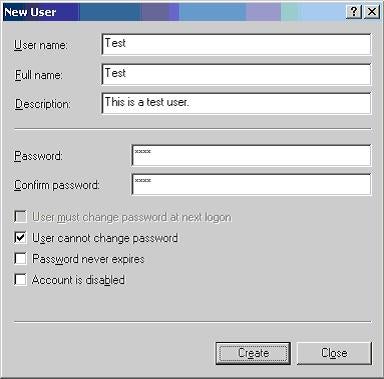
Figure 1:
Click the Create button. The Test user has been created successfully. Follow the same steps and create another user called Test2.
Security Concepts
Sometimes we want users’ requests to be run in the security context of some other user identity. For that we use impersonation. Impersonation is a process in which a user accesses the resources by using the identity of another user. An example of impersonation is the use of the IUSR_machinename account that is created by IIS. When a Web site has anonymous access enabled, then IIS runs all the users’ requests using the identity of the IUSR_machinename account. Once we have authenticated the user and the user has valid credentials, it is time to check authorization.
Before proceeding further, I will describe some concepts that represent the key functionalities that a security system must provide.
Impersonation
Authentication
Authentication is a process in which the security infrastructure makes sure that the users are who they say they are. In order to do this, the security infrastructure collects the user’s credentials, usually in the form of user ID and password, checks those credentials against any credentials’ store. If the credentials provided by the user are valid, then the user is considered an authenticated user.
Authorization
Authorization is a process in which the security infrastructure checks whether the authenticated user has sufficient rights to access the requested resource. If user has sufficient rights to access a resource, for example, the user has “write rights” on a file, then the operation succeeds; otherwise the operation fails.
ASP.NET Security
ASP.NET works with IIS and the Windows operating system in order to implement the security services. In ASP.NET, most of the IIS settings have been replaced with configuration files. However, security settings made in IIS are still valid in some of the areas because IIS is still handling the process of accepting users’ requests. In fact, whenever IIS receives requests for some ASPX page, ASMX Web Service, or any other resource that is associated with ASP.NET, it uses the IIS applications mappings to send the request to ASP.NET.
ASP.NET applications use configuration files for security and other Web application settings. All ASP.NET applications on a particular machine inherit their security configuration from a file named machine.config. Each ASP.NET application can in turn override some of the settings in machine.config using an application-level configuration file named Web.config.
So what really is an ASP.NET application? To find the answer to this question, start the Internet Services Manager, right click on the Default Web Site node, select Properties from the context menu, go to the Home Directory tab on the Web site properties dialog box, and click the Configuration… button. It will pop up the following dialog box.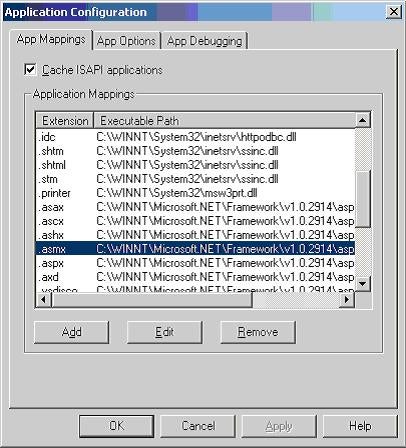
Figure 2:
As you can see in the above dialog box, the Web Services files, Web form files, and all of the other .NET file types are mapped to the aspnet_isapi.dll. This signifies that the ASP.NET is an ISAPI server extension DLL.
This is very important point. Since aspnet_isapi.dll is actually a DLL file, it will be mapped into the address space of the process hosting this DLL. This process is an IIS process — inetinfo.exe!! A user must be thinking that inetinfo.exe runs under the SYSTEM account, and since we have aspnet_isapi.dll running in the IIS address space, it means all the Web site users will be running their requests under this account!
Let me answer this question. Yes, aspnet_isapi.dll runs under the SYSTEM account, but it does not do much in terms of processing Web requests, rather it forwards the requests to the ASP.NET application worker process, aspnet_wp.exe. This worker process performs the actual request processing and returns the results back to the aspnet_isapi.dll that returns it to the IIS.
ASP.NET Worker Process
Aspnet_isapi.dll forwards requests to the ASP.NET worker process. If you have .NET Framework Beta 2 installed on your machine, then the worker process will be running under the SYSTEM account, but since the Release to Manufacturer version (RTM) of .NET, worker process runs under a less-privileged account called ASPNET.
Find the machine.config file on your hard drive and search for a tag called <processModel>. In beta versions of .NET, it would look as follows:
<processModel enable=”true” username=”System”

password=”AutoGenerate” ……. />
In the RTM version of .NET, it would look as follows:
<processModel enable=”true” username=”machine”

password=”AutoGenerate” ……. />
In the above line, “machine” is a special value that causes the ASP.NET worker process to run under the less-privileged account, ASPNET.
In order to avoid running the Beta 2 ASP.NET process under the SYSTEM account, change the username and password to some other valid Windows account. For example, the
<processModel enable=”true” username=”MyDomain\Testuser” password=”userpassword” …… />
line will cause the ASP.NET worker process to run under the privileges assigned to the MyDomain\Testuser. It is always recommended to use a specific account that has fewer privileges (like the ASPNET account used by the RTM version of .NET) for the ASP.NET worker process. In this way, even if your server gets hacked, the intruder may not be able to harm your server due to the lesser privileges assigned to the account.
If you plan on using a custom Windows account for the worker process, then you must make sure that the account has proper rights on different directories because ASP.NET needs to read and write files to/from different directories. The custom Windows account should have at least:
- Read rights on application directory
- Read rights on %installroot% hierarchy to make it possible to access the system assemblies
- Read/Write rights on the %installroot%\ASP.NET Temporary Files directory
- Read/Write rights on the %temp% directory
ASP.NET Impersonation
An understanding of ASP.NET impersonation is important before going into the details of authorization and authentication. Therefore, first we will discuss ASP.NET impersonation in this section.
Before delving into the details of ASP.NET impersonation, I would like to clarify one important point that many folk are not aware of. Actually there is one instance of aspnet_wp.exe per processor that serves all the Web applications hosted on a box. This worker process always runs under the security context defined by the <processModel> tag. The aspnet_wp.exe creates a separate thread, called worker thread, for servicing each client request. We have to distinguish between the server process and the worker threads in order to understand the impersonation and security details of ASP.NET.
With ASP.NET impersonation, the thread servicing the client request can optionally execute with the identity of the client. Let me explain it in detail.
IIS always maps a user request to some Windows account; in case of anonymous access, this is IUSR_machinename account or any other account that has been defined to be used with anonymous access; in the case of Windows authentication, this is the account whose credentials are provided by the Web site user. After successful authentication, IIS forwards this logged-in user’s identity to the ASP.NET worker thread. Now the ASP.NET worker thread has the following three options:
Now the decision depends on the impersonation settings for the ASP.NET application.
Impersonation for ASP.NET applications can be set up by using the <identity> tag in the Web.config file. We can specify impersonation in the following three ways:
- <identity impersonate=”true”/>
This means impersonation for the ASP.NET worker thread is enabled.
- <identity impersonate=”true” name=”username” password=”password”/>
This means impersonation for the ASP.NET worker thread is enabled, but the worker thread will run under the identity that will be generated by using the credentials specified by username and password attributes.
- <identity impersonate=”false”/>
This means impersonation for the ASP.NET worker thread is not enabled.
ASP.NET Authentication
As stated above, ASP.NET and IIS securities go hand in hand. Therefore ASP.NET authentication also relies on the settings that we make in IIS. ASP.NET offers following types of authentications:
The authentication option for the ASP.NET application is specified by using the <authentication> tag in the Web.config file, as shown below:
<authentication mode=”Windows | Forms | Passport | None”>

	other authentication options

</authentication>
Windows Authentication
As the name implies, this authentication method uses Windows accounts for validating users’ credentials. This type of authentication is very good for intranet Web sites where we know our users.
With this type of authentication, initially IIS performs the authentication through one of its authentication options (e.g., basic, digest, Integrated Windows, or some combination of them). After successful authentication, IIS passes the identity of the authenticated user to the ASP.NET thread. Selection of appropriate identity for the ASP.NET worker thread is performed by using the process defined under the ASP.NET Impersonation section of this article.
We can secure a Web Service by using one of the following Windows authentication schemes:
- Integrated Windows authentication
- Basic and basic with SSL authentication
- Digest authentication
- Client Certificate authentication
Integrated Windows Authentication
Integrated Windows authentication is a secure way of passing a user’s credentials on wire. It can use either NT LAN Manager (NTLM) or Kerberos authentication. This is the best scheme that can be used for intranet environments using Windows, but this scheme cannot be used for Internet because it works only with Windows clients.
In order to set up Integrated Windows authentication for our Web Services, we have to specifically tell IIS to use Integrated Windows authentication. We can do this by using the Internet Services Manager application. Run this application from Control Panel -> Administrative Tools -> Internet Services Manager; in the left-hand pane, select the CSWebservices node under the Default Web Site node; in the right-hand pane, right click on the IWAWebservice.asmx Web Service, select Properties from the context menu and go to the File Security tab. Following is the File Security tab:

Figure 3
Click Edit button in Anonymous access and authentication control group box and it will popup the following dialog box:

Figure 4
By default, Anonymous access is checked. This means IIS will not stop anyone from accessing our Web Service; in fact no authentication will be performed at all. The only entity that might stop a user from accessing this Web Service is the NT File System (NTFS) permissions. NTFS is a file system that has security capabilities built into it. NTFS always checks the security credentials of the identity that is trying to access the file. If NTFS permissions require some authentication, then IIS will challenge the user for credentials.
We don’t want this. Therefore, uncheck the Anonymous access check box and leave the Integrated Windows authentication box checked.
Apart from that, change the <authentication> tag in the Web.config file and set the mode attribute to “Windows”; similarly set the impersonate attribute of the <identity> tag to “true”. Following is the snippet from the updated Web.config file:
<system.web>

	<authentication mode=”Windows”/>

	<identity impersonate=”true”/>

</system.web>
This secures our Web Service with Integrated Windows authentication. In order to test whether our Web Service has been set up, browse the IWAWebservice.asmx file from a browser. You might need to browse the Web Service from a computer that is not part of your domain. Why? Because if you browse it from a computer on which someone has already logged into the domain, the browser will transparently pass your logged-in user’s credentials in response to the server challenge, and no password dialog box will be shown.
Browsing the IWAWebservice.asmx file from a computer that is not connected to your domain causes the following dialog to pop up.

Figure 5
This shows that our Web Service will only be accessible if you provide valid Windows account credentials.
Similarly, if we don’t pass valid credentials and try to access the Web Service in the btnTestIWA_Click handler in the testws.aspx page, then it will generate the following error.

Figure 6
Following is the code that generates the error because we are not passing credentials with our method invocation request:
CSWebservices.IWAWebservice objws =

new CSWebservices.IWAWebservice() ;

CSWebservices.MyIdentity objIdentity ;

objIdentity = objws.GetMyIdentity() ;
In order to access a Web Service that has been protected by some authentication mechanism, we use the NetworkCredential object to pass those credentials. Following is the complete code from the testws.aspx page, which accesses the IWAWebservice.asmx Web Service by passing the valid credentials of the test user that we created for testing purposes:
private void btnTestIWA_Click(object sender, System.EventArgs e)
{
// Create Web Service object.
CSWebservices.IWAWebservice objws =
new CSWebservices.IWAWebservice() ;// Create credentials object.
NetworkCredential objCredential =
new NetworkCredential(“Test”, “test”, “yourdomain”) ;// Let Web Service know about your credentials.
objws.Credentials = objCredential ;// Call method on Web Service.
CSWebservices.MyIdentity objIdentity ;
objIdentity = objws.GetMyIdentity() ;……………………
}
So after updating the code in btnTestIWA_Click handler, if we browse to testws.aspx page and click on the Test Integrated Windows Authentication button, we should see a page similar to the following.

Figure 7
Basic and Basic with SSL Authentication
The problem with Integrated Windows authentication is it uses the NTLM/Kerberos protocol for authentication purposes. For users to have one of these protocols, they must be Windows clients. (For example, Unix clients do not understand NTLM.) Some of our Web Service clients may not be aware of this protocol and will not be able to access our Web Service! We are limiting our clients. One way to circumvent this problem is to use basic authentication.
The basic authentication mechanism is different from Integrated Windows authentication because it does not require clients to compute hash for the authentication purposes.
Basically during the Integrated Windows authentication process, the client machine computes a hash value by encrypting the user’s credentials and sends it to the server. Instead, in basic authentication, the user is prompted for a username and password. This information is then transmitted to the server, but first it is encoded using base64 encoding. Most of the browsers, proxy servers, and Web servers support this method, but it is not secure. Anyone who knows how to decode a base64 string can decode users’ credentials.
Basic authentication itself is not secure, but if we use it with the secure hypertext transfer protocol (HTTPS), which encrypts all communication between the client and server, it becomes quite useful. The beauty of this option is we can easily use it on the Internet without facing any problem from proxy servers, Web servers, etc.
We can enable basic authentication by using the Authentication Methods dialog box. Now we will enable basic authentication for the BAWebservice.asmx Web Service. Open the Authentication Methods dialog box for the BAWebservice.asmx Web Service, uncheck the Anonymous access and Integrated Windows authentication check boxes, and check the Basic authentication (password is sent in clear text) check box. The dialog should look like the following.
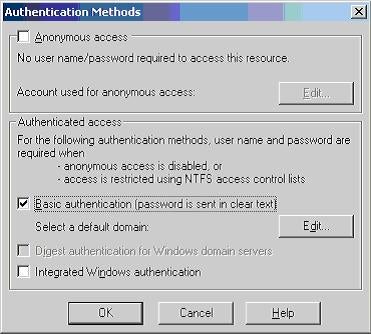
Figure 8
Click OK. We had already enabled Windows authentication in the Web.config file, therefore we don’t have to do anything more. We have successfully enabled basic authentication for our Web Service.
Now if we try to access the BAWebservice.asmx file from a browser, the following dialog box will be displayed.

Figure 9
We are not using Integrated Windows authentication, therefore this dialog box will be shown even on a machine logged into the domain.
Code for accessing the BAWebservice.asmx Web Service is the same as the code used for IWAWebservice.asmx. The following page will be displayed after clicking the Test Basic Authentication button on the testws.aspx page:

Figure 10
Digest Authentication
Digest authentication is a new type of authentication that is available on Windows 2000 domains, and only IE5 or later clients can use it. In this type of authentication, user’s credentials are not sent on the wire in the form of text, rather credentials are encrypted using a hashing mechanism called Message Digest 5 (MD5). This is a good option for Internet Web Services, but the client and server requirements limit its adoptability. On the server side, you will need the Windows 2000 domain to have all the user accounts stored in the Active Directory; on the client side, you have to have either the .NET platform or IE 5.0 or later.
Please read the following article in order to set up digest authentication for use with IIS 5.0 on your Web server: http://support.microsoft.com/default.aspx?scid=kb;EN-US;q222028
Using a Web Service that has been secured by using digest authentication is the same as using a Web Service that has been secured by using basic authentication or Integrated Windows authentication.
Client Certificate Authentication
As the name implies, this type of authentication uses certificates for authenticating users.
There are two types of certificates — server certificates and client certificates. Server certificates ensure that the identity of the server is valid and we can trust it; similarly client certificates ensure that the identity of the client is valid and the client can be trusted. Some trusted third-party Certificate Authority (CA) issues these certificates.
While invoking Web Services, a client must present a valid client certificate to the Web server. The Web server uses the client certificate for authentication purposes.
To configure a Web Service to use Certificate authentication, perform the following steps:
- Install SSL on the server computer
- Configure the Web application to accept client certificates. For information about certificates, please visit the following site: http://localhost/iishelp/iis/htm/core/iiabcsc.htm
- Modify the Web.config file and set the mode attribute of the <authentication> node to “Windows”.
Apart from the above steps, we can map certificates to Domain or Active Directory accounts. For more information about mapping certificates to Windows 2000 user accounts, please refer to Step-by-Step Guide to Mapping Certificates to User Accounts.
Now we will see how to access the Web Service that has been secured by using the certificates. On the client side, we must have the client certificate in the form of an xxxx.cer file. This file contains the client certificate and CA issues it.
For testing purposes, I have created the CCWebservice.asmx Web Service that contains a method named GetCertificateDetails. This method returns a ClientCertificateDetails object that contains some information about the certificate the client sent to the server while invoking this method on our Web Service.
Following is the minimal code that is required to access the Web Service:
1. CSWebservices.CCWebservice objws ;
2. objws = new CSWebservices.CCWebservice() ;3. X509Certificate objCert ;
4. objCert = X509Certificate.CreateFromCertFile(“C:\\certfile.cer”) ;5. objws.ClientCertificates.Add(objCert) ;
6. CSWebservices.ClientCertificateDetails objCertDetails ;
7. objCertDetails = objws.GetCertificateDetails() ;
In the above code, line 4 is creating an object of type X509Certificate. This class represents the Authenticode X.509 v.3 certificate. Since we have a certificate in the form of a CER file, we initialize the certificate object by calling CreateFromCertFile and pass in the path to the CER file. Line 5 is adding this certificate into a collection of certificates that should be sent to the server with Web Service method invocation request.
The beauty of this mechanism is that the interaction between client and server is seamless. Unlike other methods, clients are not required to interactively enter a user’s ID and password because all of it has been taken care of by the client certificate. This type of security mechanism is good for Business-to-Business (B2B) processes and transaction where no manual interaction is required.
Forms Authentication
In this type of authentication, ASP.NET redirects the unauthenticated users to a Web page that can be configured in the Web.config file. You, as a Web application developer, are supposed to develop the Web page and authenticate the user by checking the provided user ID and password against some user database.
Forms authentication can be enabled by setting the mode attribute of the <authentication> tag to Forms and not allowing anonymous users.
Following is the snippet taken from the Web.config file in which Forms authentication has been enabled:
<system.web><authentication mode=”Forms”/>
</system.web>
This mechanism is not considered good for Web Services because it may redirect the user to a user interface. This is not what our clients expect because Web Service clients expect a Simple Object Access Protocol (SOAP) message, and the returning HTML page will create problems.
Passport Authentication
Passport authentication, a centralized service provided by Microsoft, offers a single logon point for clients. Unauthenticated users are redirected to the Passport site. Similar to the Forms authentication, this redirection might create problems for clients, unless they are programmed to handle the case of redirection.
Passport authentication can be enabled by setting the mode attribute of the <authentication> tag to “Passport”.
Following is the snippet taken from the Web.config file in which Passport authentication has been enabled:
<system.web>

	<authentication mode=”Password”/>

</system.web>
More information about Passport authentication can be obtained from the Passport site at http://www.passport.com/
None or Custom Authentication
If we don’t want ASP.NET to perform any authentication, we can set the authentication mode to “none”. The rationale behind this decision could be:
- We don’t want to authenticate our users, and our Web site is open for all to use.
- We want to provide our own custom authentication.
Out of the authentication methods described previously, except for Forms and Passport authentications, all other methods require Windows accounts for implementing security. Creating and maintaining Windows accounts for a Web application might create problems when scaling an application for more Web servers because we would also have to duplicate all the Windows accounts and permissions on other Web servers.
There are some ways to provide custom authentication for our Web Services, for example:
- Accept a username and password as a parameter to our method calls
- Provide a logon method for our clients to call before they call any other business method. In that logon method, we can verify their credentials and issue them some kind of key to use in future method calls.
- Use SOAP headers for passing authentication information
Here we see how to use SOAP headers for passing authentication information to our Web Service and how our Web Service handles it.
First, we will create a class to represent data that will be passed as a SOAP header. The UserCredentials class that follows will be used for passing credentials to our Web Service:
Public class UserCredentials : SoapHeader

{

	public string userid;

	public string password;

}
Methods of Web Services have the luxury of defining SOAP headers that are associated with them. Methods can use an attribute called SoapHeader for defining associated headers. We have to define SOAP headers as public field/property in a Web Service class or a Web
Service client proxy class Web Service methods will use the name of those properties in the SoapHeader attribute.
Look at our CAWebservice.asmx Web Service that uses a SOAP header (represented as a public field, CredentialsHeader, in a Web Service class).
[WebServiceBinding(Name=”CAWebservice”)]
[WebServiceAttribute
(Namespace=”http://localhost/cswebservices/CAWebservice”)]
public class CAWebservice : System.Web.Services.WebService
{
public UserCredentials CredentialsHeader ;
public CAWebservice()
{
InitializeComponent();
}[WebMethod]
[SoapDocumentMethod(Binding=”CAWebservice”)]
[SoapHeader(“CredentialsHeader”)]
public string CheckCredentials()
{
// Access credentials here and check against your user
// database. If user is successfully authenticated, then
// return some key.// Currently we are returning a welcome message.
return “Hello ” + CredentialsHeader.userid +
“, your password is ” + CredentialsHeader.password + “.<br>you have been logged in successfully”;
}
}
In the CheckCredentials method call, we will have access to the user ID and password that has been passed to our Web Service. The following is the client-side code:
private void btnLogin_Click(object sender, System.EventArgs e)
{
CSWebservices.CAWebservice objws =
new CSWebservices.CAWebservice() ;CSWebservices.UserCredentials objCredentials =
new CSWebservices.UserCredentials() ;objCredentials.userid = Request[“txtUserID”].ToString() ;
objCredentials.password = Request[“txtPassword”].ToString() ;
objws.UserCredentialsValue = objCredentials ;
lblMessage.Text = objws.CheckCredentials() ;
}
The above code demonstrates how much easier it is to use SOAP headers for passing custom information, which is not part of the actual method call. Let’s look at the custom authentication in action.
Go to the login.aspx page at http://localhost/CSWebsite/login.aspx. The following page will be displayed:

Figure 11
After filling the user id and Password fields, click the Log me in button. This will invoke the CAWebservice.asmx Web Service and will call its CheckCredentials method. The following page will be displayed. Note that the message displayed at the end of the page is returned by the CheckCredentials method.
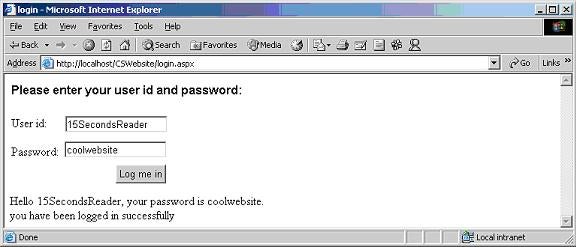
Figure 12
This is how custom authentication works with SOAP headers. How much secure is that mechanism? It is not secure because SOAP messages are sent on the wire in the form of pure text! In order to make it secure, we would have to incorporate SSL and issue SOAP requests on HTTPS, rather than HTTP. This will encrypt the data while in transit.
ASP.NET Authorization
So far we have seen different ways of authenticating clients. Now we will see how we can handle authorization for our Web Services. There are many ways to determine if an authenticated user has authorization to access our Web Service, or any other Web resource for that matter.
ASP.NET applications can implement authorization by using the following schemes:
Windows NTFS File Authorization
In Windows, if we are using an NTFS file system, anything that is stored in the file system has an Access Control List (ACL) associated with it. That ACL acts as a kind of controlling point for allowing or denying access to a resource, based on Windows accounts. We can use that ACL for authorization services.
This solution is very effective if we are using Windows authentication for our Web Services. We can add the users that are allowed to access our Web Service to the ACL of our Web Service file. In that way, if a user has not been listed in the ACL, the user will not be able to access our Web Service.
Let’s see this in action. Our Web Service, BAWebservice.asmx (which we used for basic authentication) is accessible to all the authenticated users. Now we want only the test2 user to access our BAWebservice.asmx Web Service. In order to accomplish this, right click on the BAWebservice.asmx file in Windows Explorer, select Properties, and go to the Security tab. It should look like the following: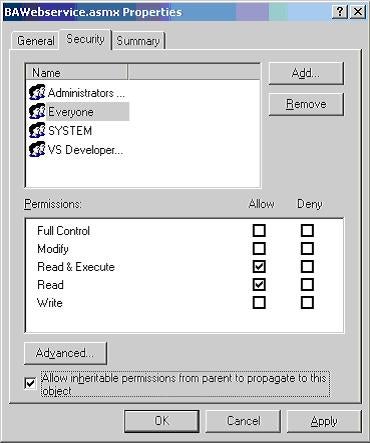
Figure 13
Look at the Windows groups that are allowed to access this Web Service. There is a group called Everyone that allows access to any authenticated user to access. This is not what we want. So remove the Everyone group from the list by selecting it and clicking the Remove button. Now add test2 user to the list. After adding test2 user, the Security permissions dialog should look like the following: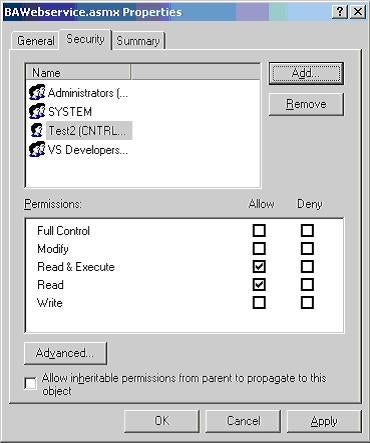
Figure 14
Click the OK button and we will be set to test this Web Service. Launch your browser and go to the http://localhost/CSWebservices/BAWebservice.asmx address. The Enter Network Password dialog box will be shown. If we try to enter the credentials of any user that has not been added to the ACL of the Web Service file (e.g., test user), we will be denied access. Try to enter the credentials of test user, and after three attempts you will see the following error page.
Figure 15
This error page tells us that we don’t have permissions to access the BAWebservice.asmx file.
An attempt to access the Web Service by using the credentials of test user successfully passed through the IIS authentication (basic authentication). After, IIS passes the security context of test user to the ASP.NET worker process, which launches the worker thread in this context (because impersonation is enabled. Look at the <identity impersonate=”true”/> node in the Web.config file). Since the worker thread is running in the context of test user and this user does not have rights on the Web Service file, this attempt fails and ASP.NET displays the error page.
If we try to access this Web Service and provide the credentials of the test2 user, then we will be able to access it successfully.
ASP.NET URL Authorization
We can use the URL authorization feature of ASP.NET for authorizing access to our Web Services. In this scheme, access is granted or denied according to different criteria defined in Web.config file.
There is a special section in the Web.config file that is used for specifying authorization options. That section is specified by the <authorization> node.
<authorization>

	<allow users=”comma separated list of users”

		roles=”comma separated list of roles”

		verbs=”comma separated list of verbs”/>
<deny users=”comma separated list of users”
roles=”comma separated list of roles”
verbs=”comma separated list of verbs”/>
</authorization>
<authorization> tag allows us to:
- Allow or deny specific users based on their credentials.
- Allow or deny specific users based on their association to specific roles
- Allow or deny specific HTTP verbs.
<allow> and <deny> tags must contain a users or a roles attribute. Multiple users or roles can be specified in a single element by providing a comma-separated list.
<allow users=”admin1, admin2″/>
In the same way, some users can be restricted from accessing resources. For example, the following line denies the test user from accessing resources on our Web site.
<deny user=”test”/>
For example, an administrative Web Service exposes some methods for administrating your Web server. You want to allow only Administrators of your Web server to access that Web Service. Do so by using the following <authorization> entry in your Web.config file.
<location path=”AdminWebservice.asmx”>
<system.web>
<authorization>
<allow roles=”WebserverDomain\Administrators”/>
<deny users=”*”/>
</authorization></system.web>
</location>
First of all the <location> tag limits the applicability of these settings to the resource whose path is specified by the path attribute of the <location> tag. In our case, these settings are limited to the AdminWebservice.asmx Web Service. The <allow> tag says that the users, which are part of the Administrators group on our Web server domain, will be allowed access. The <deny> tag specifies that rest of the users will be denied access.
I have included a Web Service named AdminWebService.asmx for demonstration purposes. For testing the use of the <authorization> tag, uncomment the <location> tag in the Web.config file in the Web Services project and change the <YouWillSupplyThis> tag with the name of your IIS server or the domain against which you want to authenticate your administrators. Now only administrators will be able to access this service.
You must be wondering that we could have achieved the same results by using NTFS file permissions. That’s true, but the beauty of using the Web.config file is that we don’t have to play around with NTFS permissions. All we care about is the Web.config file, and that’s it. In the future, if we plan to scale our application by adding multiple servers, then we would have to copy the Web.config file only; we will not have to duplicated Windows accounts on those servers.
Apart from that, the <authorization> tag also allows us to limit the capabilities of users to issue certain HTTP verbs. For example:
<allow verb=”POST” users=”Admin1″/>

<deny verb=”POST”  users=”*”/>
settings tell ASP.NET that only the Admin1 user is allowed to post information on our Web site, whereas all the other users will be denied posting.
There are two special values that can be used as the value for users attribute of <allow> and <deny> tags; these values are:
- * (This represents all users.)
- ? (This represents anonymous/unauthentic users.)
So if you don’t want any unauthentic user to access your Web site, just put following line in the Web.config file:
<authorization>

	<deny users=”?”/>

</authorization>
These special values are used with ASP.NET Forms authentication where we have to enable Anonymous access in IIS.
Conclusion
This article explains the working of ASP.NET security, and how we can mix and match it with IIS security options. As compared to previous versions of ASP, ASP.NET offers a more robust and flexible security model that can be leveraged, configured, and programmed according to our needs. Using SSL and HTTPS in conjunction with ASP.NET security makes it a rock-solid solution for our Web Services, or a complete Web application for that matter.
There is more to cover in terms of customizing ASP.NET security and writing your own HTTP handlers and modules. I may cover this in a future article. For the time being, browse to the Microsoft .NET Web site and learn this stuff.
About the Author
Mansoor Ahmed Siddiqui is a software consultant and technical writer working in the United States. He has a masters degree in computer science and been involved in software development since 1997. His areas of expertise include designing and developing Web-based applications, client-server applications, and n-tier applications, with a special focus on middle-tier and Win32 programming.
He has expertise in Microsoft. NET Framework, ASP.NET, C#, Visual Studio .NET, Web Services, ADO.NET, ASP, JavaScript, eXtensible Markup Language (XML), Simple Object Access Protocol (SOAP), Visual C++, Microsoft Foundation Class Library (MFC), Active Template Library (ATL), Visual Basic 6.0, ActiveX Data Objects (ADO), COM/DCOM/COM+, Microsoft Transaction Server (MTS), Microsoft Message Queue (MSMQ), SQL Server 7.0/2000, OMG’s Unified Modeling Language (UML), Rational Software Corp.’s Rational Rose, Java, Java Server Page (JSP), servlets, Enterprise JavaBeans (EJBs), Java 2 Platform Enterprise Edition (J2EE).
Currently, he is working with Visual Studio 7.0 and the Microsoft .NET platform. He is an MCSD and is Brainbench certified in different languages.
Apart from technical writing, other interests include listening to music, swimming, playing cricket and pool, and hanging out with friends. He can be reached at mansoorasiddiqui@hotmail.com and ICQ 151707288.