

Introduction to Role-Based Security in .NET
The year 2004 is another blockbuster year at the box office. Actors are busy starring in new movies, playing roles. So are the tens of millions of people busy going to work day after day doing their work and filling roles. We are all having roles in the corporations we work, whether as a developer, project manager, test engineer, or one of the thousands of other roles. In today’s ever more competitive and changing business world, most even have multiple roles and some are taken on temporarily. I am, for example, a Senior Manager and a Senior Architect and am required take on a Technical Support Engineer role. The roles define the responsibilities and authorities we have. The Senior Architect role gives me authority in the area of product and technology decisions, and the Technical Support Engineer role gives me authority to work with customers and access their IT systems.
Businesses are investing in software applications to automate business processes or to support employees in their roles. That means applications need to be able to reflect the roles you play in your organization and only allow you to do things you have authority for in real life. A time and expense system is a good example. Employees working on a project should be able to enter time and expenses against it. But only the Project Manager should be allowed to approve time and expenses or create new projects. And only the finance department should be able to cut checks.
Role-Based Security in .NET
The .NET framework makes it very easy to implement Role-Based security in your application. Enforcing security consists of two parts, Authentication and Authorization. Authentication is the part of verifying your identity. The application verifies that you are the person you claim to be. The most common means is for the user to enter the username and password and the application looks up the user record with the username you entered and then verifies that you entered the matching password. More advanced systems rely on biometric means, like fingerprint recognition or iris scan, or swipe cards combined with your personal PIN. Without successful authentication, users are not allowed to enter the application unless it allows anonymous access, meaning it grants you access without knowing your identity. Authorization is determining whether or not a user has the permission to perform an action in the application. Authorization relies on knowing the identity of the user and being able to find the security information associated with that user. Based on the security information, the application then can grant or deny permissions.
The .NET framework provides access to the user through an identity and authorization access through a principal. Thread.CurrentPrinicpal gives you access to the current principal assigned to the executing thread. By default, this will be an unauthenticated principal. The framework provides two different types of principals, a Windows principal (WindowsPrincipal) and a generic principal (GenericPrincipal). The Windows principal works against the underlying Windows OS. So, it maps against the Windows user under which the thread is executing. If you are running a Windows form application, it is the user running the application (or if you use the runas command you can specify under which user the application should run; for example. “runas /user:Administrator notepad.exe”). For Windows services and ASP.NET Web applications, it is the user you specify for the service or IIS. There are two ways to get access to the Windows principal.
// set that a principal should be attached to the thread and it
// should be a Windows principal
AppDomain.CurrentDomain.SetPrincipalPolicy(PrincipalPolicy.
                                           WindowsPrincipal);

// get hold of the Windows principal
WindowsPrincipal MyPrincipal = (WindowsPrincipal)Thread.
                                CurrentPrincipal;

// get the Windows identity
WindowsIdentity MyIdentity = MyPrincipal.Identity;
By calling SetPrincipalPolicy on the current AppDomain, you tell the framework which principal needs to be attached to this thread. You need to set this before you access the principal the first time. Calling Thread.CurrentPrincipal returns the principal bound to the executing thread. The first time, this tells the framework to go off and query for the Windows user information, create a Windows identity, and then a Windows principal, and bind it to this thread. From the Windows principal, you then can access the Windows identity. Another way is as follows:
// get an identity object for the Windows user
WindowsIdentity Identity = WindowsIdentity.GetCurrent();

// get hold of the Windows principal
WindowsPrincipal MyPrincipal = new WindowsPrincipal(Identity);
WindowsIdentity.GetCurrent() goes off and queries the Windows user information and creates a Windows identity object representing that user. With that, you can create a new Windows principal passing along the Windows identity. The disadvantage of that approach is that each time it goes off and queries for the Windows user information and creates a new principal and identity object. The first approach reuses the same Windows principal and identity each time. The generic principal allows you to create a principal and identity that is not bound to the underlying Windows user.
// create the generic identity GenericIdentity
Identity = new GenericIdentity("Administrator");

// define the roles to associate with the generic principal
string[] Roles = new string[2] { "Manager", "Architect" };

// create the generic principal
GenericPrincipal MyPrincipal = new GenericPrincipal(Identity,Roles);

// bind the generic principal to the thread
Thread.CurrentPrincipal = MyPrincipal;
First, you create a generic identity. You need to provide the name of the identity because it is not bound to the Windows user. Then, you define the list of roles you want the principal to have. Finally, you create the generic principal and provide the generic identity plus the list of roles. You then can bind the generic principal to the thread by setting it to Thread.CurrentPrincipal.
Creating a Custom Principal and Identity
The .NET framework also allows you to create your own custom principal and identity by implementing the IPrincipal and IIdentity interface. The sample code attached to this article shows how to create a database-driven identity and principal. The authorization process checks the user name and its password against a User table in the database. After successful authentication, it reads the user information from the User table and from SecurityGroupAssigns which security groups the user has assigned.
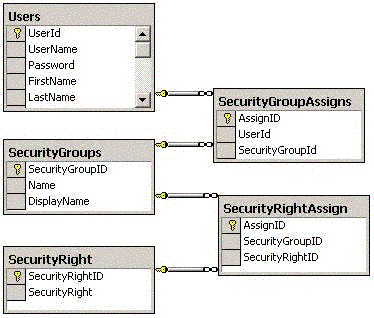
This information is used for the custom principal and identity. But, the principal goes one step further. It also allows you to check individual permissions; for example, whether the is user allowed to view the budget. This information is read from the SecurityRightAssign table. Let’s first create our custom identity.
public class UserIdentity : IIdentity
{

   // the authentication type for us is always database
   private static string AuthenticationTypeString = "Database";

   // hash table with all the user info we have
   private Hashtable UserInfo;

   // create the user identity; all user information is in the
   // hashtable passed along
   private UserIdentity(Hashtable UserInfo)
   {
      this.UserInfo = UserInfo;
   }

   //create a user identity and return it to the caller
   public static UserIdentity CreateUserIdentity(Hashtable UserInfo)
   {
      return new UserIdentity(UserInfo);
   }

}
Our UserIdentity type implements the IIdentity interface that requires us to implement three properties. The type has a private constructor to prevent you from instantiating an instance of that type. You need to call the static method CreateUserIdentity(), pass along a hash table with all the user information, and then it returns you an instance of our identity. The Name property returns the name of the identity.
// returns the name of the identity
public string Name
{
   get
   {
      return Convert.ToString(UserInfo[UserNameKey],
                              CultureInfo.InvariantCulture).Trim();
   }
}

// returns whether or not identity is authenticated
public bool IsAuthenticated
{
   get
   {
      return true;
   }
}

// the type of authentication
public string AuthenticationType
{
   get
   {
      return AuthenticationTypeString;
   }
}
The IsAuthenticated property returns if the user has been authenticated. In our sample, we always perform an authentication first, so we return always true. If you allow anonymous access, you would set that to false for anonymous users. The last property is AuthenticationType and returns the type of authentication, in our case “Database”. WindowsIdentity returns “NTLM” while GenericIdentity returns an empty string or the type passed along when instantiating the GenericIdentity. Now, let’s implement our custom principal.
public class SecurityPrincipal : IPrincipal
{
   // stores the list of security rights the user belongs to
   private Hashtable SecurityGroups;

   // stores the list of security rights the user has
   private Hashtable SecurityRights;

   // the user identity we create and associate with this principal
    private UserIdentity TheUserIdentity;

   // constructor: stores role and permission info and creates
   // custom identity
   private SecurityPrincipal(Hashtable SecurityGroups,
                             Hashtable SecurityRights,
                             Hashtable UserInfo)
   {
      this.SecurityGroups = SecurityGroups;
      this.SecurityRights = SecurityRights;

      // creates the IIdentity for the user and associates it with
      // this IPrincipal
      TheUserIdentity = UserIdentity.CreateUserIdentity(UserInfo);
   }

   // create the security principal and return it to the caller
   public static SecurityPrincipal
                 CreateSecurityPrincipal(Hashtable SecurityGroups,
                                         Hashtable SecurityRights,
                                         Hashtable UserInfo)
   {
      return new SecurityPrincipal(SecurityGroups,SecurityRights,
                                   UserInfo);
   }
}
Our SecurityPrincipal type implements the IPrincipal interface that requires us to implement the Identity property and the IsInRole() method. Also, this type has a private constructor to prevent you from instantiating an instance of that type. You need to call the static method CreateSecurityPrincipal(), pass along a hash table with the user information, roles the user belongs to, plus in our implementation which security rights (permissions) the user has. The constructor for this type calls CreateUserIdentity() from our custom identity class, passing along the user information, and then holds on to the identity it gets back. CreateSecurityPrincipal() returns you an instance of our security principal. The Identity property returns the identity object associated with the security principal.
// returns the Identity object associated with the principal
public IIdentity Identity
{
   get
   {
       return TheUserIdentity;
   }
}

// checks whether user belongs to role
public bool IsInRole(string Role)
{
   return SecurityGroups.ContainsValue(Role);
}

// checks whether user has permission
public bool HasPermission(string Permission)
{
   return SecurityRights.ContainsValue(Permission);
}
The IsInRole() method checks whether the user has the requested role by checking whether the role is in the hash table of security groups (passed along when we created the security principal) and then returns true or false. Our security principal implements, in addition to what is required by the interface IPrincipal, a method called HasPermissions(). It works similarly to IsInRole() by checking whether the requested permission is in the hash table of permissions (also passed along when we created the security principal) and also returns true or false.
That completes the implementation of our custom identity and principal. The complete source code explains how that information is read from the database. The last thing we need to do is install that principal and identity.
public static IPrincipal SetSecurityPrincipal(Hashtable SecurityGroups,
                                              Hashtable SecurityRights,
                                              Hashtable UserInfo)
{
   // set that we want to use authentication within the current
   // app-domain; this means a thread will have a IPrincipal
   // associated, which then is used by the .NET security classes
   // when checking role-based security
   AppDomain.CurrentDomain.SetPrincipalPolicy(PrincipalPolicy.
                                              WindowsPrincipal);

   // we switch to the new security principal only if we didn't do
   // so already; protects us from the client calling the method
   // multiple times
   if (!(Thread.CurrentPrincipal is SecurityPrincipal))
   {
      // create a new instance of the security principal, which we
      // can do only within a class member because we marked the
      // constructor private
      SecurityPrincipal TheSecurityPrincipal = new
                        SecurityPrincipal(SecurityGroups,
                                          SecurityRights,UserInfo);

      // get a reference to the current security principal so the
      // caller can keep hold of it
      IPrincipal CurrentSecurityPrincipal = Thread.CurrentPrincipal;

      // set the security principal for the executing thread to the
      // newly created one
      Thread.CurrentPrincipal = TheSecurityPrincipal;

      // return the current security principal;
      return CurrentSecurityPrincipal;
   }

   // return null if we don't switch the security principal
   else
      return null;

}
For that, we provide a static method called SetSecurityPrincipal() on the security principal type. First, we call AppDomain.CurrentDomain.SetPrincipalSecurity() and specify the principal policy PrincipalPolicy.WindowsPrincipal. This is a bit misleading because we are not really setting a Windows principal but our custom principal. What that call is doing is just making sure that we have a principal bound to the executing thread. Then, we check whether the executing thread is already bound to a custom principal. In that case, we don’t need to do anything else because we already assigned our custom principal to the thread. This makes sure there are no side effects if the caller calls this method multiple times. In case this is the first call, we detect that we have not yet bound our custom principal to this thread. So, we create a custom principal that itself creates the custom identity and assign it to the executing thread. We return the current principal in case the caller wants to hold on to it and later on restore it (which our sample does as soon as the user logs out from the application).
Checking users’ roles and permissions as well as accessing the user information is always done by getting hold of the principal through Thread.CurrentPrincipal. From that principal, you call IsInRole() or access the Identity property. If you want to check individual permissions from our principal, you need to type cast the generic IPrinicpal you get back from Thread.CurrentPrincipal and then call HasPermissions() on it.
public bool CheckSecurityPermission(string Permission)
{
   // if the current IPrincipal is of the same type as our custom
   // security principal then go and check the security right
   if (Thread.CurrentPrincipal is SecurityPrincipal)
   {
      SecurityPrincipal Principal = (SecurityPrincipal)
                                    Thread.CurrentPrincipal;

      // returns whether or not the user has the permission
      return Principal.HasPermission(Permission);
   }

   // if we have a standard IPrincipal in use then we cannot check
   // the permission and we always return false
   else
      return false;
}
If you are creating new threads in your application domain, you don’t want to have to set the custom principal for each thread. You can set a default principal to be used every time a new thread is created in that application domain. Setting the default principal applies also for the executing thread if you set it before accessing the principal first time through Thread.CurrentPrincipal.
// create the custom principal
SecurityPrincipal MyPrincipal =
   SecurityPrincipal.CreateSecurityPrincipal(
   AppDomain.CurrentDomain.SetThreadPrincipal);

// set the custom principal as the app domain policy
    AppDomain.CurrentDomain.SetThreadPrincipal(MyPrincipal);
You can set the default principal on the application domain only once. Setting it more then once for the application domain will throw a PolicyException exception.
The Sample Code
The sample code for this article implements a Windows form that first asks the user to log on (by default, there are two users in the database Klaus and Peter; same password as the username). The btnLogon_Click() event handler associated with the logon button authenticates the user by calling DataLayer.CheckUserNameAndPassword(). It retrieves information about the user by calling DataLayer.RetrieveUserInformation(). Finally, it retrieves all the roles the user belongs to plus all the permissions assigned to the roles by calling DataLayer.RetrieveSecurityInformation(). Equipped with all the information about the user, roles, and permissions, it calls SecurityPrincipal.SetSecurityPrincipal() to create the custom principal and identity and bind it to the executing thread.
The sample then shows in three separate lists all roles the user belongs to, all the permissions the user has, plus any information it can find about the user itself. There is a list of buttons to check which roles the user belongs to and which permissions the user has. The event handlers call CheckSecurityRoles() and CheckSecurityPermissions() to perform that check and then show a message telling whether the user belongs to a role or not and whether or notthe user has a permission. The logoff button LogOff_Click() event handler restores the old principal and the original logon form. That allows another user to log on and go through the same process above.
In the sample folder, you find a file called RetrieveSecurity.bak, which is a backup of the SQL database. Restore the database and set the proper connection string in the app.config file. You can add new users, roles, and permissions in the database. This sample shows how to implement a database-driven authentication and security model building on top of the .NET role-based security.
Summary
Most applications need to implement authentication and a security model through roles and permissions. The .NET framework makes that very easy. With just a few lines of code, can you leverage the underlying Windows user and security groups. It is also easy to extend the framework with your own custom principal and identity. The sample code shows how to implement a database-driven authentication plus role and permission system. Adding new permissions and roles is as easy as adding records (meta-data) to the database. My next article will talk about code-based security, another very important aspect of .NET security. If you have any comments to this article, please contact me at klaus_salchner@hotmail.com. I want to hear if you learned something new and useful or thought you wasted your time reading it. Contact me if you have questions about this topic or article.
About the author
Klaus Salchner has worked for 14 years in the industry: nine years in Europe, and another five years in North America. As a Senior Enterprise Architect with solid experience in enterprise software development, Klaus spends considerable time on performance, scalability, availability, maintainability, globalization/localization, and security. The projects he has been involved in are used by more than a million users in 50 countries on three continents.
Klaus calls Vancouver, British Columbia his home at the moment. His next big goal is doing the New York marathon in 2005. Klaus is interested in guest speaking opportunities or as an author for .NET magazines or Web sites. He can be contacted at klaus_salchner@hotmail.com.