

Introduction
To present tabular data in our Web applications, developers generally use HTML tables or other UI libraries. Kendo UI Grid is an easy, more maintainable, and powerful control for displaying data in a tabular format. Kendo provides many options, such as paging, sorting, filtering, grouping, and editing. These features determine the way data is presented and manipulated. Telerik Kendo UI® Core is the open source framework and version of Kendo UI. It’s a comprehensive framework for building modern Web and mobile apps with HTML5 and JavaScript. In this article, I will demonstrate the basic usage of the Kendo UI Grid control, which is used to work with tabular data.
Sample ASP.NET MVC Application
Create a new empty ASP.NET MVC Application, as demonstrated in Figure 1.
To create a new application, Open Visual Studio ->File menu ->New project ->ASP.NET Web Application.
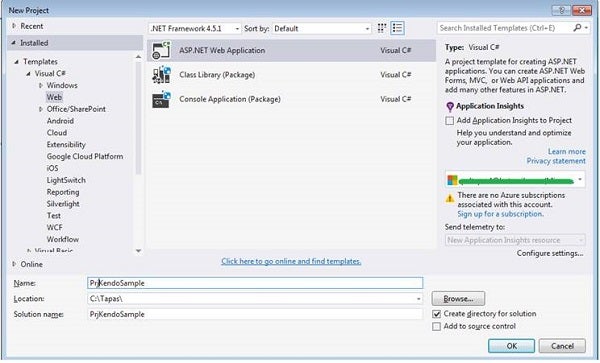
Figure 1: New ASP.NET MVC Application
Select the MVC template and click ‘OK’. Refer to Figure 2.
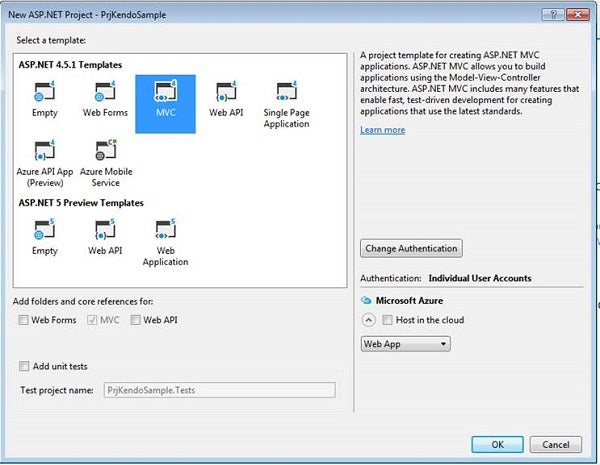
Figure 2: Select MVC Template
Next, download the Kendo UI for ASP.NET MVC version. Install the Telerik UI for ASP.NET MVC Setup 2016. After completing the installation, copy the CSS and JS files from the installed location and paste them into the project created in the previous step.
Now, open App_Start-> BundleConfig.cs to add the bundles for the Telerik UI for ASP.NET MVC.
bundles.Add(new ScriptBundle("~/Kendo").Include
   ("~/Kendo/js/kendo.all.min.js",
    "~/Kendo/js/kendo.aspnetmvc.min.js"));
Next, add a script bundle for the Telerik UI for ASP.NET MVC.
bundles.Add(new StyleBundle("~/Kendo/styles").Include
   ("~/Kendo/styles/kendo.common.min.css",
    "~/Kendo/styles/kendo.default.min.css"));
To allow minified files in Debug mode, add the following code.
bundles.IgnoreList.Clear();
The following code snippet demonstrates the bundle class.
using System.Web;
using System.Web.Optimization;

namespace PrjKendoSample
{
   public class BundleConfig
   {
   // For more information on bundling, visit
   // http://go.microsoft.com/fwlink/?LinkId=301862
   public static void RegisterBundles(BundleCollection bundles)
   {
      bundles.Add(new ScriptBundle("~/bundles/jquery").Include(
         "~/Scripts/jquery-{version}.js"));
         bundles.Add(new ScriptBundle("~/bundles/jqueryval")
            .Include("~/Scripts/jquery.validate*"));
         bundles.Add(new ScriptBundle("~/bundles/modernizr")
            .Include("~/Scripts/modernizr-*"));
         bundles.Add(new ScriptBundle("~/bundles/bootstrap")
            .Include("~/Scripts/bootstrap.js",
            "~/Scripts/respond.js"));
         bundles.Add(new StyleBundle("~/Content/css").Include(
            "~/Content/bootstrap.css", "~/Content/site.css"));
         bundles.Add(new ScriptBundle("~/Kendo")
            .Include("~/Kendo/js/kendo.all.min.js",
            "~/Kendo/js/kendo.aspnetmvc.min.js"));

         bundles.Add(new StyleBundle("~/Kendo/styles")
            .Include("~/Kendo/styles/kendo.common.min.css",
            "~/Kendo/styles/kendo.default.min.css"));

         bundles.IgnoreList.Clear();

      }
   }
}
Next, open the layout Application. By default, it is Views/Shared/_Layout.cshtml, and add the following lines of code.
@Scripts.Render("~/bundles/jquery")
@Scripts.Render("~/Kendo")
@Styles.Render("~/Kendo/styles")
The following code snippet demonstrates the _Layout.cshtml file.
<!DOCTYPE html>
<html>
<head>
<meta charset="utf-8" />
<meta name="viewport" content="width=device-width,
initial-scale=1.0">
<title>@ViewBag.Title - My ASP.NET Application</title>
@Styles.Render("~/Content/css")
@Scripts.Render("~/bundles/modernizr")
@Scripts.Render("~/Kendo")
@Scripts.Render("~/bundles/jquery")
@Scripts.Render("~/Kendo")
</head>
<body>
<div class="navbar navbar-inverse navbar-fixed-top">
<div class="container">
<div class="navbar-header">
<button type="button" class="navbar-toggle"
data-toggle="collapse"
data-target=".navbar-collapse">
<span class="icon-bar"></span>
<span class="icon-bar"></span>
<span class="icon-bar"></span>
</button>
@Html.ActionLink("Application name", "Index",
"Home", new { area = "" },
new { @class = "navbar-brand" })
</div>
<div class="navbar-collapse collapse">
<ul class="nav navbar-nav">
<li>@Html.ActionLink("Home", "Index",
"Home")</li>
<li>@Html.ActionLink("About", "About",
"Home")</li>
<li>@Html.ActionLink("Contact", "Contact",
"Home")</li>
</ul>
@Html.Partial("_LoginPartial")
</div>
</div>
</div>
<div class="container body-content">
@RenderBody()
<hr />
<footer>
<p>© @DateTime.Now.Year -
My ASP.NET Application</p>
</footer>
</div>
@Scripts.Render("~/bundles/jquery")
@Scripts.Render("~/bundles/bootstrap")
@RenderSection("scripts", required: false)
@Styles.Render("~/Kendo/styles")
</body>
</html>
Next, to add the kendo.Mvc.dll reference, right-click References in Solution Explorer. Click Add Reference by selecting the Browse tab of the Add Reference dialog. You have to navigate to the install location of the Telerik UI for ASP.NET MVC. Navigate to wrappers/aspnetmvc/Binaries/MVC5. This folder contains the ASP.NET MVC 5 version of the Telerik UI for ASP.NET MVC. Select Kendo.Mvc.dll. Click OK.
Next, open the web.config file and add the Kendo UI namespace. Refer to the following code snippet of the namespace section of the Web.config file.
   <namespaces>
      <add namespace="System.Web.Mvc" />
      <add namespace="System.Web.Mvc.Ajax" />
      <add namespace="System.Web.Mvc.Html" />
      <add namespace="System.Web.Optimization"/>
      <add namespace="System.Web.Routing" />
      <add namespace="PrjKendoSample" />
      <add namespace="Kendo.Mvc.UI" />
   </namespaces>
Next, I have created a new model class named Student.cs. Refer to the following code snippet of the Student class.
using System;
using System.Collections.Generic;
using System.Linq;
using System.Web;

namespace PrjKendoSample.Models
{
   public class Student
   {
      public Student(int StudentID, string StudentFirstName,
         string StudentLastName, string StudentClass,
         int RollNumber)
      {
         this.StudentID = StudentID;
         this.StudentFirstName = StudentFirstName;
         this.StudentLastName = StudentLastName;
         this.StudentClass = StudentClass;
         this.RollNumber = RollNumber;

      }

      public int StudentID { get; set; }
      public string StudentFirstName { get; set; }
      public string StudentLastName { get; set; }
      public string StudentClass { get; set; }
      public int RollNumber { get; set; }

   }
}
I’ve added a Student controller and added the following Action Method in it.
using System;
using System.Collections.Generic;
using System.Linq;
using System.Web;
using System.Web.Mvc;

namespace PrjKendoSample.Controllers
{
   public class StudentController : Controller
   {

      public ActionResult Index()
      {
         return View();
      }

      public ActionResult StudentList([DataSourceRequest]
         DataSourceRequest request)
      {
         try
         {
            List<Student> _stu = new List<Student>();
            _stu.Add(new Student(1, "Ram", "Kumar","Five", 1));
            _stu.Add(new Student(2, "Sham", "Kumar", "Five", 2));
            _stu.Add(new Student(3, "Jadu", "Kumar", "Five", 3));
            DataSourceResult result =
               _stu.ToDataSourceResult(request);
            return Json(result, JsonRequestBehavior.AllowGet);
         }
         catch (Exception ex)
         {
            return Json(ex.Message, JsonRequestBehavior.AllowGet);
         }
      }
   }
}
Finally, I have created a New empty index view with the default layout under the student folder and added the following code in it.
<div class="container">
   <div class="row">
   @(Html.Kendo().Grid<KendoStart.Models.Student>()
   .Name("StuGrid")
   .DataSource(dataSource => dataSource
      .Ajax()
      .Read(read => read.Action("StudentList",
         "Student"))
      )
      )
   </div>
</div>
Now, browse the Application to see the grid with data.
Conclusion
That was all about Kendo with ASP.NET MVC application. I hope this article was helpful!! That’s all for today; happy reading!