

Introduction
At times you may need to make cross-domain requests in your Windows store app. This can be done using the WinJS.xhr() function. The xhr() function is an easy to use wrapper over the traditional XMLHttpRequest object. This article introduces you with the xhr() function and many of its configuration options. It also illustrates how the xhr() function can be used to call ASP.NET Web API.
The WinJS.xhr Function
If you ever developed web applications that use rich JavaScript you are probably aware of the XMLHttpRequest object. You can use the XMLHttpRequest object to make HTTP requests using common HTTP verbs such as GET and POST. Although you can use the XMLHttpRequest object in Windows store apps too, there is an easy alternative – WinJS.xhr() function. The xhr() function is an easy to use wrapper over XMLHttpRequest object. To use xhr() function you must have set the appropriate capabilities in the package manifest. The basic syntax of the xhr() function is shown below :
WinJS.xhr(options).done( /* success, error and progress handlers go here */ );
The xhr() function takes one or more options that are passed as a JSON object (key – value pairs). The following table lists some of the common options that can be used while making xhr() calls:
| Option | Description |
| url | This is a required parameter. It represents the URL of the HTTP resource you are trying to access. For example, if you are calling a Web API this will be the URL of the Web API end point. |
| type | Indicates the type of HTTP request (HTTP verb) such as GET and POST. Default is GET. |
| user | If the resource being accessed requires user credentials this option specifies the user name. |
| password | If the resource being accessed requires user credentials this option specifies the password. |
| headers | This option is used to set HTTP request headers while making the request. For example, you may want to set Content-type header to a specific content type (say JSON) before making a request. |
| data | This option represents the data that needs to be supplied to the HTTP resource and is specified as a JSON object. For example, you may wish to call Post() method of Web API that accepts a custom object. |
| responseType | The type of response received from the HTTP resource. Some common response types are text, json, document, arrayBuffer and blob. |
The xhr() function returns a Promise when completed. You can then handle success and error conditions as shown below:
WinJS.xhr(options).done(
  function success(req) {
      // success code here
  },
  function error(req) {
     // error handling code here.
  },
);
The success and error functions receive a request parameter. The response property of this parameter gives the response from the HTTP resource.
Calling a Web API using the GET Verb
Now that you have the basic idea about the xhr() function. Let’s see how to use it for calling an ASP.NET Web API. Begin by creating a new Windows Store JavaScript app. Also add an ASP.NET Web API project to the same solution. The Web API project will expose customers Web API through an ApiController as shown below:
public class CustomersController : ApiController
{
//select all
public IEnumerable<Customer> Get()
{
    NorthwindEntities db=new NorthwindEntities();
    var data = from item in db.Customers
	       orderby item.CustomerID
	       select item;
    return data.ToList();
}

//insert
public void Post(Customer obj)
{
    NorthwindEntities db = new NorthwindEntities();
    Customer c = new Customer();
    c.CustomerID = obj.CustomerID;
    c.CompanyName = obj.CompanyName;
    c.ContactName = obj.ContactName;
    c.Country = obj.Country;

    db.Customers.Add(c);
    db.SaveChanges();
}
}
For our illustrations you need only the Get() and Post() methods as shown above. These methods essentially use an Entity Framework data model for the Customers table residing in the Northwind database. The Get() method returns all the customers from the Customers table whereas the Post() method adds a new customer into the Customers table. Notice that the Post() method takes one parameter of type Customer.
Now, go to the Windows store app and add the following markup in the default.html file:
<!DOCTYPE html>
<html>
<head>
<meta charset="utf-8" />
<title>Calling Web API using WinJS.Xhr</title>
<!-- WinJS references -->
<link href="//Microsoft.WinJS.1.0/css/ui-light.css" rel="stylesheet" />
<script src="//Microsoft.WinJS.1.0/js/base.js"></script>
<script src="//Microsoft.WinJS.1.0/js/ui.js"></script>
<!-- XhrDemo references -->
<link href="/css/default.css" rel="stylesheet" />
<script src="/js/default.js"></script>
</head>
<body>
<input id="button1" type="button" value="Get Data"></input>
<input id="button2" type="button" value="Add Data"></input>
<br /><br />
<table id="table1" border="1" cellpadding="3"></table>
<br />
<span id="label1"></span>
</body>
</html>
As you can see the default.html page contains two buttons (Get Data and Add Data) that trigger the xhr() function. The data retrieved from the Web API is displayed in the table below. The span (label1) is used to display success or error messages.
Next, open default.js file and add the following code to it:
app.onactivated = function (args) {
    ...
    ...
    args.setPromise(WinJS.UI.processAll());
    ...
    var button1 = document.getElementById("button1");
    button1.addEventListener("click", OnGetClick, false);

    var button2 = document.getElementById("button2");
    button2.addEventListener("click", OnAddClick, false);
  }
};
The above code wires the click event handlers for the two buttons. In this example you need only the OnGetClick() event handler, which is shown below:
function OnGetClick(evt) {
var options = {
    url: "http://localhost:49177/api/customers",
    type: "GET",
}

WinJS.xhr(options).done(
    function success(req) {
	var data = JSON.parse(req.responseText);
	var strHTML = "";
	for (var i = 0; i < data.length; i++) {
	    strHTML += "<tr><td>" + data[i].CustomerID + "</td><td>" + data[i].CompanyName + "</td></tr>";
	}
	document.getElementById("table1").innerHTML = strHTML;
	document.getElementById("label1").innerHTML = "<strong>Data retrieved successfully!</strong>";
    }
    ,
    function error(err) {
	document.getElementById("label1").innerHTML = "<strong>Error while retrieving data! - " + err.statusText + "</strong>";
    });
}
The OnGetClick() event handler uses the xhr() function to call the Get() method of the Web API you developed earlier. Notice how the options are specified in an object. In this case, the url parameter points to the Web API URL and the type of request is GET.
The WinJS.xhr() function is then called. The success handler function receives a request object. The responseText property of the request object returns all the Customer objects as a JSON string. This string is parsed into a JSON object array using the JSON.parse() method. A “for” loop iterates through all the Customer objects and adds a row in the table for each customer.
The error handler function simply displays the statusText property in the <span> element.
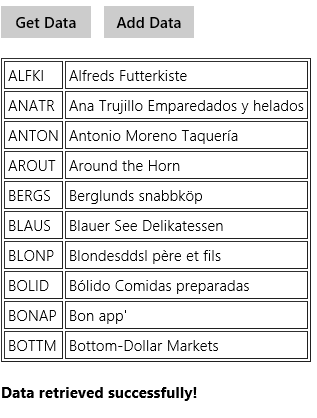
If you run the Windows store app now and click on the Get Data button you should see something similar to what’s shown below:
Calling a Web API using POST Verb
Now, let’s see how to make a POST request using the xhr() function. To illustrate this you will call the Post() Web API method from the click event handler of the Add Data button. The following code shows this event handler:
function OnAddClick(evt) {
var objData = {};
objData.CustomerID = "CUST1";
objData.CompanyName = "Some Company";
objData.ContactName = "Mr. Tom Jerry";
objData.Country = "USA";

var options = {
    url: "http://localhost:49177/api/customers",
    type: "POST",
    data: JSON.stringify(objData),
    headers: { "Content-Type": "application/json;charset=utf-8" }
}

WinJS.xhr(options).done(
    function success(req) {
	document.getElementById("label1").innerHTML = "<strong>Data stored successfully!</strong>";
    }
    ,
    function error(err) {
	document.getElementById("label1").innerHTML = "<strong>Error while storing data! - " + err.statusText + "</strong>";
    });
}
The above code first constructs a JSON object with four properties, viz. CustomerID, CompanyName, ContactName and Country. Remember that this object must match with the corresponding Entity Framework data model class. The Post() method accepts a parameter of the data model class (Customer) and hence this mapping is necessary.
Then you construct the options object. This time you specify type as POST. Since you want to pass the objData object to the Web API you also set the data parameter by stringifying the JSON data. Since you are sending JSON data to the Web API you also set the Content-Type header of the request to application/json. This way Web API knows that JSON data is coming along with the request.
The success and error functions simply display a success or error message in the <span> element.
You can run the app again and click on the Add Data button. If everything is alright you will see the success message being displayed in the <span> and a record will be added to the Customers table.
Dealing with Response Types
When a request is made using the xhr() function, the server can return its response in a variety of formats. The following table lists the common response formats that can be used with the responseType setting:
| Response Type | Description |
| text | In this case the response from the server is plain text. The response and responseText properties return the text data returned by the server as a response. |
| document | If you wish to return an XML document the response type of document can be used. The XML data can be read using responseXML property of the response. |
| json | This response type indicates that the response is a JSON object serialized as a string. The JSON data can be read using responseText property. |
| arrayBuffer | Represents binary data as ArrayBuffer. Can be used with any type of binary data such as images. |
| blob | Represents binary data like arrayBuffer but as a single chunk of data rather than an array. |
In the earlier examples you have seen how JSON data can be handled. The following example shows how an image can be retrieved as blob data and assigned to an <img> tag dynamically.
var options = {
   url: "URL_to_some_image_file",
   responseType: "blob"
}

WinJS.xhr(options)
    .done(
        function (req) {
            var rawData = URL.createObjectURL(req.response);
            document.getElementById("Image1").src = rawData;
});
Handling Timeouts
If you expect any problem on the server while making the request, you may want to set a timeout value so that the request is cancelled after a specified time. Unlike the XMLHttpRequest object where you can do so by setting the timeout of the base object itself, the xhr() function doesn’t offer a direct way to set the timeout value. However, you can achieve the same effect by using the Promise object. The following code shows how:
WinJS.Promise.timeout(1000,
  WinJS.xhr(options)
      .then(
        function (req) {
            var rawData = URL.createObjectURL(req.response);
            document.getElementById("Image1").src = rawData;
  },
  function error(err) {
       document.getElementById("label1").innerHTML = "<strong>Error while displaying image!"</strong>";
  })
)
It’s basically the same xhr() call but with a couple of changes. Firstly, the xhr() call is now wrapped inside Promise.timeout(). The first parameter is the timeout value in milliseconds (1000 in this case) and the second parameter is the xhr() call itself. Secondly, the xhr() uses then() instead of done(). This is required because then() returns a Promise in the event of any error whereas done() doesn’t.
Summary
The WinJS.xhr() function allows you to make HTTP requests to remote resources. Internally it uses the XMLHttpRequest object to get its job done. Using the xhr() function you can call any resource such as a Web API or an HTTP handler. You can also use it for downloading or uploading small files. The xhr() function is an easy to use wrapper over XMLHttpRequest object and allows you to configure many aspects of the request such as response type, request headers, request data type and security credentials.