By David Myers
Prior to the .NET Framework, most of us were accustomed to Windows applications having free access to all of the local resources, including the registry, file system, event logs, environment variables or available printers. Due to the limitations of role-based security, we were conditioned to accept that nothing was off limits to a running application as long as the user (or the user context under which the application is running) was authorized to use the resource.
With the proliferation of distributed component-centric systems, it’s not uncommon for applications to download and execute components from Internet/intranet sites or network shares. The possible negative consequences of such applications are obvious. Malicious code, whether by design or not, could be loaded from an external entity and wreak havoc on a local computer or the network on which it resides. There is also the threat of security breaches that could jeopardize the privacy of sensitive data.
What’s needed is an integrated security model that grants code permission to resources based on “evidence” pertaining to the encapsulating assembly. The .NET Framework provides that security model; it’s called Code Access Security. This article will focus on the definition and configuration of the Code Access Security Policy.
Overview of Code Access Security
The CLR implements Code Access Security based on the “evidence” gathered about assemblies. Evidence includes such things as:
- From where is the assembly being loaded?
- If the assembly was downloaded from the Web, what is the URL of the source directory?
- What is the Strong Name (if any)?
- Who is the publisher (if digitally signed)?
The CLR assigns assemblies to Code Groups based upon the evidence gathered. Code groups are organized in an inverted tree-like hierarchical structure. Each code group has one and only one Membership Condition that specifies which assemblies should be assigned to the group. Each code group also has a set of Permissions which indicate what actions the assemblies in that group are permitted to perform. When the .NET Framework is installed, default code groups, membership conditions, and permissions are enabled, which reduce the likelihood of our computer or network being victimized by malicious code. Code groups will be explained further down.
Policy Levels
There are up to four security policy levels. They are listed in the table below:
Policy Level Configuration File
Enterprise %Systemroot%\Microsoft.NET\Framework\version\Config\enterprise.config Machine %Systemroot%\Microsoft.NET\Framework\version\Config\security.config
User %UserProfile%\Application Data\Microsoft\CLR Security Config\version\security.config
AppDomain N/A
The Enterprise, Machine, and User security policy configurations are loaded from XML-based configuration files. The AppDomain policy level is not enabled by default. It must be explicitly specified programmatically. Details pertaining to how to implement the AppDomain policy level will be given below. The User security policy is specific to an individual user on a specific machine. The Machine security policy is applied to all users on a machine. The Enterprise security policy applies to a family of machines that are part of an Active Directory installation. The AppDomain security policy is specific to a specific application running in an operating system process.
Code Groups
Each policy level contains its own set of code groups. The default Enterprise and User security policy levels each contain only one code group. At the Enterprise and User policy level, every assembly is assigned to this “All Code” code group which allows all code full trust, or free access, to all resources. The typical Machine security policy level contains a hierarchy of code groups, each of which allows specific permissions to resources. The diagram below (diagram 1) depicts a typical sample of a Machine policy level code group hierarchy:
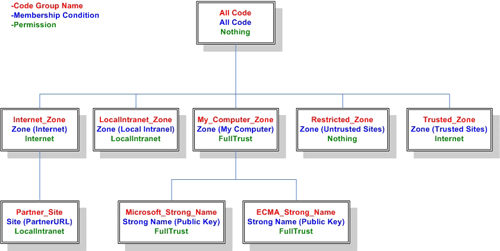
Diagram 1 -Machine Policy Level Code Group Hierarchy
As mentioned previously, each assembly loaded by the CLR is also assigned to one or more Machine policy level code groups based on the evidence gathered about the assembly. An assembly is assigned to a code group if it matches the code group’s Membership Condition. The CLR starts with the “All Code” code group and traverses the tree, finding all the code groups for which an assembly is a member. If an assembly does not meet the membership condition, then it is not a member of that code group or any of its descendants. The table below (Table 1) lists the built in Membership Conditions that are available in the .NET Framework:
| Membership Condition | Description |
| All Code | All assemblies meet this condition |
| Application Directory | All assemblies in the directory or a child directory of running app |
| Hash | All assemblies with a hash that matches the given hash |
| Publisher | All assemblies digitally signed with a specified certificate |
| Site | All assemblies downloaded from a specified site |
| Strong Name | All assemblies with a specified strong name and public key |
| URL | All assemblies downloaded from a specified URL |
| Zone | All assemblies that originate from one of five specified zones:
|
Table 2
Each code group contains a set of permissions. The .NET Framework ships with a set of built-in permission sets. Click here to view a list of those permission sets and their corresponding descriptions. When an assembly is assigned to a code group, it is granted the permissions which correspond with that code group. In a case where an assembly is assigned to multiple code groups in a policy level, the permissions allowed for that policy level is a UNION of the permissions of the multiple code groups. In other words, each code group brings additional permissions. Consider the case below (Diagram 2) where an assembly is assigned to the All Code, LocalInternet_Zone, and Partner_Site code groups at the Machine Security Policy Level:
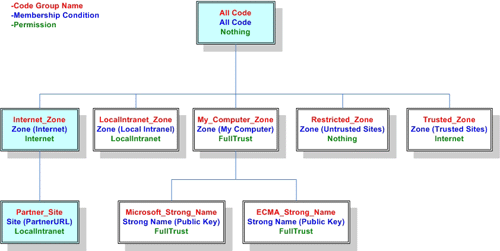
Diagram 2 -Machine Policy Level Code Group Assignment
In this case, because the permission sets corresponding to the three assigned code groups are Nothing, Internet and LocalIntranet, the assembly’s permissions at the Machine security policy level is the UNION of the permissions allowed by the All Code, LocalInternet_Zone, and Partner_Site code groups. However, the effective permissions of an assembly is the INTERSECTION of the permissions at each security policy level. Therefore, each of the security policy levels can in effect “deny” any permissions allowed in any other level by simply not granting that permission. Diagram 3 below illustrates:
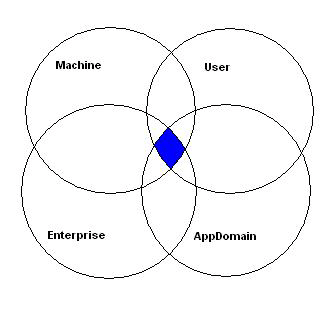
Diagram 3 -Permissions Intersection
Because the default Enterprise and User security policy levels grant FullTrust permissions to all assemblies, the Machine policy level normally determines the permissions an assembly is allowed (AppDomain is not enabled by default).
Security Policy Administration
Now that the preliminaries are out of the way, let’s look at the actual administration of security policy. I’ll also give code examples, which will demonstrate the net effect of the modifications we make to the security policy.
The command line tool caspol.exe or the MMC Snap-in mscorcfg.msc can be used to edit the XML files that define the security policy (at the Enterprise, Machine and User levels). If our intention is to create scripts to alter security policy for a large number of machines, caspol.exe would be the best tool to use. Throughout this article, we will be using the MMC Snap-in. To run the snap-in, go to a command prompt and enter
%Systemroot%\Microsoft.NET\Framework\version\Mscorcfg.msc.
After the UI appears, expand Runtime Security Policy\Machine\Code Groups\All_Code. We will then be presented with a graphical representation of the hierarchy of the Machine level code groups as defined on our machine. See diagram 4 below:
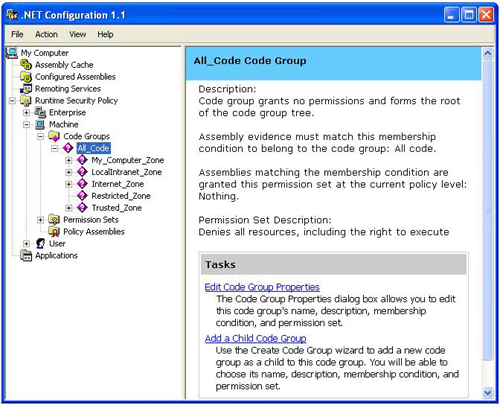
Figure 1 -Machine level code groups
The default Enterprise and User level code group hierarchies are much less interesting because they consist of only the All_Code code group. We can expand the expandable code group nodes to view all of the code groups in the hierarchy. Click on the LocalIntranet_Zone code group and then click on the Edit Code Group Properties link in the right pane. When the ‘LocalIntranet_Zone Properties’ dialog appears, click on the ‘Permission Set’ tab. We will see a list of permissions that are granted to the LocalIntranet_Zone code group.
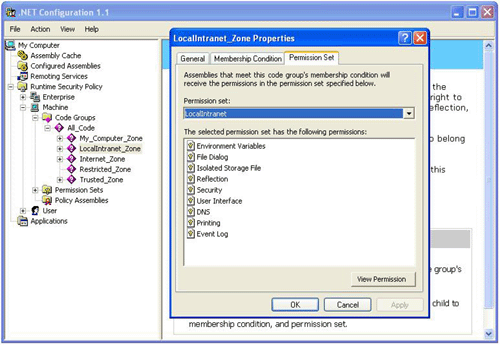
Figure 2 -LocalIntranet_Zone Permissions
By default the LocalIntranet_Zone code group does not have permissions to several resources, including the registry and the file system. Click here to view a complete list of the .NET Framework code access permissions.
When we click on the ‘Membership Condition’ tab, we will see that the membership condition type is ‘Zone’ and the specific zone is ‘Local Intranet’. By default, assemblies that originate on an organization’s intranet and assemblies that are loaded via a UNC path meet this membership condition. We can configure the ‘Internet’, ‘Local Intranet’, ‘Trusted Sites’ and ‘Restricted Sites’ zones through the ‘Internet Options’ dialog in Internet Explorer.
The following simple code example will help demonstrate how Code Access Security permissions effect the execution of managed code. This console application will read the registry sub-keys under the HKLM\Software\Microsoft\.NetFramework registry key and display the key names in the console:
using System;
namespace ConsoleReadRegistry
{
/// <summary>
///
Summary description for Class1.
/// </summary>
class Class1
{
/// <summary>
/// The main entry point
for the application.
/// </summary>
[STAThread]
static void Main(string[] args)
{
Microsoft.Win32.RegistryKey
rk;
try
{
rk =
Microsoft.Win32.Registry.LocalMachine.OpenSubKey(
"Software\\Microsoft\\.NetFramework",false);
string[] skNames = rk.GetSubKeyNames();
for (int
i=0;i<skNames.Length;++i)
{
Console.WriteLine("Registry Key: {0}",
skNames[i]);
}
rk.Close();
}
catch(System.Security.SecurityException e)
{
Console.WriteLine("Security
Exception Encountered: {0}", e.Message);
}
}
}
}
If we compile and execute the application, we will see that the names of the registry keys under the .NetFramework key are displayed. The CLR granted our assembly permissions to execute and read the registry.

Figure 3
Let’s recap what just happened. The code was compiled and an assembly was created that resides on our hard drive. Assuming that the default security policy is in place, at the User and Enterprise security policy levels the assembly was assigned to the All_Code code group. At these two policy levels all assemblies assigned to the All_Code group are granted FullTrust permissions.
At the Machine policy level our assembly satisfies the membership condition for the All_Code AND the My_Computer_Zone code groups (because it’s loaded from a local hard drive). Therefore, at this policy level our assembly is granted a union of the permissions of the two code groups. We can see from Diagram 1 that no permissions are associated with the Machine policy level’s All_Code code group and FullTrust (unlimited) permissions are associated with the My_Computer_Zone code group. Thus, our assembly is granted FullTrust permissions at the Machine policy level.
The Enterprise, Machine, and User security policy levels each grant a set of permissions based on the evidence gathered. The intersection of the permissions granted at each of the policy levels determines the permissions that will be granted to our assembly (see Diagram 3). The AppDomain policy level was not programmatically specified in this example so it does not apply (Enabling the AppDomain security policy level will be covered later in the article). In the scenario above our assembly was granted FullTrust permissions at all three levels so it has unlimited access to local resources.
If we copy our assembly to a shared folder and run the application by entering a UNC path at the command line, we would see a result different from what we saw in Figure 3. For example, if we start the application by entering \\MyMachine\MyShare\ConsoleReadRegistry.exe at a command prompt, we would see the following:

Figure 4
The difference is that the assembly is now being loaded using a UNC path. The default ‘Local Intranet Zone’ configuration specifies that all assemblies loaded via a UNC path are assigned to the LocalIntranet_Zone code group. The assembly is not assigned to the My_Computer_Zone code group even if the file share is on the local machine. Thus, at the Machine policy level the assembly is granted the permissions listed in Figure 2 (which does not include ‘Registry’ permissions). As a result, the following method call causes a SecurityException:
rk =
Microsoft.Win32.Registry.LocalMachine.OpenSubKey(
"Software\\Microsoft\\.NetFramework",false);
Suppose we wanted to grant assemblies from a specific file share permissions to read from the registry? We could simply use the configuration tool to associate the “FullTrust” or “Everything” permission set with the LocalIntranet_Zone code group. This wouldn’t be the best approach because it would leave our machine vulnerable to attack. A better solution would be to add a custom code group with ‘Registry’ access permissions to the Machine policy level. We would then give the code group a URL membership condition which would specify the UNC path of our file share. Let’s use the configuration tool to add our custom code group as a child of the LocalIntranet_Zone code group.
First, let’s create a custom permission set that contains permissions to access the registry. Using the MMC Snap-in, right click on the Runtime Security Policy\Machine\Permission Sets node and select New… from the popup menu. When the ‘Create Permission Set’ dialog appears select the ‘Create a New Permission Set’ radio button and enter a name and description for the new permission set.
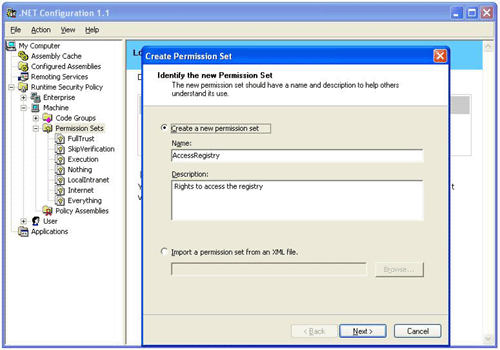
Figure 5
Click on ‘Next’. When the next dialog appears select the Registry permission from the list and click on ‘Add >>’. When the ‘Permission Settings’ dialog appears select the Grant assemblies unrestricted access to the registry radio button. Click on ‘Ok’ and ‘Finish’.
To create the new code group right click on the Runtime Security Policy\Machine\Code Groups\All_Code\LocalIntranet_Zone node and select New… from the popup menu. Enter a name and description for the new code group and click on ‘Next >’. When the ‘Choose a condition type’ dialog appears, select the URL condition type from the drop down list box and enter the UNC path to your assembly. Click on ‘Next >’.

Figure 6
When the ‘Assign a Permission Set to the Code Group’ dialog appears, select our newly created permission set from the drop down list box. Click on ‘Next >’ and ‘Finish’.
At this point our assembly satisfies the membership conditions of All_Code, LocalIntranet_Zone and our newly created code group. The effective union of the permissions granted at the Machine policy level is the set of permissions granted by LocalIntranet_Zone plus the registry permission granted by the new code group. If we re-run our application by entering the UNC path, a SecurityException is not encountered and our code is permitted to read from the registry.
AppDomain Security Policy Level
The AppDomain security policy level is not enabled by default. Up until now we have focused on the configuration of the Enterprise, Machine and User policy levels using the MMC snap-in. The seldom discussed AppDomain policy level is configured via code at runtime. It can be implemented only is cases where an assembly is dynamically loaded into an Application Domain (also referred to as “Sandboxing”). This policy level must be programmatically defined before an assembly is loaded into the AppDomain in order for the security policy to have effect. Consider the code example below:
using System;
using System.Net;
using System.Diagnostics;
using System.Threading;
using System.Security;
using System.Security.Policy;
using
System.Security.Permissions;
namespace ConfigPolicy
{
/// <summary>
///
Summary description for Class1.
/// </summary>
class SetAppDomainPolicy
{
/// <summary>
/// The main entry point
for the application.
/// </summary>
[STAThread]
static void Main(string[] args)
{
// Create a new AppDomain PolicyLevel.
PolicyLevel
domainPolicy = PolicyLevel.CreateAppDomainLevel();
// Create a ‘Membership Condition’ to be assigned to a new
code group
AllMembershipCondition
allCodeMC = new AllMembershipCondition();
// Create a new permission set with the same permissions as
the
// "LocalIntranet" permission set.
PermissionSet
CustomPS = new PermissionSet(domainPolicy.GetNamedPermissionSet("LocalIntranet"));
// Add the permission needed to read from the registry.
CustomPS.AddPermission(new
RegistryPermission(PermissionState.Unrestricted));
PolicyStatement
polState = new PolicyStatement(CustomPS);
//Create a new code group which will serve as the root code
group for the
//AppDomain policy level
CodeGroup allCodeCG
= new UnionCodeGroup(allCodeMC,polState);
domainPolicy.RootCodeGroup
= allCodeCG;
// Create a new application domain.
AppDomain domain =
System.AppDomain.CreateDomain("CustomDomain");
domain.SetAppDomainPolicy(domainPolicy);
// Load and execute the assembly.
try
{
string FQ_UNC_Path =
@"\\MyServer\MyShare\ConsoleReadRegistry.exe";
domain.ExecuteAssembly(FQ_UNC_Path);
}
catch(PolicyException e)
{
Console.WriteLine("PolicyException:
{0}", e.Message);
}
catch(Exception e)
{
Console.WriteLine("Unexpected
Exception: {0}", e.Message);
}
AppDomain.Unload(domain);
}
}
}
In this scenario, a custom permission set is created with the same permissions as the default “LocalIntranet” permission set. The LocalIntranet permission set contains the permission our assembly needs to execute, but because our assembly attempts to read from the registry, we need to add a permission to our set which will permit our assembly to read from the registry:
CustomPS.AddPermission(new
RegistryPermission(PermissionState.Unrestricted));
An “All Code” membership condition is created:
AllMembershipCondition
allCodeMC = new AllMembershipCondition();
The newly created custom permission set object and membership condition object are used to create a custom code group which will serve as the root code group of the AppDomain policy level:
CodeGroup allCodeCG = new
UnionCodeGroup(allCodeMC,polState);
domainPolicy.RootCodeGroup = allCodeCG;
Because the AppDomain security policy is programmatically configured, the CLR will determine the intersection of the permissions granted at all four security levels to determine the effective permissions of the dynamically loaded assembly.
Conclusion
The .NET Framework supports the Enterprise, Machine, User and AppDomain security policy levels. The configurations of the first three mentioned are stored in XML-based configuration files. The config files can be edited using the caspol.exe tool or the mscorcfg.msc MMC snap-in. The AppDomain policy level must be programmatically configured at runtime by calling the System.AppDomain.SetAppDomainPolicy method. The default security policy configuration settings provide a reasonably high level of security from malicious code. However, security policy administration tools like mscorcfg.msc provide granular control of permissions granted to .NET assemblies.
About the Author
David Myers earned his Bachelors of Science degree in Computer Science from the University of Texas at El Paso in 1987 and he holds an MCSD (for .NET) certification. He has fifteen years of information technology experience including nine years as a software consultant developing Microsoft-centric solutions. His areas of expertise include the .Net Framework, C#, XML Web-Services and SQL Server. David works as a solutions developer for Microsoft thru CompConTech consulting. He can be reached at dtmyers0712@yahoo.com.


