

Introduction
For security reasons browsers prohibit AJAX calls to resources residing outside the current origin. This means you under the current settings, you can’t provide a service exposed by a Web API to some other origin. However, at times you might want to allow a legitimate origin to access a resource. This is where Cross Origin Resource Sharing (CORS) specifications come into the picture.
While there are other ways to enable CORS at the web application level, the ASP.NET Web API takes CORS support a step further through certain attributes. Using these attribute you can fine tune CORS at the global level, controller level or individual action level. This article discusses how this support can be used in your applications.
What is CORS?
As already mentioned, CORS stands for Cross Origin Resource Sharing. CORS is a W3C standard and deals with a mechanism for making AJAX calls across different origins. An origin is a combination of a scheme, host and port. For example, consider the following two URLs:
http://www.website1.com
http://www.website2.com
In these URLs the scheme is http, and the hosts are www.website1.com and www.website2.com respectively. Port number is not mentioned explicitly. In this case since the hosts are different, they are considered as different origins. On the same lines http://www.website1.com and https://www.website1.com are different origins because their schemes are different (http and https).
Suppose that you have developed an ASP.NET Web API and it is hosted at http://www.website1.com. You have also developed a website that is hosted at http://www.website2.com. The website now wants to consume the Web API developed earlier, and you use XMLHttpRequest or jQuery $.ajax() to call the Web API. Unfortunately this communication will fail because the browser won’t permit you to make AJAX calls to resources that are not part of the origin under consideration.
While the browser blocks such calls for the sake of security, such calls might be legitimate and you may want this communication to succeed. CORS specification establishes a standard way to allow such communication. Using CORS you can enable cross origin calls so that your web page can make AJAX requests to a Web API hosted in a different origin.
To understand this problem clearly let’s try to make such cross origin calls between two different web applications. Begin by creating an ASP.NET Web API project and modify the default ValuesController as shown below:
namespace CORSWebAPIDemo.Controllers
{
    public class ValuesController : ApiController
    {
        public IEnumerable<string> Get()
        {
            return new string[] { "Red", "Green", "Blue" };
        }

    }
}
As you can see the Get() Web API method simply returns an array of strings with three elements – Red, Green and Blue.
Now add an Index view for the HomeController’s Index method (Note that you are still inside the Web API project). Write the following code inside the Index view.
<head runat="server">
    <meta name="viewport" content="width=device-width" />
    <title>Index</title>
    <script src="../../Scripts/jquery-1.7.1.min.js"></script>


    <script type="text/javascript">
        $(document).ready(function () {
            var options = {};
            options.url = "http://localhost:49250/api/values";
            options.type = "GET";
            options.contentType = "application/json";
            options.success = function (results) {
                alert(results.join());
            };
            options.error = function (evt) {
                alert(evt.status + " - " + evt.statusText);
            };

            $.ajax(options);
        });
    </script>

</head>
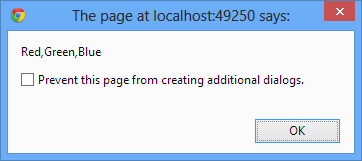
The above code essentially makes an $.ajax() call to the Web API you developed earlier. The success method displays the array by joining its element. In this case Index view as well as the Web API belong to the same origin (since they are part of the same project) and hence this call will succeed. You can test this by running the Index view. You should see an alert box as shown below:
If you see the request and response through Chrome Developer Tools (or whatever equivalent provided by your browser) you will observe the following:
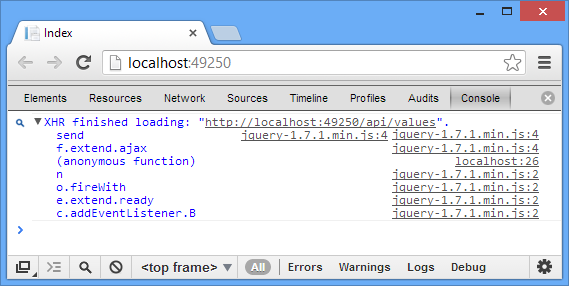
As you can see the message is – “XHR finished loading”. The $.ajax() of jQuery uses XMLHttpRequest (XHR) behind the scenes and the XHR call is successful as indicated by the message above.
Now, add a new ASP.NET MVC 4 project (Empty template) to the same solution. Add a HomeController and Index view to it and copy-paste the markup of Index view developed earlier (i.e. Index view from Web API project) inside the newly created Index view. In this case you are trying to make an $.ajax() call from a different web application to the Web API. Run the newly created Index view. This time you should see an error as shown below:
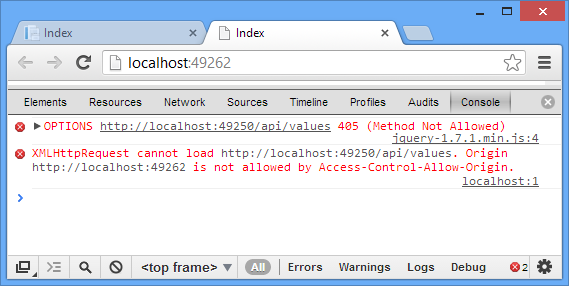
As you can see the XMLHttpRequest call has failed and it clearly says that the call is not allowed by “Access-Control-Allow-Origin”. What is “Access-Control-Allow-Origin”? It’s an HTTP header that tells you whether an another origin can call a resource from the origin under consideration.
Enabling CORS via web.config
Now that you know the problem, let’s see how to get rid of the error. A simple way is to add “Access-Control-Allow-Origin” header in the web.config. Open the web.config of Web API project and add the following markup under <system.webServer> section:
<system.webServer>
    <httpProtocol>
      <customHeaders>
        <add name="Access-Control-Allow-Origin" value="*"/>
      </customHeaders>
    </httpProtocol>
<system.webServer>
As you can see the <httpProtocol> section now adds an http header named Access-Control-Allow-Origin and sets its value to * (all origins are allowed). This will enable CORS for the Web API. If you run the application again, this time it won’t give any error.
CORS support in Web API
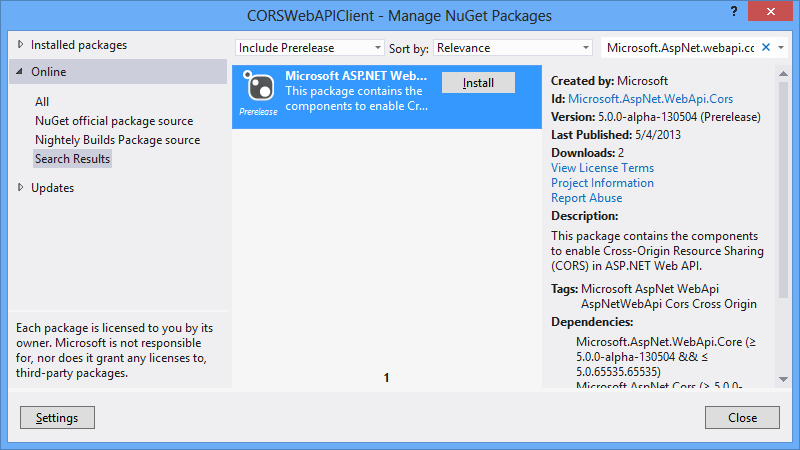
While the web.config way of enabling CORS works as expected, it offers very little control on what can be shared. It’s a global level setting that enables access to all the resources. You may want to control what you are sharing with the outside world. Luckily, ASP.NET Web API intends to provide CORS support through certain attributes. As of this writing the assemblies that provide CORS support in Web API are available as a part of nightly builds. To grab these assemblies you need to add a new Package source in Visual Studio as shown below:
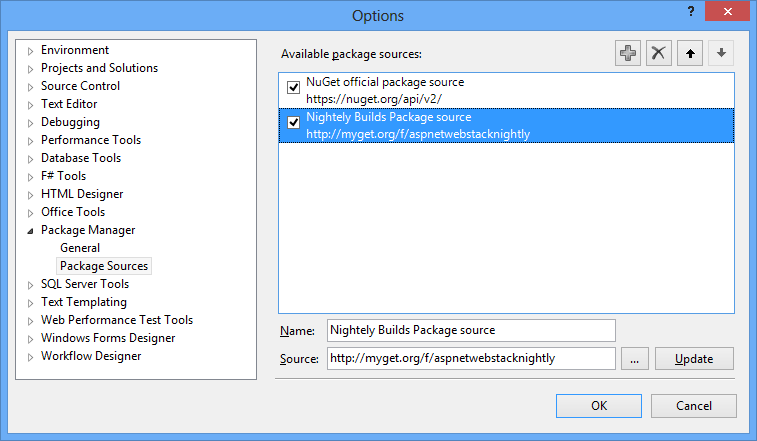
Once you add a new source (http://myget.org/f/aspnetwebstacknightly) you can install the Microsoft ASP.NET Web API Cross Origin Support package.
Installing this package adds reference to two assemblies that are responsible for the CORS support:
- System.Web.Cors.dll
- System.Web.Http.Cors.dll
Enabling CORS Support
Now that you have installed the CORS support assemblies, let’s enable CORS support. Remember to remove the “Access-Control-Allow-Origin” header from the web.config in case you added as described in the earlier section. Then open the WebApiConfig.cs file from the Web API project (If you can’t see this file, go to Global.asax, right click on WebApiConfig from the Application_Start event and select Go to Definition menu option) and modify it as shown below:
namespace CORSWebAPIDemo
{
    public static class WebApiConfig
    {
        public static void Register(HttpConfiguration config)
        {
            config.Routes.MapHttpRoute(
                name: "DefaultApi",
                routeTemplate: "api/{controller}/{id}",
                defaults: new { id = RouteParameter.Optional }
            );
            config.EnableCors();
        }
    }
}
As you can see EnableCors() method enables CORS support for the Web API. At this point you have not yet specified which of the Web API controllers will support CORS. To do so, go to the ValuesController and decorate the Web API controller class with [EnableCors] attribute as shown below:
namespace CORSWebAPIDemo.Controllers
{
    [EnableCors("*", "*", "*")]
    public class ValuesController : ApiController
    {
        public IEnumerable<string> Get()
        {
            return new string[] { "Red", "Green", "Blue" };
        }

    }
}
As you can see the ValuesController class now has [EnableCors] attribute. The EnableCors attribute takes three parameters viz. origins, headers and methods. A value of * indicates that all origins, headers and methods are allowed. This technique will allow you to call all the methods from the Web API controller. If you wish to expose only certain methods you can individually decorate the methods with the [EnableCors] attribute as shown below:
namespace CORSWebAPIDemo.Controllers
{
    public class ValuesController : ApiController
    {
        [EnableCors("*", "*", "*")]
        public IEnumerable<string> Get()
        {
            return new string[] { "Red", "Green", "Blue" };
        }
        ...
        ...
    }
}
As shown above now only Get() method has CORS enabled. Other methods of the Web API controller class (if any) won’t be accessible.
If you wish to enable CORS for all the methods of a controller except a few methods you can also use [DisableCors] attribute as shown below:
namespace CORSWebAPIDemo.Controllers
{
[EnableCors(“*”, “*”, “*”)]
public class ValuesController : ApiController
{
[DisableCors]
public IEnumerable<string> Get()
{
return new string[] { “Red”, “Green”, “Blue” };
}
…
…
}
}
In this case all the methods of ValuesController will be CORS enabled except Get() because the Get() method is decorated with [DisableCors] attribute.
To test that cross origin calls are working as expected, run the Index view from the ASP.NET MVC application again. This time it should return the color array as expected.
Summary
CORS specifications allow you to make cross origin AJAX calls. ASP.NET Web API support for CORS comes in the form of two assemblies System.Web.Cors and System.Web.Http.Cors. As a part of CORS support you can make use of [EnableCors] and [DisableCors] attributes. This way you can expose all the methods of a Web API controller or just selected ones.