By Thiru Thangarathinam
ASP.NET 2.0 introduces a new control named TreeView that provides a seamless way to consume
information from hierarchical data sources such as an XML file and then display that information.
You can use the TreeView control to display information from a wide variety of data sources such
as an XML file, site-map file, string, or from a database. In this article, we will discuss this
new control in depth and understand how to use this feature rich control in your ASP.NET applications.
Apart from statically data binding the TreeView control with the contents of an XML file, we will also
demonstrate how to populate this control dynamically by adding nodes at runtime. Finally, we will see
how to apply XSL transformation on XML data before displaying that information in a TreeView control.
Hierarchical Data
One of the important ways of organizing data which now pervades IT is hierarchical data. ASP.NET has
a series of controls that make it both easy and logical to utilize hierarchical data. TreeView is one
of the important controls that can be easily bound to data source controls such as SiteMapDataSource,
XmlDataSource to display hierarchical information. Before we go onto take a look at the TreeView, let
us understand the common types of hierarchical data.
- Folders – The way folders are structured in a Windows file system denotes a hierarchical way of storing data.
- XML – XML documents are self-describing meaning that the metadata that is required to qualify the data is actually contained in the XML document itself providing a flexible way of handling XML data.
- SiteMap – Sitemap is nothing but an XML format that provides a consistent way of describing the navigation structure of a web site including all the pages contained in that web site.
- Menu system – A menu system can also use an XML document as its input and displays the contents of the XML document in a hierarchical manner.
Now that we have looked at some examples of hierarchical data, let us look at the support provided by ASP.NET in terms of handling hierarchical data. ASP.NET provides the following hierarchical data source controls.
- XmlDataSource – This control allows you to bind to XML data, which can come from a variety of sources such as an external XML file, a DataSet object and so on. Once the XML data is bound to the XmlDataSource control, this control can then act as a source of data for other data-bound controls such as TreeView and Menu. For example, you can use the <asp:XmlDataSource> control to represent a hierarchical XML data source.
- SiteMapDataSource – This control basically retrieves the site map information from the web.sitemap file.
The architecture of TreeView control is very similar to the design of controls for tabular data. It is data bound to any of the above hierarchical data source controls to display the information.
TreeView Control
The ASP.NET 2.0 TreeView control is a completely new control introduced with ASP.NET 2.0 that is available under the Standard tab in the Toolbox. You can use the TreeView control in any situation in which you need to display hierarchical data. For example, you can use this control when displaying a navigation menu, displaying database records from database tables in a Master/Detail relation, displaying the contents of an XML document, or displaying files and folders from the file system. It is also possible for you to programmatically access the TreeView object model to dynamically create trees, populate nodes, set properties and so on. The TreeView control consists of nodes and there are three types of nodes that you can add to a TreeView control.
- Root – A root node is a node that has no parent node. It has one or more child nodes.
- Parent – A node that has a parent node and one or more child nodes
- Leaf – A node that has no child nodes
The easiest way to use the TreeView control is to specify a static set of tree nodes. For example, you can use the TreeView control to display a simple navigational menu for a Web site. Or, you can use the TreeView control to display the table of contents for a help file.
You specify the appearance of a static TreeView control by declaring one or more TreeNode controls within the TreeView control’s <Nodes> tag. The following code demonstrates how to declare a TreeView control and a root node.
<asp:TreeViewRunat="Server"ExpandImageUrl="Images/closed.gif"
CollapseImageUrl="Images/open.gif"OnTreeNodePopulate="Node_Populate"
ID="tvwauthors">
<Nodes>
<asp:TreeNodeText="Authors"PopulateOnDemand=trueValue="0"/>
</Nodes>
</asp:TreeView>
As you can see in the above code, the root node is declared using the asp:TreeNode inside the Nodes element. Each node has a Text and a Value property. The value of the Text property is displayed in the TreeView, while the Value property is used to store any additional data about the node, such as data passed to the post back event associated with the node. The text displayed through a node can be in one of two modes: selection mode and navigation mode. By default, a node is in selection mode. To put a node into navigation mode, you can set the node’s NavigateUrl property to a value other than an empty string ("").
Customizing the Appearance of the TreeView Control
The TreeView control provides ImageUrl properties such as RootNodeImageUrl, ParentNodeImageUrl, and LeafNodeImageUrl. These custom images are rendered to the left of the node’s text. You can override the default image for the node type using the ImageUrl property. The TreeView control also provides CollapseImageUrl and ExpandImageUrl properties for the expanded and collapsed indicators. These are usually represented by plus and minus icons. There is also a property named NoExpandImageUrl that can be used for rendering an image for nodes which have no children. You can turn off the default image using the ShowExpandCollapseboolean property.
In addition to custom images, the TreeView control also supports TreeNodeStyle properties for each node types. These style properties override the NodeStyle property, which applies to all node types. A node can also have a different style applied when it is selected. When Selected property is set to true, the node is selected and the SelectedNodeStyle properties overrides any corresponding unselected style properties for the selected node. It is also possible for you to render check boxes between the node and image by setting the ShowCheckBoxes property to a boolean value.
Implementation
Now that we have understood the theory behind the TreeView controls, let us look at the following examples.
- How to use the TreeView control to display site navigation structure
- How to implement TreeView data binding with an XML file
- How to dynamically populate nodes in a TreeView control
- How to perform XSL transformation on XML data before displaying that information through a TreeView control
Let us start our implementation by discussing the first example in the above list.
Using the TreeView Control to Display Site Navigation Structure
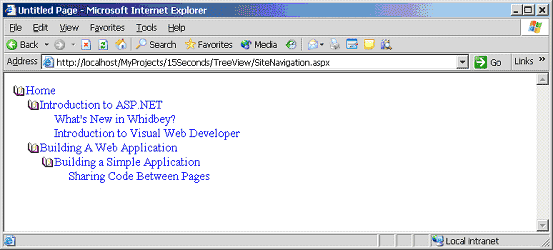
In this example, we will use the TreeView control to display hierarchical information about the site structure using the contents of the web.sitemap file. In the web.sitemap file, you specify the list of nodes that specify the navigation structure of the site, which can be completely independent of the site folder layout or other structure. When a SiteMapDataSource is placed on the page, it will specifically look for a file with that name and then read the contents of the web.sitemap file and consume that information. Once the information is available in the data source control, you can then bind a TreeView control to the data source control to display that information in the web page.
Fire up Visual Studio 2005 and create a new ASP.NET Web Site named TreeView by selecting New Web Site from the File menu. In the New Web Site dialog box, click the Browse button and select Local IIS as the location and click Open. In the New Web Site dialog box, enter http://localhost/MyProjects/15Seconds/TreeView as the location of the web site. Then click OK.
Once the project is created, add a web.sitemap file by selecting Add New Item from the Web Site menu. In the Add New Item dialog box, select Site Map and click Add. This will result in a new file named web.sitemap being added to the web site.
Modify the code in the web.sitemap file to look as shown below.
<?xmlversion="1.0" encoding="utf-8"
?>
<siteMap>
<siteMapNodetitle="Home" url="~/default.aspx" >
<siteMapNodetitle="Introduction
to ASP.NET"
url="~/introduction/default.aspx">
<siteMapNodetitle="What’s
New in Whidbey?"
url="~/introduction/whatsnew.aspx"/>
<siteMapNodetitle="Introduction
to Visual Web Developer"
url="~/introduction/vwd.aspx"/>
</siteMapNode>
<siteMapNodetitle="Building
A Web Application"
url="~/development/default.aspx">
<siteMapNodetitle="Building
a Simple Application"
url="~/development/simple/default.aspx">
<siteMapNodetitle="Sharing
Code Between Pages"
url="~/development/simple/codedirectory.aspx"/>
</siteMapNode>
</siteMapNode>
</siteMapNode>
</siteMap>
Now that we have the web.sitemap file created, let us create a new ASP.NET Web Form and name it as SiteNavigation.aspx. To the newly added web form, add a TreeView and SiteMapDataSource controls to it. Set the ExpandImageUrl and CollapseImageUrl properties of the TreeView control to "Images/closed.gif" and "Images/open.gif" respectively. Then set the DataSourceID property of the TreeView to the ID of the SiteMapDataSource control we added earlier. After modification, the code should look like the following.
<%@ PageLanguage="C#"%>
<!DOCTYPEhtmlPUBLIC"-//W3C//DTD XHTML 1.1//EN""http://www.w3.org/TR/xhtml11/DTD/xhtml11.dtd">
<htmlxmlns="http://www.w3.org/1999/xhtml">
<headrunat="server">
<title>Untitled Page</title>
</head>
<body>
<formid="form1"runat="server">
<div>
<asp:TreeViewDataSourceID="SiteMapDataSource1"
ExpandImageUrl="Images/closed.gif"
CollapseImageUrl="Images/open.gif"ID="TreeView1"
Runat="server">
</asp:TreeView>
</div>
<div>
<asp:SiteMapDataSourceID="SiteMapDataSource1"Runat="server">
</asp:SiteMapDataSource>
</div>
</form>
</body>
</html>
When you execute the above code, you will see an output that is somewhat similar to the following screenshot.

Figure 1
The advantage of using the TreeView control with a SiteMapDataSource is that Web site navigation information can be maintained in a central location. The default provider for the SiteMapDataSource control is the XmlSiteMapProvider, which retrieves site navigation information from the web.sitemap file. Note that the web.sitemap file must always appear in the root directory of your ASP.NET application.
Implementing TreeView Data Binding with an XML File
In this example, we will bind the TreeView control to an XML file. To accomplish this, you need to go through the following two steps.
- Add an XmlDataSource control to the page and set its DataFile property to the name of the XML File
- Then add a TreeView control and set its DataSourceID property to the ID of the XmlDataSource control.
- Then map the nodes and their attributes in the XML file to the TreeView nodes by declaring the asp:TreeNodeBinding elements as part of the TreeView declaration.
For the purposes of this example, let us create an XML file named Categories.xml that looks like the following.
<?xmlversion=’1.0′?>
<!– This file represents
a fragment of a Categories inventory database –>
<Categories>
<CategoryID="1" Name="Beverages">
<DescriptionValue="Soft
drinks, coffees, teas, beers, and ales"/>
</Category>
<CategoryID="2" Name="Condiments">
<DescriptionValue="Sweet
and savory sauces, relishes, spreads, and
seasonings"/>
</Category>
<CategoryID="3" Name="Confections">
<DescriptionValue="Desserts,
candies, and sweet breads"/>
</Category>
<CategoryID="4" Name="Dairy Products">
<DescriptionValue="Cheeses"/>
</Category>
</Categories>
Once the XML file is created, create a new Web Form named TreeViewDataBinding.aspx and modify its code to look like the following.
<%@ PageLanguage="C#"%>
<!DOCTYPEhtmlPUBLIC"-//W3C//DTD XHTML 1.1//EN""http://www.w3.org/TR/xhtml11/DTD/xhtml11.dtd">
<htmlxmlns="http://www.w3.org/1999/xhtml">
<headrunat="server">
<title> Binding TreeView Control with an XML File</title>
</head>
<body>
<formid="form1"runat="server">
<div>
<asp:TreeViewExpandImageUrl="Images/closed.gif"
CollapseImageUrl="Images/open.gif"ID="TreeView1"
Runat="server"DataSourceID="XmlDataSource1">
<DataBindings>
<asp:TreeNodeBindingDataMember="Category"
ValueField="ID"TextField="Name">
</asp:TreeNodeBinding>
<asp:TreeNodeBindingDataMember="Description"
ValueField="Value"
TextField="Value">
</asp:TreeNodeBinding>
</DataBindings>
</asp:TreeView>
</div>
<div>
<asp:XmlDataSourceID="XmlDataSource1"Runat="server"
DataFile="~/Data/Categories.xml">
</asp:XmlDataSource>
</div>
</form>
</body>
</html>
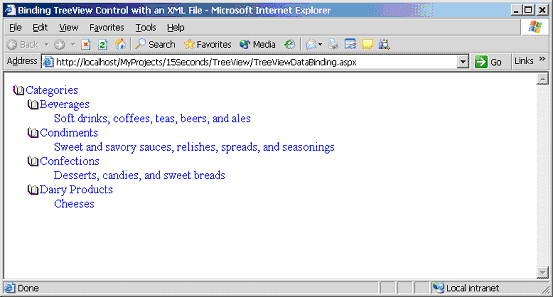
The above code listing contains a TreeView control that is bound to an XML file through an XmlDataSource control. This is accomplished by setting the DataSourceID property of the TreeView control to the XmlDataSource control. The TreeView associates properties of individual TreeNode objects to attributes of XML nodes in the hierarchy. When you perform data binding, attributes in the individual XML elements are promoted to properties of the data item. Also note that the TreeView hierarchy exactly matches the hierarchy of the source XML. Because of this, you normally construct the XML specifically for binding to the TreeView.
Executing the above code results in the following output.

Figure 2
Now that we have understood how to statically bind an XML file to a TreeView control, let us now understand the steps involved in dynamically populating the treeview control with contents from a database.
Dynamically Populating Nodes in the TreeView
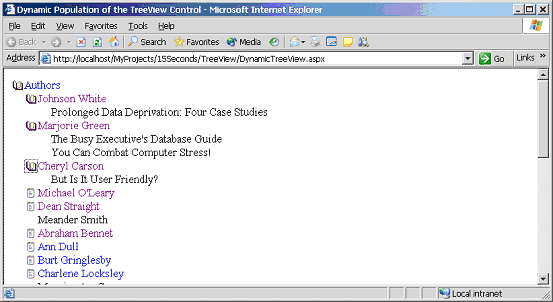
In this section, you will dynamically populate the nodes in the TreeView with data from the database. The first level of nodes will represent master data — in this case, authors. When users click a node, the child nodes for that author will be created by making a query to the database that fetches all the titles for that particular author. For this example, let us create a new web form named DynamicTreeView.aspx and modify its code to look like as shown below.
<%@ PageLanguage="C#"%>
<%@ ImportNamespace="System.Data"%>
<%@ ImportNamespace="System.Data.SqlClient"%>
<%@ ImportNamespace="System.Configuration"%>
<!DOCTYPEhtmlPUBLIC"-//W3C//DTD XHTML 1.1//EN""http://www.w3.org/TR/xhtml11/DTD/xhtml11.dtd">
<htmlxmlns="http://www.w3.org/1999/xhtml">
<headrunat="server">
<title>Dynamic Population of the TreeView
Control</title>
<scriptrunat=server>
void Node_Populate(object
sender,
System.Web.UI.WebControls.TreeNodeEventArgs e)
{
if(e.Node.ChildNodes.Count == 0)
{
switch( e.Node.Depth )
{
case 0:
FillAuthors(e.Node);
break;
case 1:
FillTitlesForAuthors(e.Node);
break;
}
}
}
void
FillAuthors(TreeNode node)
{
string connString = System.Configuration.ConfigurationSettings.
ConnectionStrings["NorthwindConnnection"].ConnectionString;
SqlConnection connection = new SqlConnection(connString);
SqlCommand command = new SqlCommand("Select * From
authors",connection);
SqlDataAdapter adapter = new SqlDataAdapter(command);
DataSet authors = new DataSet();
adapter.Fill(authors);
if
(authors.Tables.Count > 0)
{
foreach (DataRow row in authors.Tables[0].Rows)
{
TreeNode newNode = new
TreeNode(row["au_fname"].ToString() +
" " +
row["au_lname"].ToString(),
row["au_id"].ToString());
newNode.PopulateOnDemand = true;
newNode.SelectAction = TreeNodeSelectAction.Expand;
node.ChildNodes.Add(newNode);
}
}
}
void
FillTitlesForAuthors(TreeNode node)
{
string
authorID = node.Value;
string connString = System.Configuration.ConfigurationSettings.
ConnectionStrings["NorthwindConnnection"].ConnectionString;
SqlConnection connection = new SqlConnection(connString);
SqlCommand command = new SqlCommand("Select T.title,
T.title_id
From titles T" +
" Inner
Join titleauthor TA on
T.title_id =
TA.title_id " +
" Where TA.au_id = ‘" + authorID + "’", connection);
SqlDataAdapter adapter = new SqlDataAdapter(command);
DataSet titlesForAuthors = new DataSet();
adapter.Fill(titlesForAuthors);
if
(titlesForAuthors.Tables.Count > 0)
{
foreach (DataRow row in
titlesForAuthors.Tables[0].Rows)
{
TreeNode newNode = new TreeNode(
row["title"].ToString(),
row["title_id"].ToString());
newNode.PopulateOnDemand = false;
newNode.SelectAction = TreeNodeSelectAction.None;
node.ChildNodes.Add(newNode);
}
}
}
</script>
</head>
<body>
<formid="form1"runat="server">
<div>
<asp:TreeViewRunat="Server"ExpandImageUrl="Images/closed.gif"
CollapseImageUrl="Images/open.gif"
OnTreeNodePopulate="Node_Populate"ID="tvwauthors">
<Nodes>
<asp:TreeNodeText="Authors"PopulateOnDemand=true
Value="0"/>
</Nodes>
</asp:TreeView>
</div>
</form>
</body>
</html>
The above code consists of two utility methods named FillAuthors and FillTitlesForAuthors, which are used to retrieve the list of authors and the list of titles for a specific author respectively. The FillAuthors method starts by retrieving the connection string from the web.config file by invoking the ConnectionString property of the ConnectionStringSettings class. The connection string is defined in the web.config as shown below.
<connectionStrings>
<addname="NorthwindConnnection"
connectionString="server=localhost;database=Pubs;uid=
sa;pwd=test"/>
</connectionStrings>
Once the connection string is retrieved, it then creates an instance of the SqlConnection object passing in the connection string as an argument to its constructor. After that it creates SqlCommand, SqlDataAdapter, and DataSet objects. Then it fills the DataSet object with the results of the sql query execution by invoking the Fill method of the DataSet object. Then the code loops through all the rows contained in the DataTable adding them one at a time to the TreeView control. The implementation of the FillTitlesForAuthors is very similar to the FillAuthors method except that it executes a different query in this case. While constructing the query, it also uses the author id value that is retrieved from the currently selected node.
Now that we have had a look at the code for the methods, let us look at the declaration of the TreeView control. The TreeView control associates the OnTreeNodePopulate method with an event handler named Node_Populate. The Node_Populate method simply checks the depth of the node and it is 0, it invokes the FillAuthors method and if it is 1, it invokes the FillTitlesForAuthors method. As part of the TreeView declaration, we also set the PopulateOnDemand property of the asp:TreeNode element to true. This property allows you to indicate that the node will be populated dynamically through the code.
If you execute the above code, you will see the following output.

Figure 3
Transforming XML Data and Displaying that Information in a TreeView Control
It is also possible for you to transform the XML data before it is displayed by the TreeView control. You can do this by setting the TransformFile property of the XmlDataSource control. This is very useful in scenarios when the original XML structure is not suitable for display through the TreeView control. In that case, you can transform the XML data using XSL and then bind that transformed XML to the TreeView control.
As with the XML data, you typically load the style sheet from a file, indicated by the TransformFile property, but you can also use it in string form directly using the Transform property.
For the purposes of this example, we will use the Categories.xml file that we used in our previous example. We will transform the categories.xml file using a Stylesheet named categories.xsl. Code for the categories.xsl file is shown below.
<xsl:stylesheetversion="1.0" xmlns:xsl="http://www.w3.org/1999/XSL/Transform">
<xsl:templatematch="/">
<categories-list>
<xsl:for-eachselect="//Categories/Category">
<category>
<xsl:attributename="id">
<xsl:value-ofselect="@ID"/>
</xsl:attribute>
<xsl:attributename="name">
<xsl:value-ofselect="@Name"/>
</xsl:attribute>
<xsl:elementname="desc">
<xsl:attributename="value">
<xsl:value-ofselect="Description/@Value"/>
</xsl:attribute>
</xsl:element>
</category>
</xsl:for-each>
</categories-list>
</xsl:template>
</xsl:stylesheet>
Now that we have created the XSL, let us create a new page that exercises the above XSL. To this end, create a new page named TreeViewXmlTransformation.aspx and modify its code to look like the following.
<%@ PageLanguage="C#"%>
<htmlxmlns="http://www.w3.org/1999/xhtml">
<headid="Head1"runat="server">
<title>XML Transformation</title>
</head>
<body>
<formid="form1"runat="server">
<div>
<asp:TreeViewID="TreeView1"Runat="server"
ExpandImageUrl="Images/closed.gif"
CollapseImageUrl="Images/open.gif"
DataSourceID="XmlDataSource1">
<DataBindings>
<asp:TreeNodeBindingDataMember="category"
ValueField="id"TextField="name">
</asp:TreeNodeBinding>
<asp:TreeNodeBindingDataMember="desc"
ValueField="value"TextField="value">
</asp:TreeNodeBinding>
</DataBindings>
</asp:TreeView>
<asp:XmlDataSourceID="XmlDataSource1"Runat="server"
DataFile="~/Data/Categories.xml"
TransformFile="~/Data/Categories.xsl"/>
</div>
</form>
</body>
</html>
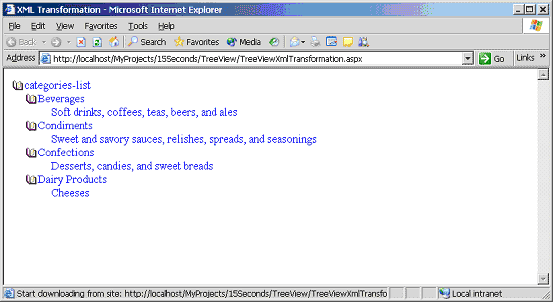
As you can see from the above code, the ValueField and TextField attributes of the asp:TreeNodeBinding element are set to the new XML element names that are produced by the XML. If you execute the above code, you will see an output that is somewhat similar to the following screenshot.

Figure 4
As you can see from the above screenshot, the root node is shown as categories-list, which is produced as a direct result of the XSL transformation.
Conclusion
In this article, we have understood the features of the new ASP.NET 2.0 TreeView control and how to use that in your web applications. We also demonstrated how to consume the site navigation structure from the web.sitemap and then display that information in a TreeView control. We also discussed the implementation of populating treeview nodes dynamically with the contents from the database. We also understood how to apply XSL transformation on XML data before displaying that information in a TreeView control.


